


TOP-10 Fashion photography Tips
Jan 14, 2019
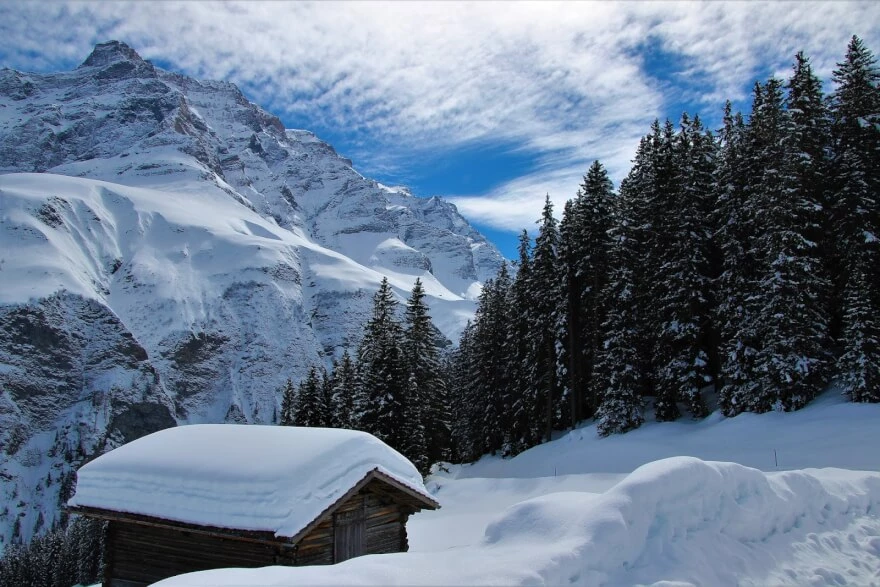
If you were born and live in temperate latitudes, then you are lucky enough to observe all seasons. Not every photographer can boast of this luxury. Snow is actually a rarity for most countries, sometimes you have to travel to get snow pictures. Today, we talk about how to get the most out of your camera, when shooting various snow photos, and more.
There are different types of photography: it can be portrait photo, landscape photography, and macrophotography. Each type of photography has its own approach, as well as settings for your camera. When photographing in winter, the first problem you will most likely encounter is camera focusing. When everything is white around, it is very difficult for the camera to get the focus under such conditions. You should either use manual focus instead or search for contrasting objects to help your autofocus to adjust. Let us get a deeper look into different camera settings corresponding to a different type of photography.
There are some general snow photography settings for any case.
The first thing to do is to shoot in RAW mode. Thus, you will receive lossless images, which will allow you to select the required file compression format during post-processing. RAW images are very flexible in terms of processing, as it contains much more information and details than compressed images. It is a pleasure to add color correction and other processing elements to a RAW photo.
Aperture
Aperture priority is also recommended. No matter how trite it may sound, but in winter your fingers get very cold. The aperture priority setting will allow you to simultaneously control the depth of field and keep your hands warm and do not get back to the setting by every shot.
It is also recommended to use exposure compensation, as you will have less control over the exposure itself when using the aforementioned setting.
White balance
When using automatic white balance, your photos may get an unnecessary blue or gray tint of snow. The camera will react to the excess white color going in, which will lead to certain results. It is recommended to set this to manual mode with around 6500 K. Also set the overexposure to 0.7 - 1, which will also help to overcome gray and blue tints in the photo.
Shutter speed
If you decide to shoot during snowfall, which is an essential attribute of snow photos, then you will need to switch to manual shooting mode. This way, you can control the shutter speed to correctly capture the moving snowflakes. Slow shutter speeds of 1/100 or lower will produce motion blur effects. With this setting, you can experiment to get this or that effect. For better sensations, it is still recommended to shoot snowfall at shorter shutter speeds, for example, 1/250, so the snowflakes will create less blur, otherwise, the whole photo will be as if in fog.

Batteries
If we are getting cold, imagine how cold conditions affect our camera and gear. It is known that the battery starts losing capacity in the cold. Thus, it is good to keep your charged cells somewhere in an internal pocket to keep them warm.
Lens and body
Falling snow on your device can form condensation, and any moisture for electronics is not good. There is a specialized uniform for cameras, which is essentially a transparent bag with access to the main elements. Such as the RUGGARD RC-P18 camera rain cover. But not everyone can afford this pleasure, anyway, something like this can be hand-made. Sometimes a simple plastic bag wrapped around your lens and camera body is enough. You can also attach a lens hood to prevent snow from sticking that much to the glass and melting on it.
Spare parts
However, it happens that your lens starts covering with fog due to the condensation. In that case, you should not blow on to warm it. Warming it up causes condensation forming from the inside, and this may lead to ice crust formation and potential damage to internal elements. It is best to take a spare lens for this and use them alternately.
Okay, the device is covered and safe, settings are good, everything is set, let us shoot some snowy landscapes!
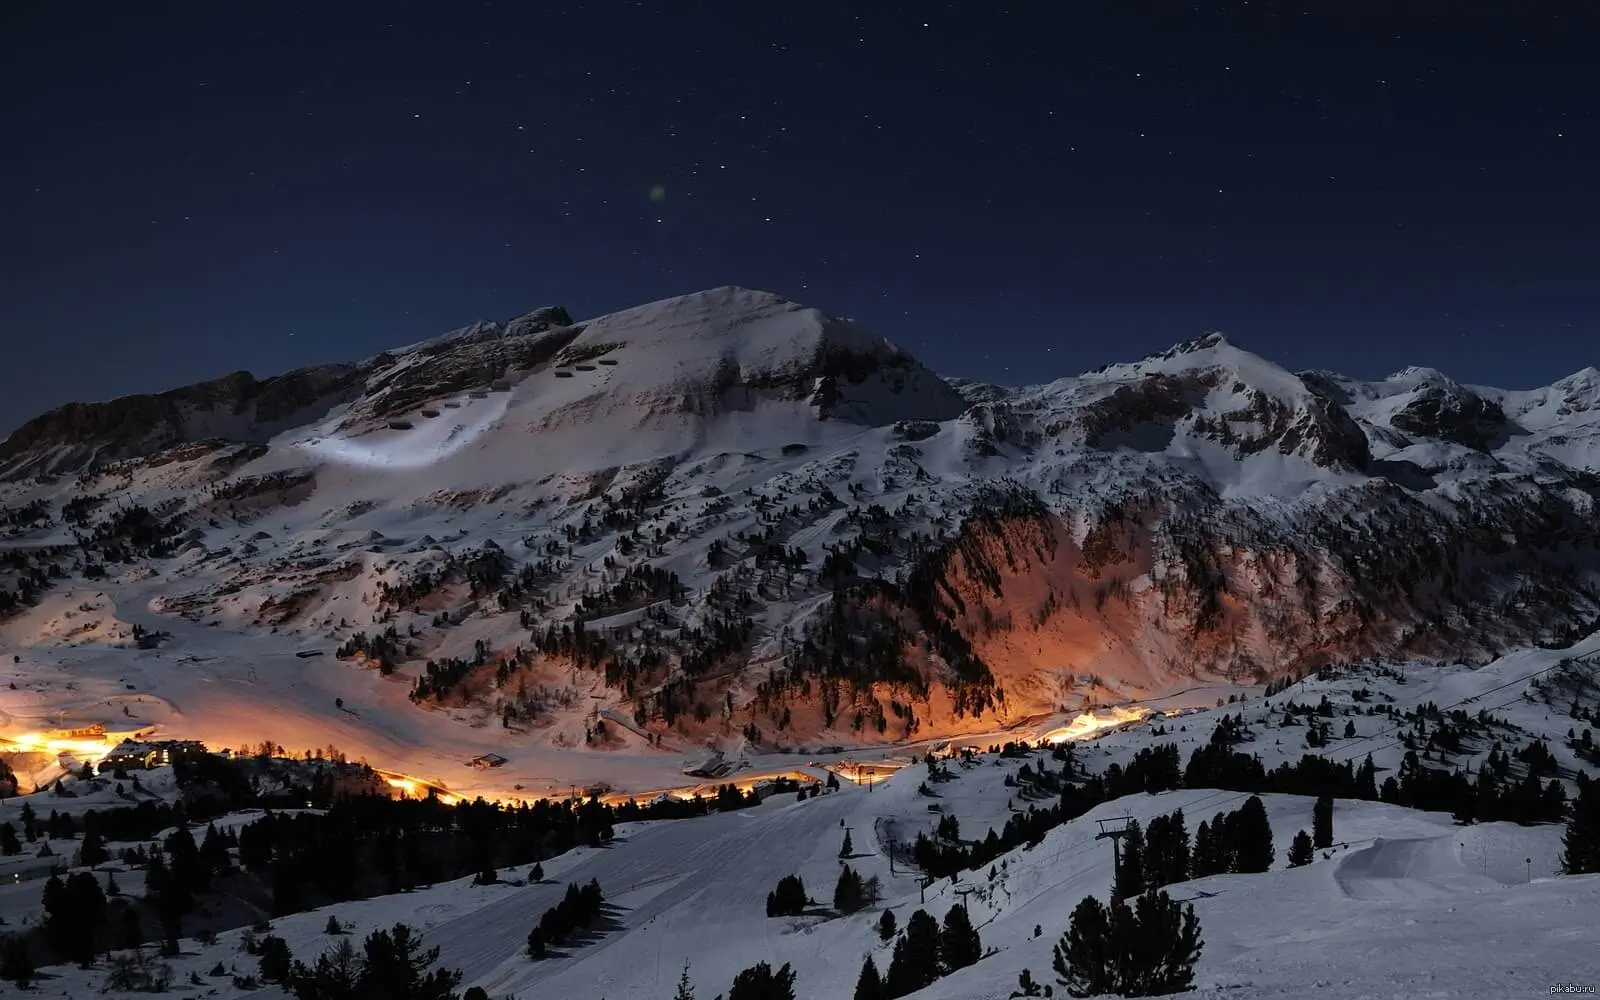
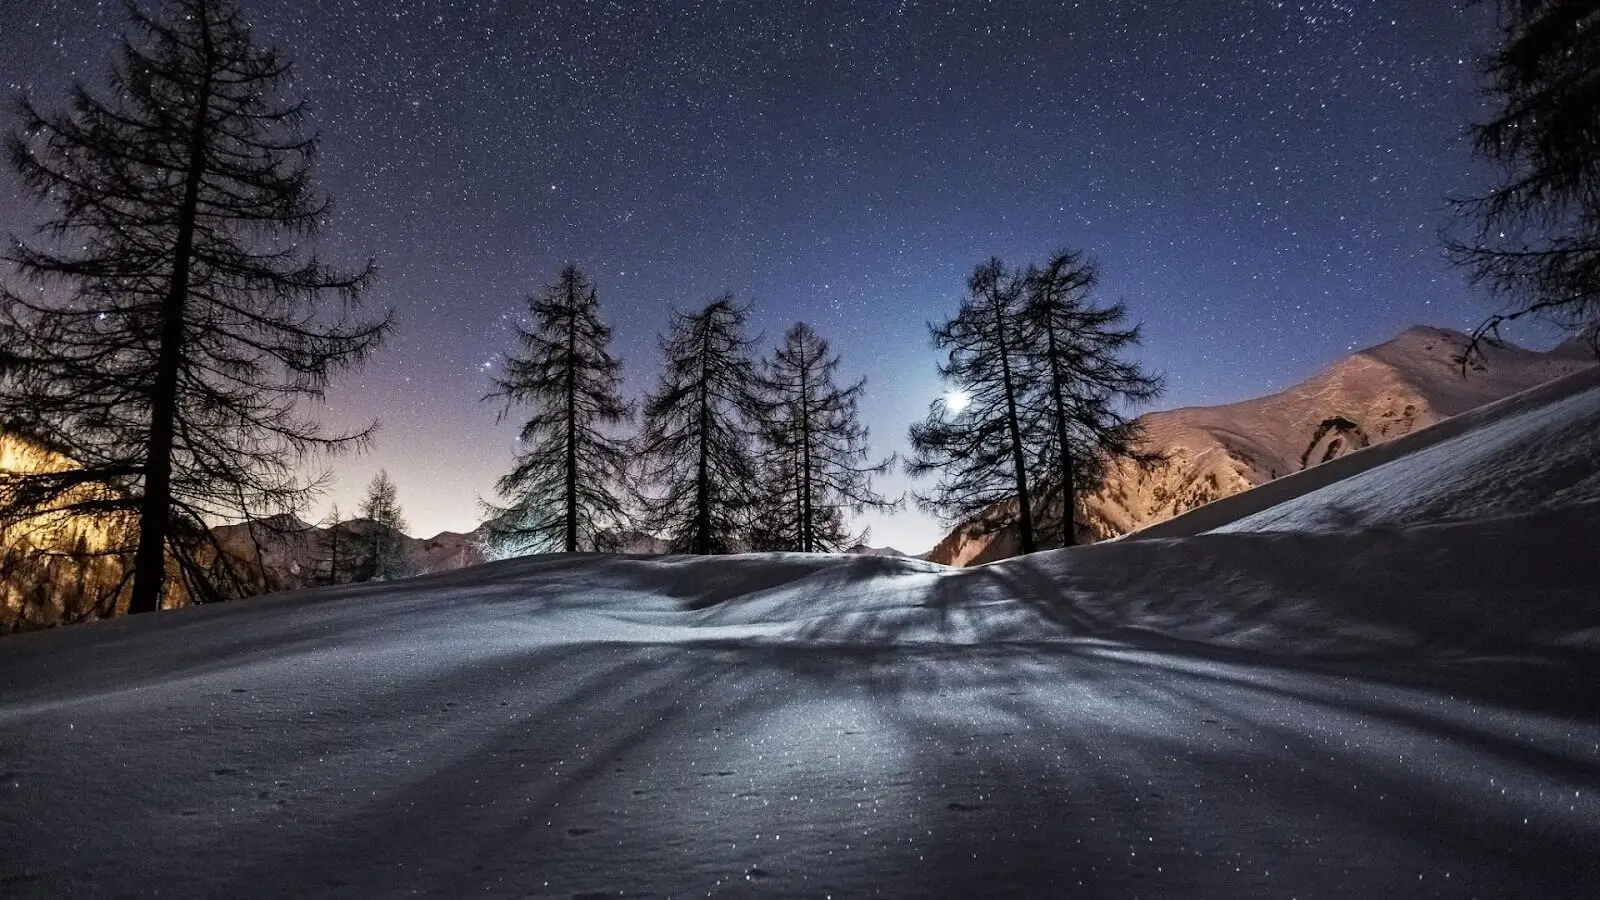
1-st, we need to choose when we are going to shoot, based on that we find our location. Nighttime snow photography is advised because shooting even in low light conditions still gets light reflected over the snow that provides enough exposure to the scene. You can get dreamlike shots of that if we use moonlight reflecting on the snow surface and highlighting the nearby woods, which is a nice overall composition.
The 2-nd is to use a wide-angle lens on your camera. It let you capture more in your frame, especially when it comes to landscape shooting when the sky is also a huge element in it. Low aperture is preferable for that. Having the lens with f / 2.8 means it would be double the size of a lens with an f / 4 aperture. To be able to use smaller lenses with f / 4, you need to adjust the ISO in a way of higher numbers and get a slower shutter speed.
Turn off autofocus and use manual mode instead to help your camera find focal points in the dark. For that matter, you can use any bright object as the reference point. It can be the moon in the background or some really bright and big star in the sky.
A wide-open aperture works the same in-camera lens as it works with pupils. The darker it is, the wider is our pupil, same with the aperture. It just physically lets more light go through the lens. Also, slower shutter speed helps for that kind of static image. But make sure to use a tripod because the slower the shutter speed is, the more sensitive your camera sensor would be for any motion in the frame. Thus, even button pressing can provide enough jittering to spoil the shot and make it blurry.
When it is snow, it is a good opportunity to shoot some portraits. It is good for a reason that there would be a lot of light reflecting towards the shooting model.
Shooting portrait in snow, you may also consider using the bokeh effect to create some winter wonderland image effect with it. It is feasible due to the trees in the background covered in snow and for that matter, you need to use a very low depth of field, thus it makes the background blurry and concentrates all the accent on the model in the frame.
Here is an example of certain camera settings that you can play around with to see how it looks in your case. We advise using a 50 mm lens and setting the shutter speed at 1/2500 with 200 ISO and f / 1.8. These settings should make the bokeh effect achievable and get you a wonderful portrait image.

The other tip to get a beautiful portrait picture is to use the sun to get some flare effect on your photograph. Do not be scared to experiment with the sun in the background, sometimes it can provide some epic footage.

As you can see in this image, there is a nice orange hue coming out in the camera flare, and it really adds to that magical wintry quality.
Before getting into snow photography, you need to prepare yourself and your model for going outside and to work in low-temperature weather conditions. It is likely to be very cold and both for the photographer and the model it is important to stay as warm as possible with gloves, scarf, and hat on. If you are planning ahead you can get the shoot done as quickly as you can and this means that everyone stays nice and toasty. Particularly for the model who may be wearing significantly less clothing than you are, it is also essential to really know what you are doing, so you can get it done quickly, so the model can stay looking charming and warm in front of the lens, and you can have that lovely relaxed feel. Thus, you can plan what images you exactly want to take with our next tips for photography poses.
Portrait photography in snow also requires some creativity.
Here we gather some ways to appear in your frame to make your photos a bit of storytelling and exciting to view.
Sometimes you need to be creative, but in that case, you just need to be yourself and enjoy life in a frame. A bit of acting is advised here, and do not be shy to experiment.

Stick out your tongue to catch the snow, for example, especially if your boyfriend can hold your hand in the frame while shooting you at the same time.

Get cozy with some hot cocoa on your balcony and do not forget to smile.

You can hold your scarf or cover your face hiding behind it to make an exciting photo

Take some snow from the ground and blow it off or unsplash with your hands into the frame

You can figure out anything by yourself, and fantasy has no limits! Stick out your hands and kick the snow, or play snow fight with someone while the operator is trying to capture the hit of the snowball.
Winter is perfect for shooting some macros, especially when you shoot snowflakes or ice and wild berries that are still growing on the trees during the cold season.
When it comes to macro shooting the smallest objects, you need to know certain settings and equipment that can provide the best quality of this kind of photograph.
For macro shooting, you need a macro lens at first. Usually, macro lenses are expensive, but you can find budget varieties like Sigma 105 mm lens which perfectly matches macro shooting demands.

Let us get into settings for macro shooting, shall we? For the image above we use these settings with a 105 mm lens: 1 / 500 sec, f /6.3 ISO 1000. Typically, lenses for macro are heavy, thus it is recommended to use a tripod for that matter, it also helps to avoid any frame smear caused by camera shake.
If you have already done your snow photoshoot, some photos, you may consider adding snowflakes into the frame that is lacking off. For that matter, you can use a photo editor with snow effects. There are a bunch of different apps at the store to use like “Just Snow - photo effects” or “Snow Photo Editor”. You can also try adding the snow by using photoshop combined with downloaded snowflakes, footage that is already rendered on a transparent background using PNG image format. If that is all way too complicated, you can always try the RetouchMe App and make a certain task with it for our professional Photoshop designers.
As we get our photoshoot done and everything looks awesome in the photo, there are still ways to improve your image with some filters added and a bit of color correction. 1-st tip before you even start your photoshoot is to set your capturing into RAW mode. The RAW provides lossless quality, and it is an uncompressed image file format. Thus, the image files would be pretty heavy, but if you have enough memory sticks that should not be an issue. The RAW image is more flexible in a matter of post-processing because it contains much more image information such as colors and details that you can flex on.
Photographers usually use Lightroom for post-processing images, as it stands for photo application for desktop PC, but you can also use Photoshop if you are more experienced with it. As we mentioned before, we overexposed our images during the photoshoots to avoid some unnecessary tints. Now we can set some White Balance to compensate and tone down. Lightroom contains WB presets and if you are not very experienced with the setting, we would like to recommend you to use them first to get an idea of how it looks. Then you can manually adjust your settings. The other setting you can consider adding is a color curve. That curve you can play with to get a different color balance in the frame. The tool is flexible by its nature, as smoother the curve as smoother the changes would be.
If you set your camera well for a certain photo, you may not even need any post-processing, and we wish that would be your main case for most of the time!
He started his career as a professional photo designer and retoucher. Professional commercial photographer with 20 years of experience. He is a leading advertising photographer and has worked as a food photographer with Michelin-starred chefs. His work with models can be seen on the calendars of many leading companies in Ukraine. He was the owner of the photo studio and photo school "Happy Duck".


