


Color theory in photography
Feb 2, 2022
Many photographers, especially beginners, neglect the variety of opportunities offered by shutter speed settings. This small article will show the importance of such essential digital elements of photography. It is necessary to define all the terms and functions, to realize how many shots can be improved with the help of existing camera options. Everything you need to know is how to adjust your gadget for every situation. Because every moment of our lives is worth to be memorized, but not all technological gadgets are able to understand which moment and object is the key figure on the image. That is why it is better to control and adjust initial settings before head.
Start to understand photo effects by learning:

Shutter speed is one of the most crucial elements, which determine the exposure of an image. Naturally, it corrects sharpness of a photo, and permits to try many interesting artistic effects in the picture. Let us look at a more detailed description of this significant option.
Only high-quality SLR cameras can quickly respond to instantly changing and dynamic moments, for example in sports. In addition, professional devices have such an option as dynamic autofocus, which allows you to constantly keep a moving object sharp, no matter where it is, in the center or else. Such an option simplifies the choice of necessary adjustments.

Inside every digital photographic device there is a small valve. It is located right in front of the sensor. When you press a button to make a picture, this device opens and closes, to make the light reach sensors, creating an image. This function shows how quickly or slowly it opens and closes to capture different moments of the event. Its regulation will affect the final result which will be obvious for contrast and sharpness levels. Choose a perfect spot to capture the frame. Control light and even wind levels to avoid unnecessary distractions.

Low shutter speed means that sensors are capturing the image with a long time interval, and the fast one means that the sensor is open for a short time interval. That is why we can say that this small option shows the amount of time, in seconds or fractions of a second, which keeps the sensor open for capturing images. If the sensor is disposed of to light for only 1/4000 of a second, then your camera captures everything that happens during that time. But, if it is set for 10 seconds, the picture will memorize everything that has happened during those 10 seconds.

Various devices display different numbers to measure this speed. Most cameras offer a wide range of settings, from a few thousands of a second to several seconds. DSLR cameras are also equipped with a "Bulb" mode, where you can prolong the capturing interval as long as you need it. There are various types of other digital devices which have different facilities, which depend on its professional level. That is why when you need to choose a camera for a specific caption in motion or freezing, then it is better to pay attention exactly to the detail we are exploring in this article. None will give a unique golden rule of how and what should be done to obtain an expected image. Still, many professionals have shared experience with their cameras to help beginners with an optimistic classic approach.
The first question to think about for shutter speed definition is whether we will keep the camera still? Since a slight movement will appear in our image as a slight blur or loss of sharpness. Most people are able to keep the camera still with a normal lens. When using telephoto lenses, you may need to use other settings. It is not necessary to purchase expensive equipment immediately, because it is not going to guarantee the best shot. Expert lens does not mean an expert photo. Only practice and understanding of personal errors can help you to improve the technique.
There is a rule of thumb according to which when taking pictures with hands, the interval of opening and closing of a diaphragm should be no longer than the effective focal length of the lens. If you are shooting on a 300mm telephoto lens, your minimum level should be no longer than 1/300. If you can not make it, then it is better to use a tripod.


In automatic mode, your camera will try to define shutter speed by itself, in order to capture your scene without allowing under and overexposure. Unfortunately, not every modern technology can guess your plot and idea. The image may result blurred due to the movement of the object. Some professionals add this effect intentionally. The best option is to switch to manual mode and take control over camera settings.
Playing with settings you are able to demonstrate the following effects:

Frame shake occurs when it is in your hands. No matter how good you are, you cannot stand completely still and this slight movement appears in photos as blur or lack of sharpness. It is possible to avoid this sad error, when you choose to increase the speed from standard to faster levels. This is more noticeable for lenses with a long focal length, so the larger it is, the more you need to increase to avoid camera shake. Do not think to be unique and strong enough to hold the focus. Guarantee the best result with a professional tripod or any other equipment for additional support. This small, but significant purchase will help to exclude evident problems.

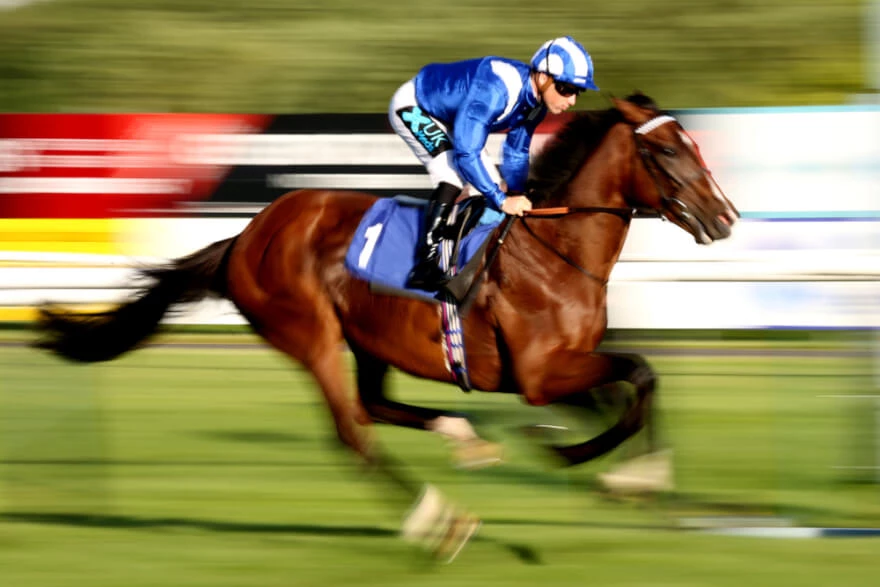
Motion and blurring occurs when you photograph a moving object or a running person. Sometimes it seems that objects and models in movement become a blurred spot. But if one reduces the time interval when the light faces camera sensors, then the final picture will be sharp and capture exactly the runner, car, bird or other moving object. With a fairly faster speed, this blurring becomes imperceptible, and the effect is “frozen”. It is a great tool for both amateurs and experts who decide to try something new in their work.
But before you set the level as high as you can, you need to consider if you really want to get rid of the blur. After all, this is a great way to transmit speed or movement on the scene of action. You can also keep the subject sharp and the background blurred by moving the camera.

You must ensure that your scene is correctly exposed. This rule is valid for all styles and generations of photographers. Low shutter speed allows more light to pass through. You must choose a certain mode to capture the right amount of light without making images too bright (overexposed) or dark (underexposed) with a good quality in detail. Remember that everything also depends on sensitivity. A good technological device is able to change settings itself, which will permit to obtain necessary effects of blur, and then adjust the aperture and ISO to give a good overall effect.

Having practiced enough with this interesting detail of modern photo devices, you can add some interesting creative effects to your shots.
When you open the diaphragm for much longer than usual – from a few seconds to a few minutes, there is a great possibility to get a unique masterpiece. Because such a setting, as a rule, is ideal for creating blurry pictures of a crowd, moving water, fog, creating a background for cars.
In addition, you can capture “frozen” movements, such as birds in flight, athletes in action, or splashing water. These types of frames often require much time for practice and hard work with errors, but they are worth it.
Note!

Sometimes you may notice that the entire frame becomes blurry. This is due to camera movement. If you put it on a tripod or change with another option for support, the blurring will disappear.
In priority mode, shooting gadgets automatically adjust individual values so that pictures with different settings have the same brightness.
If you are shooting indoors or with low light sources, you may notice how the aperture value starts to jump on the LCD screen. This means that the diaphragm should be closed. If this happens, you need to either reduce film or sensors disposal to light or raise the ISO value.

Eyes of a human can see much more than the best lens! Even the latest technological sensors are not able to transfer the same shades and effects, but they are getting close. Special algorithms of taking several photos with different settings and details in different areas can give the desired result. But only a smart post-processing work, controlled by an expert can create a memorable post-card with unforgettable impact on a viewer.

Each photo is unique. Sunsets, midday, interiors, etc. require individual approach and settings. Use quick preparations to make a photo of a certain style, and then edit the picture according to requirements of this particular case. Some adjustments are terrible for one frame, but surprisingly beautiful for others!
There are other elements of a perfect picture solution, but all pros try to avoid well-known standards and find their own and original filming styles. Just make double shots and drafts of your images to be sure that you will have a choice to work with during a post-processing period.
He started his career as a professional photo designer and retoucher. Professional commercial photographer with 20 years of experience. He is a leading advertising photographer and has worked as a food photographer with Michelin-starred chefs. His work with models can be seen on the calendars of many leading companies in Ukraine. He was the owner of the photo studio and photo school "Happy Duck".