


What is moire in photography?
Dec 10, 2020
We have learned a lot of kinds of different image representations from printing to photographing. We would not say that scanography photography is the next level, but it is definitely worth your consideration. As it comes from the name, we are going to make images with the scanner which leads to different interesting effects, which is the main point of use.
What is unique about the scanner is that it records images line by line, so each line it records is a separate moment in time. This is different to the camera’s sensor, which captures the picture as a whole at once, equally over all those pixels. Moving an object during scanning can create some really interesting-looking images, as shown below.
And there are a lot of scanography ideas led by this approach of image capturing. Today we are going to do a guide to scanography, which will show you all the different techniques you can use to create fascinating images and become a scanography artist yourself.
Let us first talk about the kind of files that you can actually record. There are two common file types which are TIFF and JPEG, and both have their pros and cons. JPEG is a more compressed file format, therefore you get smaller files, which is good for any online purposes like placing it on Instagram, sending email, or doing a website with it. The other file format makes larger files, but that also has its pros, such as better processing flexibility for editing and conversion due to better overall quality of the file format and more information it contains about color and pixels.

The other setting you can adjust is resolution or dpi, which is dots per inch. The better the resolution, the more dots per inch it would be, the more detail and the better quality you get. The more dpi you choose, the more scanning time it would take. If you are done adjusting these settings, make sure that the glass surface of your scanner is clean and steady. It is better to wipe down every use. For that, you can use isopropyl alcohol from any office supply store paired with some lint-free cloth from a camera shop. After each wipe, do a preview scan to have a look if there are any smudges or marks left. If everything looks fine, we can start scanning.
Now let us get into the fun stuff where we actually start to record an image. We are going to do different moves which will lead to different scanography art effects.

The first technique is called ‘stretch’, which involves moving an object with the sensor of a scanner at the same speed. What will happen is the scanner will record the same part of that object over and over again, and this will result in an elongated, stretched effect.
The next movement is called ‘reverse’. It is a similar motion to the stretch, however this time rather than moving with the sensor of the scanner you actually want to move in the same direction, but at a quicker speed than what the scanner is moving. This will create a mirror-like effect, where the object is flipped around and shown the opposite direction to what it is actually facing.
Next on the list is ‘compress’. The compress involves moving the object in the opposite direction to what the scanner is going. This will squish the object and create a compressed-looking picture.
We can also combine some moves to reach some more interesting effects. That way we combine both stretch and compress, and that is by doing the rotation. Rotate involves spinning an object around while it is being scanned, and this will result in different shapes. Sometimes you can get weird images, but sometimes it comes with sense.

Cycle moving the object from left to right will result in a warp effect. It will create a really fluid, liquify-looking motion as you move your object back and forth.
The settings we have discussed previously can change the scanning speed, which we can use for doing some precise moves and have a bit more control over how the final image looks. You can clearly see the difference between the 300 dpi scan and the 800 dpi scan when doing the warp effect. There would be a lot more waves involved the more dpi used.
Having a high dpi you can try to do relocate technique which is good for 3D objects.
With a lower sensor speed, you will have enough time to relocate your object on a scanner surface to capture all the sides of it with a variety of the other effects from our list.

The scanner also has an interesting way of creating depth. They are typically only sharp where the object is touching the glass and as soon as something moves away from the glass you will start to get a really blurry soft focus.

You can also affect the background from white to black by simply increasing or decreasing the amount of light going on the scanner’s surface. You can just turn off the light to get the black background or cover your object with some black sheet.
There are two different types of scanners that you might actually have. One kind of scanner is called a CIS sensor, and you will typically find this in the cheaper models, so your printer printer-scanner combos or anything sub a couple of hundred bucks is likely to be a CIS-sensor scanner.

The higher-end scanners have CCD sensors, and you will find these in scanners that are often compatible with scanning things like photographic negatives or ones that go up to the hundreds or the thousand's dollar range.

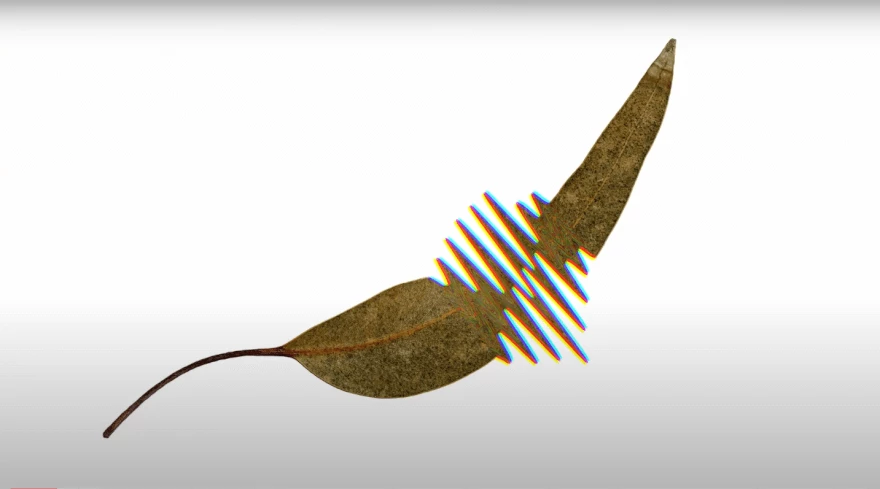
There are a couple of differences between the two of them. One thing that you can get with the use of a CCD sensor is this really cool miss registered color effect while moving an object as shown in the image below.

This will create these sorts of kaleidoscopic psychedelic-looking scans where you are getting cyan, magenta, and yellow colors all warped and changed.
CCD scanners also have a better range of focus. In this case, the CIS scanner wins due to getting a better blurry effect, losing the depth of field for such effect.

The last difference between CCD and CIS scanners is the way they capture projected light.
That way, if you will scan your phone screen, CCD will show all the colors while CIS will make it look black and white.
With this, you can be assured of the purpose while choosing scanography scanners.
If the projected colors matter and you are about to do some scanography portraits, then you better choose a CCD scanner. And for more blurriness and simple abstract shapes, CIS would be enough.
Co-founder of RetouchMe. In addition to business, he is passionate about travel photography and videography. His photos can be viewed on Instagram (over 1 million followers), and his films can be found on his YouTube channel.
Moreover, his profile is featured on the most popular and authoritative resource in the film industry — IMDb. He has received 51 international awards and 18 nominations at film festivals worldwide.


