


Birthday party photography
Apr 10, 2020
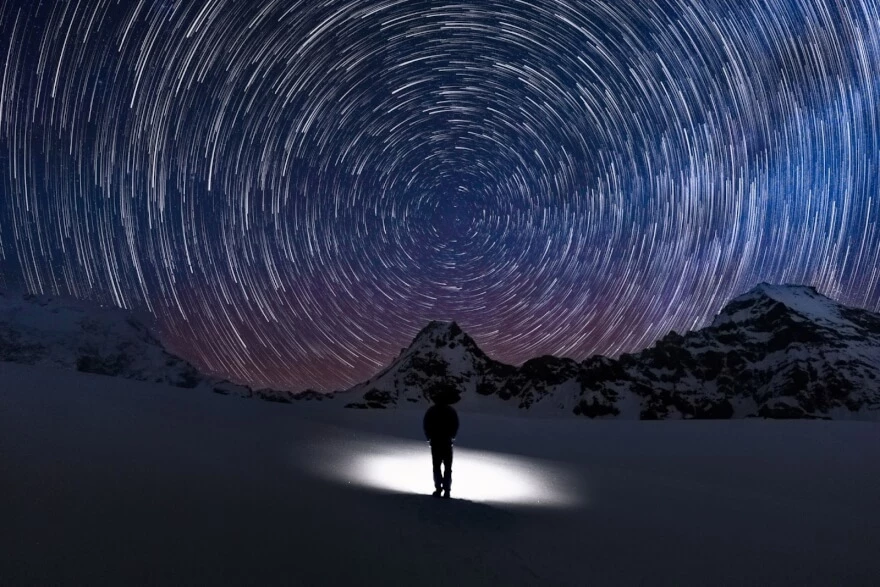
This type of photography is one of the best ways to depict the rotation of the Earth on its axis. As it spins, the stars appear to turn circles in the sky overhead. This motion is normally too slow to see with the naked eye, but is unveiled beautifully on an extremely long exposure. What is great about photographing star trails is that you can even do it from heavily light-polluted areas, as your camera will pick up way more stars than you can see with your naked eye. There are many things to adjust and prepare your camera for before shooting, and here we come with a star trail photography guide.

So first, let us start with the gear. You will need a camera that is а DSLR or mirrorless, which does not really matter because even some smartphones can do star trails these days. The next is a wide-angle lens. It is recommended to shoot from 14 up to 24 mm lenses, but you can also try and experiment with longer focal lengths. A tripod is also mandatory here because we are going to shoot a long exposure still. But in case you do not have one, you can also just place your camera on any flat surface like a windowsill, and make sure your camera will not move. Check if your camera has a built-in intervalometer. The feature allows you to program multiple shots taken at a chosen interval. If you do not have that feature available, you can buy an add-on device itself. Shooting star trails take hours for your camera to be turned on, at this point, it is recommended to have an external power source to supply power throughout the shooting session. You can also plug in a USB battery, and it will power up your cam for the whole night. Your camera may not support USB batteries, you can buy a dummy battery instead, which you can then plug into some sort of 12-volt power supply. Another optional part of your kit is a lens warmer, this will keep your lens nice and warm while also preventing condensation from forming on it.

Most people shoot one to three hours long single exposures, or even more. But that is way too risky because if something went wrong halfway through you may lose everything, then there is no way back, you basically waste your time and need to start all over again. On top of that, if it is not freezing outside, your sensor is going to get so hot that you will have lots of thermal noise in the final image. That is when you consider shooting multiple shorter exposures instead. You can start with 4-5 minutes long exposures to have fewer images to stack later on in post-processing and as you get handy with that you can raise up to 20-30 seconds lengths which is basically a star trail limit for most of the lenses, and by that, you will get astonishing results. Shooting multiple and short sessions you are now able to turn those images into a time-lapse video as well, that way you will get two for the price of your time and dedication. To resume, set your shutter speed to the star trailing limit accordingly. To figure out your limit, you can use a so-called ‘500 rule’. You need to divide 500 by your lens focal length. That way, if you are shooting on a 20 mm lens, you divide 500/20 and get your shutter speed by that. An important note: the 500 rule works only for full-frame cameras, if you use a crop sensor you need to replace 500 to 300 and do the same math. For a Micro 4/3, the number to divide becomes 250.
Your ISO and aperture depend on the environment you are shooting from. If you do photos in low light conditions, you can shoot at F / 2.8 - F / 3.5 and an ISO of 1600 to 3200.
If you are more likely to shoot in an urban environment with lots of artificial lights on, you can step down to F /4 - F /5.6 and lower your ISO to 800. That is pretty much everything you need for star trails photography settings. Let us now move to the shooting process and figure out the composition.

Now as we are done setting up our camera, it is time to set up the scene.
As we get to the shooting process, the first thing we need to do is to find the focus. You should aim your camera towards the brightest star or a planet in the sky. To aim better, use your digital zoom and place the start in the middle of your display. Then manually adjust the focus until you see your bright start become smooth and sharp as possible. If there is no option of a bright star in the sky, you can use a distant streetlight instead, which should be enough to bring you a good focus.
The focus is set, now it is time to choose our composition. Direction is the key here, as it will influence the pattern of the trail.

You will get concentric circles if you face north in the Northern Hemisphere. You will find Polaris in the middle of those circles, or the North Star. The point directly in the center is known as the North celestial pole. This is the point that the Earth rotates around – its axis, which leads us to get that concentric pattern because stars are circling around this point. If you want to get concentric circles of the Southern Hemisphere, then you will have to face south.

Facing east or west you will have divergent arcs and the straight line that emanates from the east or the west is known as the celestial equator. It is the point of the night sky that is directly above Earth’s equator.
Facing south from the Northern Hemisphere provides you with arc patterns stretching over the horizon. But if you are in the Southern Hemisphere, this is what you will get facing North.

The last step is to program our intervalometer. If your camera has one built-in, you can check the manual instruction on that, but also check that it saves the individual exposures, because some camera manufacturers only make a video file, when you use the intervalometer mode. So make sure that it saves all files as JPEG. In another case, you can use an external intervalometer, and here is how to set it up. Scroll across until you see the word ‘Delay’ on top of your display, and set it to zero (default value). The next setting is going to be ‘long’ which regards how long your shutter would be. Let us set it to 25 seconds, but you have to make sure that your shutter speed is set to the bulb so that the intervalometer can control the shutter speed.
Next is the interval, the time between the end of one shot and the start of the next. If you have a good memory card and camera, you can set it to one second here. But you may want to set it to 2-3 seconds, which is the safer option.

Make sure that you have long exposure noise reduction turned OFF, otherwise, you will have to wait a long period of time between each image.
Here are 2 last settings available: the number of shots to take. Keep it at 999 (default) so it keeps taking shots until you tell it to stop. And then you have the ‘repeat’ setting, which stands for how many times you want to repeat that 999 sequences. That is all about star trail photography tips, now let us move to post-processing.

Post-processing allows us to do an image sequence or a still image with a recorded start trail in it. For that, we usually use a set of programs and some of them are specifically made of star trail photography software. Let us start with Lightroom.
You are going to do less in the Lightroom. You simply drop your image sequence there, do some color correction and customize the white balance to your liking. Then, the crucial thing to do here is to remove chromatic aberration, which is the option in the Lens Corrections section (picture below). Checking that box allows you to get rid of the color fringing on the stars and get you cleaner results in rendering. If your lens is perfect, you may have not seen this issue at all.

But if you see colors on the edge of the stars, make sure to check the box.
If you still see the aberration after checking the box, you need to go to ‘Manual’ in the Lens corrections settings and set the color range that you affect and then change the amount from 1 or 2 there.

That will ultimately fix the color fringing on the stars.
To sync all the images, you need to press CTRL+A to select all the images on the timeline and then press the ‘sync’ button on the right side under the settings.

Check every single box there and press synchronize.
After the syncing, we need to render our images into something. Press ‘file’ –
‘Export’ with all the images still selected. Choose the folder for your exporting file. We recommend choosing the ‘.TIFF’ output file format in the ‘File Settings’ to keep all of that raw information, which allows us to work with the output file even further in other apps without any quality loss. Choose no compression, and sRGB for the color space. Make sure that chosen Bit Depth is the same as your camera’s, usually, it is 16 bits by default. No resizing or image sharpening is usually checked unless you need that specific setting, and then we click ‘Export’.
To do the stacking you can use a specific software called StarStax, the software is free to use.
Drag all of your rendered images into StarStax. Choose Gap Filling in the blending mode to get smooth trails from your stars. And then you can just click the Start Processing button on top.
Then you can save the sequence by pressing the ‘save as’ button, but make sure to add .tiff at the end of your file name, otherwise, it will save it as JPEG by default which may lead to quality issues. If you are sophisticated in image quality, you can go further and keep editing your output file in Adobe Photoshop.
Here you can do a cleanup for your trails. The most issue happening after processing is that you will notice satellites and meteors appear in between your star trails. For that, we use the clean-up brush tool. We suggest creating a new layer for that cleanup. Then, using the cleanup brush, you just click on one end and then hold shift and click on the other end of the unnecessary trails made by satellites or meteors. Repeat the process until you feel satisfied. You can also change the background here in photoshop by making a mask to get a blur background effect, or replace it with another image to your liking. And then just export your clean image into a file.
He started his career as a professional photo designer and retoucher. Professional commercial photographer with 20 years of experience. He is a leading advertising photographer and has worked as a food photographer with Michelin-starred chefs. His work with models can be seen on the calendars of many leading companies in Ukraine. He was the owner of the photo studio and photo school "Happy Duck".


