


Crystal Ball Photography
Aug 30, 2019
It is impossible to count all the tutorials and videos, telling how to improve your skill, learn professional techniques or correct common errors. Still, most problems can be resolved only starting with basic knowledge and rules. None told that this art will be easier than others, that is why if you really want to master this creative world of photography, then be patient and accurate to absorb all the useful information,which is available. Saying useful, we mean really constructive advice, which is essential for a high quality result.
To begin with, let's think about how does the shooting process take place. Probably, everyone builds a frame in different ways: someone intuitively captures landscapes and movements, fortunately, at the right moment. Others keep prefer to follow certain requirements and tricks.
In this article we will try to discover, what is the main rule of a great frame?
At the same time, is it always necessary to follow strict rules and standards?
Is it really a guarantee of a boring and predictable picture?

Imagine that most objects should be located precisely in a certain point to raise necessary emotion of the viewer. No other reason should be taken into consideration.
The rule of thirds has been applied by number of artists over centuries. And when the photo appeared, it became one of its basic principles. It is considered a fundamental, but at the same time, powerful method of image composition, it helps to understand where to place objects or key elements in order to get a balanced and interesting photos.
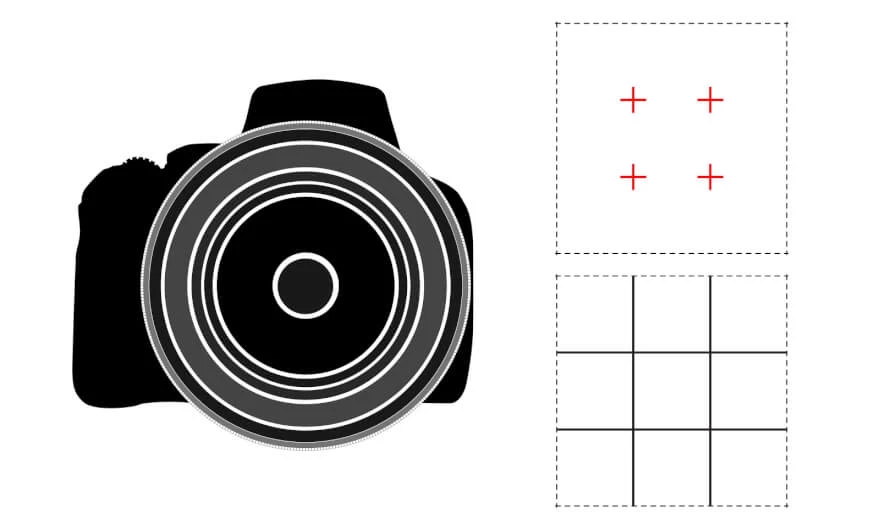
Imagine that your frame is divided into nine squares, horizontally and vertically. Intersections of these squares are visual spots. These are the strongest points of focus that capture the most attention. This is the most easy explanation. But now other questions are getting ready to be answered:

Take your camera or smartphone which is sometimes even more advanced and start exploring various settings and filters for shooting.
It may sound surprising, but not everyone is familiar with the menu of his digital camera. If you are one of those exceptions, then great, and if not, then it's time to get acquainted. Practically all devices have a function of placing the grid on the screen. And you do not need to count those thirds of the frame, because they are in front of you!
The grid, moreover, can be non-standard, that is, not just the intersection of four lines, but a larger number of straight lines. In some devices, the grid can be difficult to find, so just turn on the Live View mode.

Do not be afraid to experiment with different models, locations and poses. Everything you need to know is a right trich for each moment.
In the head portrait, eyes or lips are usually distinguished, so it is logical to reinforce the impression by placing them at the intersection points of the mentioned lines.
In the bust and waist portrait, not only the position of a person’s head, his emotions, but also his body gains significance. In addition, hands can be an important accessory of the whole photo. It will be a great idea to put them on the section line.
When shooting above the knee of a person, you can slightly shift the frame to the right or left, so he will be clearly positioned according to a classic rule of thirds.
If you want not just to photograph several people in the middle, but to make an artistic picture, then place models so that they exactly fall on two lines or points of the golden section. A great example is a family photo: children standing in front on the first line, and parents, located a little further, on the second.
The object does not have to be right on the hot spot, but just next to it. During the shooting you will need to get closer or further. It is necessary to find the only perfect spot for the best composition.

Most picture theories and laws are connected to each other and have to to be studied together. This is caused by a complex approach of this artistic industry of shooting.
In addition to intersections, four lines (two horizontal and two vertical) are also very useful for composition. Especially if your object is tall or long, you should put it along or near these lines. Use such an imaginary grid or try to find it in your camera settings, to obtain great results without long post-processing work, thinking of all errors you could avoid.

Do master the key aspects of photography, but do not be upset with minor errors. Everything can be easily corrected, if needed.
It does not matter, if you are highly professional or a newbie, there will be always a need to improve every single shot. Perfection is always present in the work of experienced photographers, but not all of them confess about hours of Photoshop and editing. Thanks to modern applications available at every smartphone app store, there is no need to worry about minor errors. You will have more time to practice and master your new skills and all the editing will be done by smart software.

Get to know the grid and count the location of objects in it.
Modern photographers often place the horizon right in the center of a frame. There is a feeling that the image is divided into two parts, which usually does not look very nice.
According to our magic strategy, if you place the skyline on one of the horizontal lines, the result will become more balanced and allow you to highlight the desired area of the photo.
For example, you have to place the horizon on the bottom line if you want to highlight a beautiful sky or sunset. And if you want to focus on the ground, then you should place the horizon on the upper line.

When photographing a moving object, pay attention to its direction. You need to place it near the hot spot or line opposite the side where it is going. Otherwise there will be poor balance and no concentration in the frame.
If your object is looking in a certain direction, then you need to place it opposite the side where it is looking. Due to this, empty space will appear in front of the object and there will be no feeling that he is looking to nowhere. This area will be created artificially, but providing an explained reason to capture attention.
If you can not figure out which side is better, choose the right one.

So far we have talked about the cases which follow the above mentioned standard. What if they have other ideas and approaches? Is it possible to make them look great and attractive to a viewer? Sometimes the idea is too complicated and only an experienced photo editing can correct the situation with cropping and highlighting.
By this moment, a free-spirited and creative artist, which you most likely are, will probably feel obliged to use this 3rd rule for artistic photography. However, some laws and standards are invented to be broken sooner or later. It is a great approach when you are learning basic steps and movements, capturing the world around you. As soon as you eyes will learn to separate great frame from a common one, you will not need to remember certain diagrams, grids and overlays to obtain a successful shot.

The core principle of the rule of 3rds is that it is imperfect to place an object in the center of a picture. There are many other situations, when it is better to ignore all classic lessons and try to be creative, inspired by the process. For example, you might want to make the subject appear more resisting. It is important to ask yourself:
If everything you need to succeed is the rule of thirds, photography will become one of your reasons to be proud of yourself. One of the key success factors is to use everything that helps you to achieve goals. Otherwise do not let it interfere with your composition.

The rule of thirds definition gives us a deep understanding of its importance and significance as a great method of composition, but, like every other directive, it can be broken. Such behaviour can bring very interesting results.
Among the most outstanding examples of professional avoiding of basic standards, there are: symmetry of an object or location, displaying the object larger or more powerful, redirection of a sight of a viewer. In some cases smaller elements and lower items should be emphasized to attract attention, for example a narrow path or small object on the ground.
Remember that it is quite easy to follow the rules, but to use them correctly and if necessary, to break it requires a delicate perception of the photo and its tasks. It is not enough to read numerous articles and master-classes on the presence of taste and personal style that the author wishes to express in the picture. Practice more and explore your personal approach to every law in photography. Rule of thirds is not an exception. As all others, it gives more possibilities to express necessary emotions and hide disturbing details. Do not be afraid to experiment and let your frame be original and memorable!
He started his career as a professional photo designer and retoucher. Professional commercial photographer with 20 years of experience. He is a leading advertising photographer and has worked as a food photographer with Michelin-starred chefs. His work with models can be seen on the calendars of many leading companies in Ukraine. He was the owner of the photo studio and photo school "Happy Duck".


