


Shutter Speed Photography
Feb 19, 2019
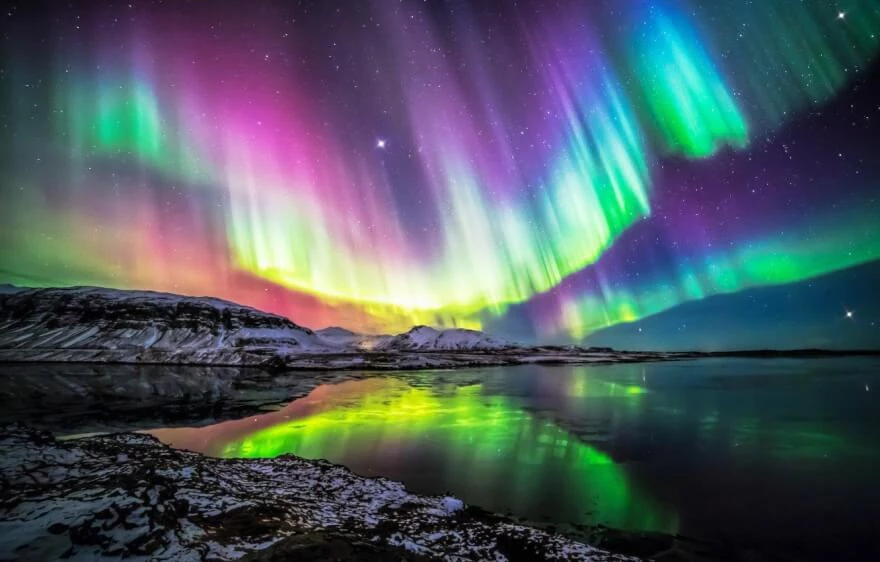
Photographing Northern Lights is a dance between you with your camera and the Northern lights. It is important to be prepared both in terms of gear and theory about the nature of the phenomenon. Today we will discuss the most important aspects for shooting the Northern Lights, or as it is also called the Aurora Borealis / Australis (for the South Pole), and share with you the mesmerizing shots that you will be able to take by yourself after reading this article.
If in any other type of photography all the emphasis is on the camera settings and equipment, in the case of the aurora photography you will need to understand the nature of this phenomenon. Aurora Borealis as an effect occurs when the solar radiation touches the earth's magnetic field. Yes, you have heard it right - radiation, and it is destructive, only the magnetic field of the earth among the ozone layer allows us to feel the gentle rays of the summer sun and not to be boiled alive. Although in the heat of summer it can be just like that.
In order for your photo shoot to be successful, there are a number of conditions that must be met.
At first, the northern lights do not appear everywhere and can be observed only from some parts of the planet. And more precisely, from a certain meridian, which you can find out on the Institute of Alaska website in the Aurora forecasts section.
 Here you can see specific information about the event locations, and if your country or city lies on this meridian, congratulations, but if it is not, then get ready for the tour, which we will talk about further because it is equally important to prepare competently for that too. For inquisitive minds, we say in advance that there is no necessity to go to Antarctica or the North Pole at all.
On the website in the illustrations of northern lights regions, you will see a green stripe or line, which is the boundary of the phenomenon visibility area.
Although it may seem obvious, but it is important to note that the northern lights are better to observe and photograph at night. Given the trip, it may be in the other hemisphere with a 12h difference, so you need to wisely calculate the time of arrival if you plan to conduct a photo shoot on the same day. But it is better to arrive 3-5 days in advance, or better yet in a week, to see the other views and the surrounding area, a combination of business and pleasure as saying. We would recommend visiting Iceland and Stockholm for such photo shoots.
Secondly, even if you are lucky enough to be born in the right region, you need to know at least approximately when the northern lights appear. You can also track this at the Alaska Institute of Weather on the same site. Here you can track the periodicity of the phenomenon.
As you can see from this graph, the highest activity occurs once every 27 days, which is the period of Sun rotation around its axis.

With this you can conclude that not all areas of our Sun behave in the same way. You can also see the forecast for increased Sun activity with the graph, and the closer to the event, the more adjustments you will see in terms of changing magnetic conditions. It is worth mentioning that If you have a high weather sensitivity, you can feel a headache if the activity is above 4 points, but this is strictly individual.
Thirdly, it is important to understand what the weather is like at the shooting moment. A clear sky overhead is indispensable here, overcast weather is unacceptable. Keep in mind that the clearer the weather, the colder the wind and the lower the temperature in general because you will be inside a cyclone and the wind can be pretty strong. So it is important to have a good and weighty tripod for your camera, but we will talk about that later in the chapter on camera settings and gear setup.
Weather conditions can be dynamic, so do not be upset if you arrive and the sky is overcast. The clouds may clear by nightfall and visibility will improve. That is why it is so important to arrive a few days in advance because if the weather is specifically unlucky, you can take pictures a day before or a day after the highest magnetic activity. We recommend using the Norwegian site Windy, which gives probably the most accurate information in terms of temperature, cloud cover, wind direction and its strength. You can also run an animation of the forecast, how the air masses will move, where the gaps in the clouds will be, and you can understand at what point in time you will have a clear sky overhead based on this information. But again, keep in mind that this is a forecast, not a guarantee, and in reality, things may turn out a little differently. We recommend you collect weather information from different websites and thus average the figures to get more accurate and objective data. As an application for your phone, we recommend using the Aurora app. The application allows you to get fairly accurate data not only about the weather itself but also to receive notifications about changes in Aurora’s activity. All of this can be customized according to your needs. There are times when you are literally on the hunt for Aurora and this app helps a lot. By the way, the app is connected with windy as far as we know.

As we mentioned above, this could be Iceland, the northern parts of Norway and Finland, and the Kola Peninsula in Russia, which is the closest territory to Europe. With powerful flashes, the visibility boundary may widen, but it will no longer be as spectacular as within.
The choice of a particular location also matters. You may see a blown-out frame in some unsuccessful photos. This is due to the fact that the city lights may be reflected not the best way in a frame because the shooting is done at night and at slow shutter speed. So it is better to choose an area as far away from urban infrastructure as possible to avoid unnecessary light noise.
The northern lights occur not only in winter but also in summer because the magnetic field of the earth is constant, therefore the phenomenon itself. But there is another problem in summer, which is called the polar day. On a polar day, the night almost never comes, and taking pictures of the Aurora Borealis during the day is probably beyond the power of even the most modern cameras. Nevertheless, the dark time on polar days will be about 2-3 hours, therefore the window of opportunity is shortened, but it still saves you from having to wait another six months until winter. The best time of year to shoot Aurora is from fall onward when the day and night become equal length. November, December, January, and February have the longest nights. But when exactly in the night do we start shooting?
As practice shows, you will have a better chance of contemplating the phenomenon in the first half of the night (9 PM). The showtime varies, sometimes it is 20-30 minutes, and sometimes it is for half the night. But the fact remains, you need to be there and ready to spend 3-5 hours for a good photo shoot at the beginning of the night.

In addition to shooting the phenomenon itself, you can make it more artistic. For example, if there is a railway near your shooting spot, a passing train can add some ambiance and atmosphere to your shot. As we have talked about the polar day and the shortness of the night window, you can use that fact to catch the light at the day and night meeting, when half of the sky is already sunlit and the other half is still in darkness - it makes for a very interesting and eye-catching effect.
We tend to get away from towns and villages to avoid unnecessary light noise, nevertheless, the rising moon in the frame can also obscure the radiance by all means. So shoot away from the moonlight, thus at a long shutter speed you will get illuminated surroundings in the frame, but the night sky will remain unchanged because the light will hit you in the back instead of your camera lens.
We are going to cold places, so make sure that you have waterproof and windproof clothes. Again, there are wind and snow, shoes must be closed by themselves and outside - pants with open ankles or cuffs will not work here, for sure. You may stick to the place of your photo shoot for a long time, consider camping on site with tents and all the entails. Hot tea is mandatory.
Now let us talk about the equipment and camera setting for the actual shooting.

One of the important parts of your setup will be a tripod. It should be solid, weighty, and not shaky to withstand the wind. Since you will be shooting the pictures with a long exposure, even a slight tilt of the camera may blur the frame, and it will affect the final quality of a picture. It is best for your tripod to have a hook in the middle, which you can use to hang your backpack or something else to increase the weight and rigidity, just be sure that the backpack itself will not sway in the wind but laying down and generating downforce. That is why it is even better if your tripod is equipped with spikes for grip.
It is good to have a remote control for your shutter, as pressing the button with your finger definitely will not add sharpness to your shot. A downed mirror also makes a pop, which can also affect the quality, so raise it up if you have a DSLR. If you do not have a remote, you can compensate for a potential frame shake with a built-in shutter timer, but trusting the automation can make you miss the most colorful moment.
What really matters is not the camera itself as much as its brand. Canon is the most popular choice, but you can use any camera you are comfortable with. It doesn't really matter if you use a full-frame or a cropped one. But there is a second opinion that frame size does matter, because on FULL-frame sensors the threshold of acceptable noise in the frame is higher, as well as the maximum ISO values. So take note, but if you do not have a choice, be prepared to lose a bit in light sensitivity.
Things are more complicated when it comes to choosing a lens.
You need to choose only the most photosensitive and wide-angle lenses with aperture values of F/2 and below (F/1.8, F/1.4, and F/1.2 - perfect). The point is that lenses with these aperture values allow more light to reach the sensor, thus reducing the shutter speed needed to capture the Northern Lights and reducing noise that can occur at a high ISO setting. Focal lengths from 16 to 55 mm are superb for capturing the Aurora Borealis. It does not matter if it is a Full-Frame Micro 4/3 or APS sensor. If your budget allows, we recommend looking at an aperture value that tends towards 1.4, i.e. the fastest lenses.
So all we left is to figure out our camera settings.

Let us start with a quick recap of the terminology and outline the basics.
ISO - This is the sensitivity of your camera's sensor.
The higher the ISO value, the higher the voltage applied to the sensor, and the more it will react to light. But the problem is that this is digital gain, so at high ISO digital noise can occur. Speaking differently, there will be more noise at high ISO values with long shutter speeds.
Shutter speed refers to the amount of time that the shutter will be open and light will hit the sensor. This value is measured in fractional or whole seconds. For example, 5 seconds, 10 seconds, or 15 seconds.
Aperture is a lens characteristic that indicates how much light the lens can let through, i.e. how wide open the aperture is for light to enter the lens. The more open the aperture is, the more light enters the sensor accordingly.
Foremost, set the shooting mode to RAW format. The RAW format gives you uncompressed images which are more amenable to post-processing, but they take up a lot of space on your memory card, so make sure you have plenty of storage.
Most of the time you will have to adjust the shutter speed and ISO on your own. The advice is to open the aperture to the maximum that your lens allows (F/ 2, F/ 1.8, F/ 1.4).
In most cases, the optimal settings for ISO will be between 1600 and 400 with a shutter speed of 10-15 seconds. When the moon is full, you can lower the ISO even down to 100. Sometimes you can increase the ISO setting but decrease the shutter speed, so you get an acceptable amount of noise, and the picture will still be properly exposed. Do not get stuck to specific values, it is best to find your own by trial and error, so do not be afraid to experiment. Northern Lights can be static and dynamic, so an ISO of 400 with a shutter speed of more than 15 seconds can make for a very blurry picture. So vary your settings based on the nature of your Aurora, if it changes every second as if someone is tugging at its edges, set your shutter speed as fast as you can to capture the texture.
Stock up on batteries, because they tend to discharge much faster in cold conditions than at optimal temperatures. It is better to keep extra batteries warm underclothing.
Take a flashlight just in case, there may be an interesting object in the frame that can be lit at slow shutter speed by moving around the object with the light because the essence of the long exposure is that it captures all the light and summarizes it in the frame. The main concern here is to not get into the frame while doing so because the movement will be smeared on. Thus, it provides a light painting effect, which you can read about in this thread. Thus, your illuminated object will also be reflected in the frame along with the northern lights in the sky. Besides, a flashlight will help you quickly adjust the settings of your camera when you have no other light source, so it's better to have a head-lamp, so your hands are free at the time. If you have a red-spectrum flashlight, it won't bother your colleagues, and its light will be enough to see the settings panel. It can also be useful to have a laser pointer, it can help your camera to focus on it.
Also, have a thermos of tea and patience. The process can be very long and to pass the time warming up will be a great option. Aurora Borealis is a dynamic phenomenon, sometimes it flashes and shines for 15 minutes, then it fades, and you stand there wondering if the show will continue.
So how do you know when is the best time to start shooting? The fact is that our human eye sees the glow a little differently than our camera lens. Even a small amount of aurora can be detected with a long exposure lens, so if you have the forecasts from the Aurora app which updates for your current location, you can start shooting even an empty sky in advance, at least with your phone camera, to make sure not missing the beginning. If you already see green glimmers in the frames you get, it means it is time to get dressed and go outside to take pictures, and the actual shining will start in 15 to 30 minutes.
It is better to choose locations in advance because it will be difficult to find a good spot in the dark, and you may miss an interesting moment. Thus, coming to an unfamiliar area, it is best to walk and look around in the daytime. Take a compass with you, as the shining will be going from the north side, so you can make your camp set relative to this direction.
You can also walk around and look for good foregrounds. For example, ponds look very good in shots of the northern lights. Take a few shots in daylight and evaluate the resulting composition, so you have a picture of your upcoming photo session. You should be able to move from one place to another so that the shots are not boring with the same composition of foreground and background.

Vary the shutter speed and its relation to the ISO parameter - the so-called exposure-pairing by means of the targeting shots. If the illumination is very bright, you should either decrease the ISO or decrease the shutter speed. Therefore, look at each shot to adjust the settings as the photo session progresses.
For a more casual approach without any of those professional setups, you still have an option to get a good picture using your smartphone.

You can find Northern Lights Photo Taker in the App Store. This app allows you to have settings that are capable of making an acceptable picture of the Northern Lights with no professional equipment available. The quality of pictures you take would not be the greatest, but you will still get it captured at some point.
If the quality would not be to your liking, then you can try Nightcap pro. The app takes several pictures over 16 seconds and applies noise reduction. So the results might be better.
It is better to have both apps at the same time installed to see the difference and choose what works better in your particular case.
He started his career as a professional photo designer and retoucher. Professional commercial photographer with 20 years of experience. He is a leading advertising photographer and has worked as a food photographer with Michelin-starred chefs. His work with models can be seen on the calendars of many leading companies in Ukraine. He was the owner of the photo studio and photo school "Happy Duck".


