


12 Crucial Tips for Street Photography - Street photography tips for beginners
Apr 17, 2018
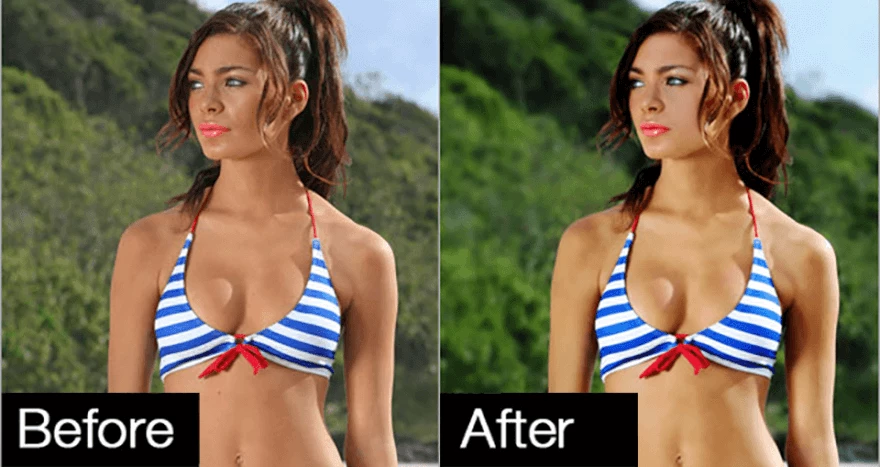
Have you ever made an outstanding photo shoot on the seaside? Imagine the summer has come and you are posing as a model wearing a brand-new bikini. After the session, you get a pack of photos but, unfortunately, you are not satisfied with an outcome. The light is on the wrong side, your head is turning the way your nose looks a little bit crooked and your skin seems to be slightly sunburnt. For such cases, the professional retouching software Photoshop is at your disposal.
Here is a piece of advice, which will come in handy for both models and photographers.
It is not a secret that every girl at least once in their life have dreamt of having a perfect skin without any spots, marks, and blemishes. Nowadays in the era of advanced high-tech technologies, there is a safe side for every girl. We are talking about a photography retouching. This simple and fast procedure will erase all of the undesired flaws on the face and body in the whole. It is well-known that there is a pile of special programs for editing photographs. Some of them work also online such as Instagram, for instance. Same, there are online photo editing services. Notwithstanding the rising popularity of Instagram, this article will reveal secrets of how-tos of Photoshop.
However, you need to be careful with the tools you set so as not to “burden” the overall image. Speaking of the Photoshop, it has tools for making your makeup look brighter, or you have an opportunity just to erase your lipstick and have one that you wanted to purchase last year. It is also necessary to mention that Photoshop makes it possible to resize your body, to make you look slimmer and fitter. You can do yourself long legs or dreamy breasts (notably, without surgical intervention). If you follow the tutorial carefully and not to excessive use the “magic” tools, you will get what you want from your picture! So, let`s see what we are bound to learn here.
Almost the half of work is done! You made up your mind to edit and retouch a photo by your own. First of all, you need to open your photo in the Photoshop Program. We will correct this photo in its original size. The first thing you are desired to put into life is to create an empty layer on top.

For starters, there is a need of concealing every imperfection and defect. This can be blemishes, pimples, small spots etc. Using Clone Stamp Tool, zoom in and choose an area next to a pimple, then you are recommended to close a pimple with its help. You can make this as many times as it needs to be done until your face is perfect and glow with health. Then we should smooth the skin surface. Look for an Eyedropper Tool in the instrument desk. The next phase is to pick a color of the face. Then using the Brush Tool we are to set a Soft Round 50px and Opacity for 20%. All in all, you need to pay attention to how the skin tone changes while you do all these options.

This step will have to do with smoothening the body. Here you copy the main first layer, which you need to rename into “Surface Blur”. Now you can think “Do I need to airbrush the entire body or what?” The answer to your question is “No”. On this stage, you are to do these simple small steps: go to Filter, Blur, Surface Blur. We need to warn you that you shouldn`t forget about setting the Radius to 5 and Threshold to 20.

In most cases, when you utilize Surface Blur, the bikini will be smoothened as well. Some of the amateur photographers won`t even notice this. However, we don’t want this to happen. In order not to come across such situation, you need to choose the “Surface Blur” layer and adapt Layer Mask to it. Now roll this mask to black. Use the Brush Tool with #FFFFFF just to paint smoothened skin and got it revealed.

Here comes the stage, where we do want to make our model not to merge with the background. Remember duplicating the original model layer? It is high time we did it again. Then again rename it to “Lens Blur”. Select this duplicated layer and go to Filter, Blur, Lens Blur. Change every parameter (Radius, Blade Curvature, Rotation, Brightness, Threshold and Noise Amount) as the following diagram shows. In the Distribution line, you need to tick either Uniform or Gaussian (we recommend to stick Uniform). By the way, you have to put a mark on the “Faster” button. In the “Shape” field there is a need to have “Hexagon (6)”.

As we dwelled upon the entire image again, we need to attach a mask to the given layer once again. In this case, the blur will deal with only the background. Use a mask to the “Lens Blur” layer and hide a model with a help of black-colored Brush Tool (#000000). So you need to have the very same image as it is shown below.

Here you should duplicate the original model layer one more time (you are not tired of it, are you?). You need to rename this layer to “Soft Light”. Now we advise you to bring this very layer over the rest of layers. You need to set a Blend Mode to a Soft Light.

We are almost on the finish line! We need to make our colors deeper. In this stage, we need to create a correction layer and set the following values 15, 1.00, 255. Make yourself sure that the first field in the Output Levels has a value of 0.

We know that you are aware of creating new levels! Here make a new one again which is called Brightness/Contrast Adjustment Layer and set the Contrast to 10. What`s more, you don`t need to put a tick in front of the “Use Legacy”.

The work is almost done. Final touches are always of paramount importance. All you have to do is follow the steps that are described below to get an impeccable result.
As you probably know, digital photography tends to have many reds on the skin and over-permeation in all of the given colors. We are used to the look of the digital photographs; however, the reds and over-saturation will damage the overall image with corrected skin. You are offered to create a new improvement layer named Hue/Saturation. Of course, you are free to play with the settings until you are satisfied with what you see. We recommend you not to change these lines too often. In the contrary case, your photo will get an unnatural look as if a red color was laid on it. It can be hard enough to add them but you will get a hand in it in future.

According to the screenshot below, work out a Curves Adjustment Layer and make the Blue and Green curves look like here. For this, it is necessary to stretch the curves up and a little to the right to make them look like on this screenshot.

To sum up, you got it!
These 10 simple steps are not so complicated for even an amateur. Now you know how to make skin smooth, vanish all of the defects on the face, maintain control over the background and regulate hue or saturation of the photo. Blue and Green curves will help you to put a cherry on the top.
There are also programs, which make it possible to make changes with the hair or eyes color. However, the beginners in Photo Retouching may not be aware of the effects of such tools. Do not make the hair too blond or too brunette. If you would like your photo to look natural, just paint it a little bit, using an obscure palette. Furthermore, you have an opportunity to whiten your teeth if there is such a need. What`s more, be careful with makeup correction. If it is a model who has a photo shoot, do not apply too much make-up. People who look at this photo should have a feeling that this girl has just come from the sea and her mascara is still in her eyes but not too much. The same with red lipsticks and blushes. Do you personally have your make-up on while going to the seaside?
As was stated before, you are not to exaggerate your abilities in reshaping a body. Your photo needs to look professional. There is no need to worry if the sun is not here when you make a picture. Special light correction option will correct this mistake. Another point is not to use too many unnatural layers and filters on your photo. Imagine as if you sent your picture to the fashion magazine. How do you think, will the editor be happy with too much Sepia effect or Vibrant filter attached to the photo? We bet, no.
Here we are! You may look at the edited photo and compare all the changes made. Everything can be as easy as ABC.

He started his career as a professional photo designer and retoucher. Professional commercial photographer with 20 years of experience. He is a leading advertising photographer and has worked as a food photographer with Michelin-starred chefs. His work with models can be seen on the calendars of many leading companies in Ukraine. He was the owner of the photo studio and photo school "Happy Duck".


