


Smoke Bomb Photography Guide
Mar 16, 2020
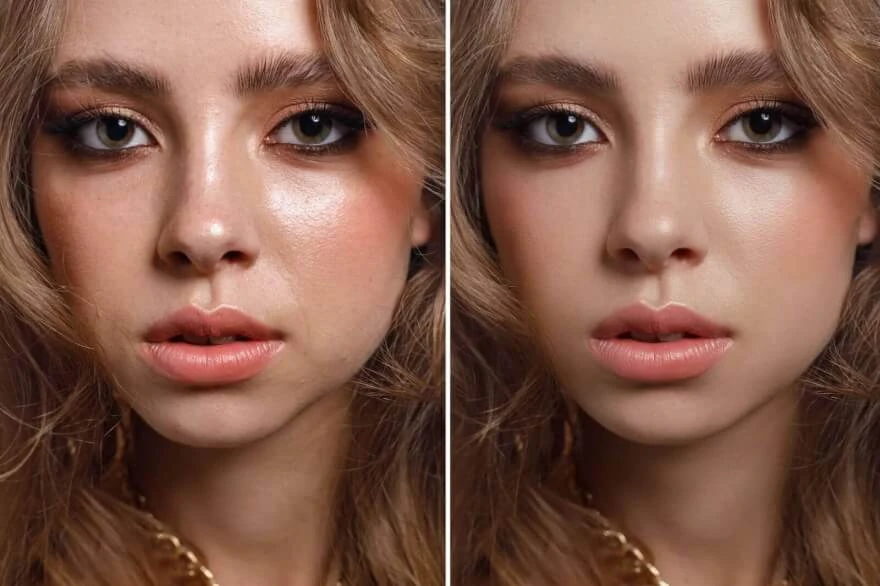

Besides high-definition monitors for digital photography, photoshop is known to be one of the most effective tools to perfect images. Performing simple manipulations, one can quickly get beautiful portraits that fit into glamour magazines, create stunning pictures using various photo effects and edit images eliminating unwanted details. Here, we are going to talk a little about how to touch up a photo in photoshop. Also we list retouching techniques that are applied to correct portrait images. Makeup and qualitative lighting contribute a lot to creating glowing skin photos but let’s take a look at a few amazing techniques, namely, touch-up layer technique, frequency separation technique and “byRo” method to find out about ways and benefits of applying tools for photoshop skin retouching.

We are often quite prejudiced about photos of ourselves. We can admire, dislike or even hate them. Nowadays, photoshop techniques and tools allow us to adjust our photos to whatever extent we would like to so that we could be satisfied with them. The advantages of using different photoshop techniques are obvious. First of all, you are offered with a huge variety of tools that give you a possibility to improve the appearance of your skin, make it smooth and clean still having it look natural. Secondly, Photoshop can be used at different levels of task complexity, both when you need to correct very noticeable imperfections and when there are minor blemishes.
When speaking about photoshop skin smoothing, touch-up layer technique is one of the most popular in terms of easiness and effectiveness. You need to use it on the initial stages of photoshop retouching. It is applied to polish and brighten skin textures, remove blemishes, spots, strands of hair, deal with flakes, wrinkles, blurred makeup lines, etc. Though it is not a panacea for all retouching problems but only for noticeable ones. It most likely won’t help you with tiny blemishes and spots on the photos. A touch-up layer technique is quite simple to use. Tools you will need to apply are Healing Brush, Clone Stamp and Eraser. Size of brushes to start with for all these tools varies between 50 and 75% which means that they should be quite small but larger than blemishes so that they could cover them.
Begin retouching with the Healing Brush. Before you start using it, add a new empty layer on the top of your background layer. Choose the empty layer you have just created and zoom in. Then set the brush size. Use of this tool consists on clicking on blemishes when moving over all areas of the face. However, avoid making several clicks over each other since you can ruin skin tone. Also, when using Healing Brush, don’t paint or sweep as you will make the skin look artificial as if it had scars. Change the brush size as you move around blemished skin of the face in accordance with the size of spots and marks beginning with the bigger and finishing with the smaller ones. As mentioned above, touch-up layer technique can be used to retouch makeup if needed. For instance, clean up lipstick from 'too-blurry' areas around lips to keep them looking sharp or correct an eyeliner for a clean line, etc.

Clean up makeup lines, lighten wrinkles or remove hair strands using another tool, namely, Patch tool. Patch tool is very if you want to lighten deep or completely remove insignificant wrinkles. Using this tool you can delete all redundant details of any size, precisely, if they are bigger than spots. For this purpose, cut around the area you are going to change and move it to a nearby area of even skin. Set the opacity at 100% which equals to total remove of the wrinkles or other imperfections and lower if you want to reduce wrinkles but not eliminate them. In result, you get a younger looking face skin. However, remember that if you want to get image with natural looking skin but which is not completely different from the original version you need to be careful with the Patch tool and use it moderately so that image could be regarded edited but not completely changed.
Another tool that enables high-quality photoshop retouching is Clone Stamp tool. Use of it implies correcting through cloning samples from one area to another. In other words, it is a texture replacement tool. You can choose a Clone Stamp brush size whatever you need, though, remember that the smaller it is the sharper image you get. While you work, set the cloning tool at low opacity, for example, 20% which is the most appropriate for removing small blemishes. It is very important to keep a pulse on whether the skin texture and tone are changing strongly or not when applying a Clone Stamp tool. Any too noticeable changes are not desirable. They may occur if you get too far with using a sample of particular area of the face skin copying them into remote areas of the face. The more similar a sample of clean skin with the area you are retouching is, the better it is for an overall result.
The final steps in photoshop skin smoothing when applying touch-up layer technique are to correct results you got in case you are not happy with them. For this purpose, use Eraser. Simply select it and correct touch-up changes you have made before.

Frequency Separation technique basically consists of two qualitatively different levels independently. The first one concerns editing details of high frequency such as acne, red and oily patches, skin pores, wrinkles, tiny blemishes, fine lines, scars, strands of hair, etc. At low frequency level, we work with such data as volume, tones and colors, dark and light areas.
At this stage, tiny details do not matter since we use tools to improve general impression of an image. When you have a photo with the skin clear from noticeable blemishes, you can proceed to perfecting its texture.
Skin retouching frequency separation is needed if you can’t finish photoshop skin smoothing after all, even very small spots are deleted as skin texture still may seem to look ‘injured’. When skin texture is clearly visible, apply frequency separation technique.
First, create a new layer to fix the result of the work you have done on the photo. When you have your Background and Touch-up layers turned on, hold down Alt key and choose Merge Visible (Layers panel). Create the “High Frequency” and “Low Frequency” copies of a new layer.

Make the High Frequency layer invisible. Now you will need only Low Frequency layer to correct the color information it contains by blurring skin texture. For this purpose, you need to select Gaussian Blur from the Filter panel. Be careful not to overdo on blurring as it can result in non-natural face skin.
Then make the High Frequency layer visible again and save changes you made. Here, you can also experiment with the Clone Stamp tool using soft brush at up to 50% hardness with the same opacity definition photoshop. So, add a new layer and move it to the top of the layers. When you apply the Clone Stamp tool using frequency separation technique, pay attention to face color, shading and contours to keep them natural and as much similar to the initial version of how the person looks like as possible. Avoid cloning too dark skin into light areas, blending the natural shading and contour violation since it results in change of the facial shape.
For high pass retouching you may apply High Pass filter Photoshop skin. It gives a possibility to distinguish the brightest pixels that are grayed out. By deleting overexposed highlights on the skin you are able to make it more matte.
Begin with selecting the High Frequency layer setting up the correct High Pass radius. Select High Pass in the Filter panel in Photoshop and increase it from zero to some point. For example, at 1-2px radius it is too hard to notice any excessive tonal transitions, bulky volumes and textures, at 10 px radius you usually see too many fine details, so, you need to choose some number between and make changes both on High and Low Frequency layers using tools we have already talked before, for example, the Healing Brush, Clone Stamp and Gaussian Blur.

At the final stage, when you are retouching skin texture, you may face different skin related problems, for example, uneven foundation makeup, tired look, large pores, acne breakouts zones, etc. In this case, besides techniques we discussed above you may apply the byRo method which is most appropriate technique for effective overall smoothing. It can be applied instead of frequency separation technique as well as after it since it is quite similar but still has some peculiarities.
The byRo Method is not intended to be used for dealing with blotchy skin. You need to remove all noticeable blemishes before you get start with the byRo Method. So, as for frequency separation technique begin with creating a new layer duplicating it.
Select the duplicated layer choosing Gaussian Blur. Here you need to determine the radius of Gaussian Blur for smooth skin, which, however, you will not be using immediately. Once, you know the most appropriate radius, close the Gaussian Blur dialogue box and choose High Pass in the Filter panel. Apply this radius for High Pass filter. After that, without turning off the current layer, go back to Gaussian Blur and apply radius but with threefold decrease. Instead of a radius of 9 pixels set for the High Pass filter use a radius of 3 pixels for the Gaussian Blur. Then, invert the High Pass layer (Image panel> Adjustments > Invert) and change the layer loweringits opacity to approximately 50%. Mask this layer out holding Alt and Add a Mask (Layers panel). Paint in the mask with soft brush (50% opacity) in different areas avoiding zones around eyes, nose, hair, and lips.

Besides the touch-up techniques used for photoshop skin retouch, consider these two final techniques to get beautiful skin.
The problem retouchers often have to deal with concerns reds and over-saturated colors. In order to correct them apply a Hue adjustment technique. Add a new layer, select Reds and decrease the Hue maximum to +3. Nudge the Saturation down between -5 and -10 selecting Yellows.
Another problem digital photography can result in is unnaturally smooth image. To restore skin texture add a layer of grain. Create a new layer and select Grain in the Filter Gallery (Filter panel). Increase both Intensity and Contrast to 30 and choose Enlarged grain mode, then apply. After that select Desaturate in the Image panel and adjust the layer opacity to the extent you think is the most suitable in order to make skin look natural.
Co-founder of RetouchMe. In addition to business, he is passionate about travel photography and videography. His photos can be viewed on Instagram (over 1 million followers), and his films can be found on his YouTube channel.
Moreover, his profile is featured on the most popular and authoritative resource in the film industry — IMDb. He has received 51 international awards and 18 nominations at film festivals worldwide.