


What is framing in photography?
Apr 25, 2022
Photoshop allows you to do a lot of things with your photos. Most of the tools allow you to get rid of unnecessary parts in the picture and add up some improvements. People often ask ‘How do I turn my photo into a painting?’ As we see, there are a lot of simple techs shown here and there, but most of them are missing crucial parts that allow you to improve your image.
Today we are going to show you an advanced technique to turn photos into paintings.
For this job you need Adobe Photoshop CS6 version or above, however, the interface could be changed with different versions, but the principle would stay the same.
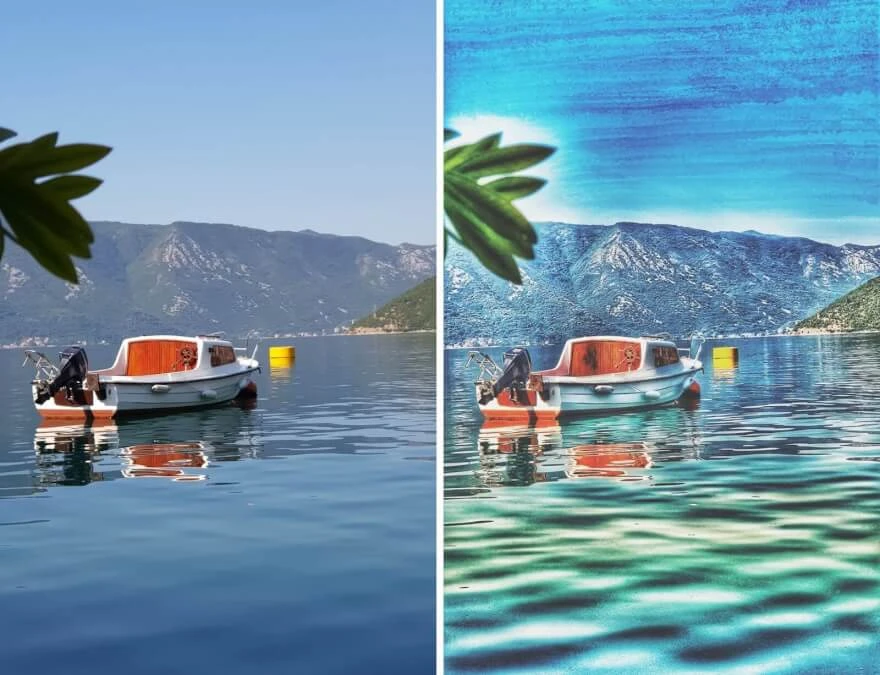
To get a better idea of what a photo to oil painting looks like, let us take a look at the outcome in the image down below.
Now let us break it down step by step to have a better idea of how to achieve the same results no matter the picture you have.
So let us start our tutorial right from scratch. First, we are going to insert our image in Photoshop, and then we need to create a Black & White base for it. The base will allow us to create an effect on the image. To do this, click on the adjustment layer icon ![]() and choose Black & White.
and choose Black & White.
Photoshop will show you color adjustment lines. There is no certain tech to establish those values, but you can just play with these values to see which one works best for you. We just make it look like a zigzag adjustment, turning reds to -200 then yellows to +300, etc. This will create a watercolor texture.
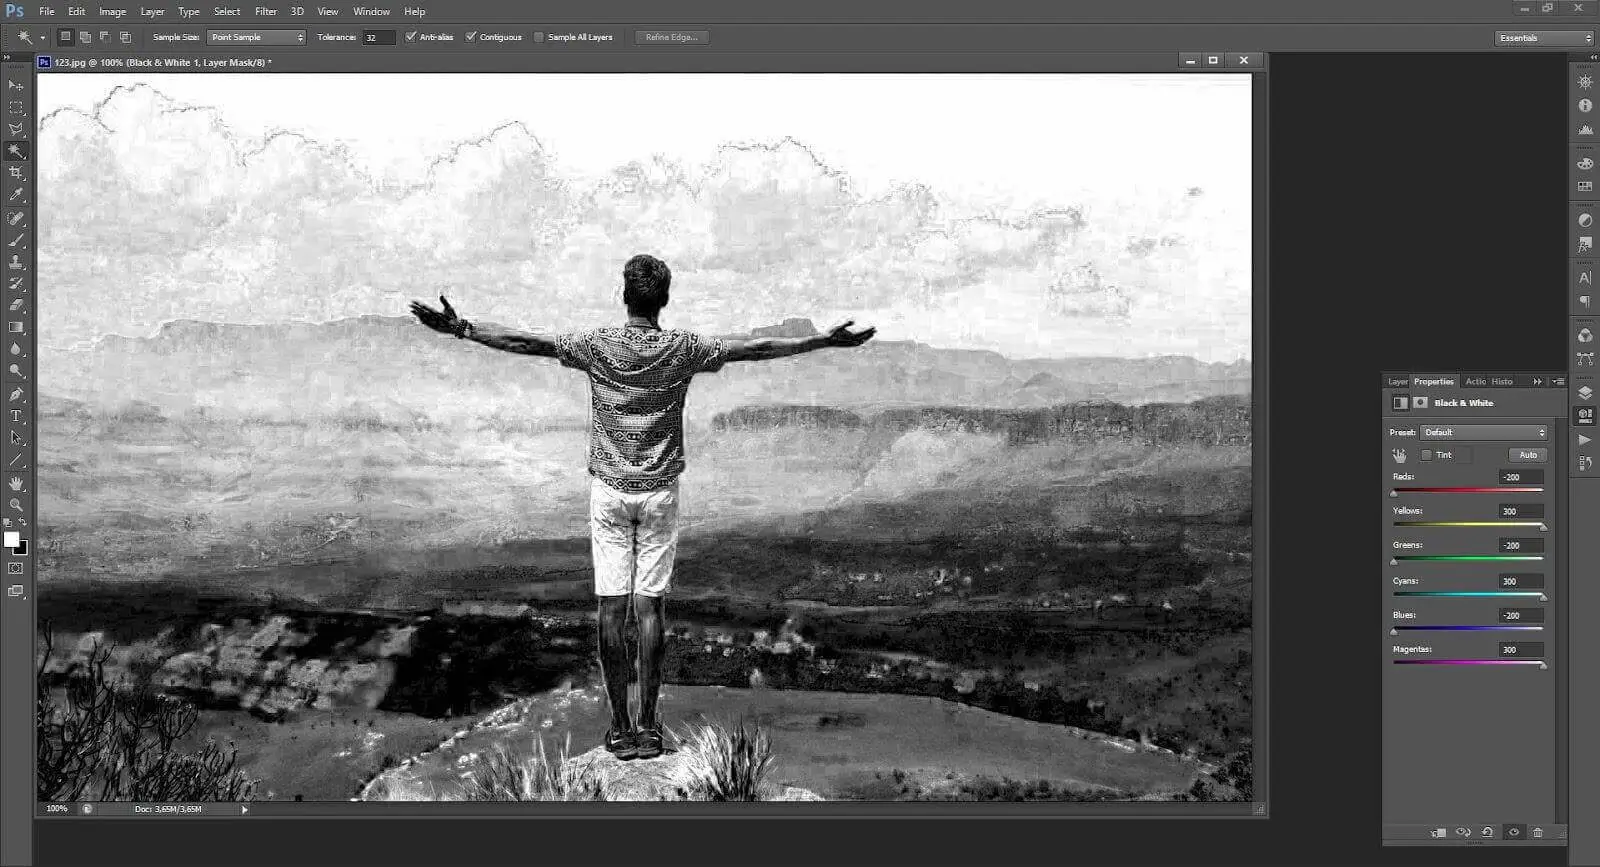
This filter will appear on top of your layer’s panel within the properties' section with a certain filter name, that way you can always go back to adjust the values here at any time.
These actions already make a photo into a painting, just without color, but that is not enough yet.
Now we need to add some stroke to it. So what we do, is we create a stamp visible layer. To do that, press CTRL/COMMAND + ALT/OPTION + SHIFT + E - that creates a merged layer of everything that you see in the canvas right now. Now we need to convert this into a smart object so that when we apply the filter, we can change the values later. Go to ‘filter’ → ‘convert for Smart Filters’. Now, let us add some strokes to it. For that, make sure you have selected our new smart filter (names ad Layer1) and go to the filter → Filter Gallery… Choose here Brush Strokes folder and find the ‘Angled Strokes’ filter here. This will apply a nice filter to your image, you can check the difference by pressing this button in the filters' menu ![]() . Play with the values here as you like, but we have chosen
. Play with the values here as you like, but we have chosen
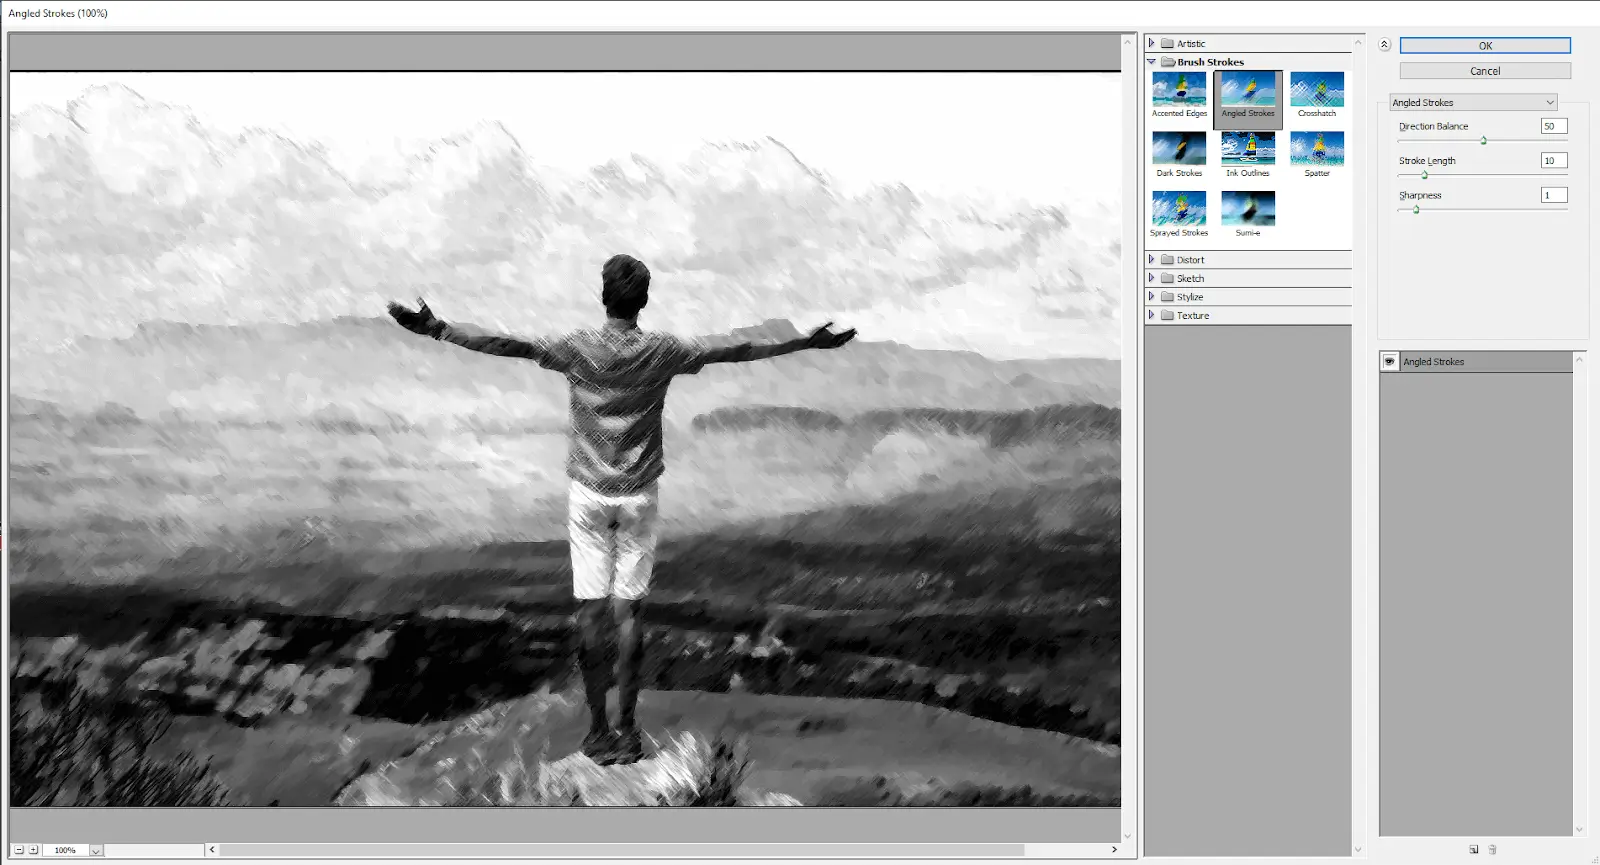
Direction balance numbers allow you to set strokes direction. With minimum value, the strokes would be more like one direction and if you take it to the right it would be the opposite direction. Right in the middle, you will get lines to cross. At that point, we already have converted our image from photo to painting with these filters applied, but it still needs some improvement for a better look.
To improve our image, we need to separate the subject from the background. For the background, we have long strokes, which is fine, but we want to have short strokes on our subject, so it looks separate. For that, we make a duplicate of our ‘Layer1’ by pressing CTRL/COMMAND + J. Rename our Layer1 into - BG (background) and the copy into ‘Subject’ to not mess things up. As we have our ‘Subject’ set as the smart object, now we can change the values of our ‘angled filter’ there. Double-click on the filter gallery in our ‘Subject’ and decrease the stroke length from 10 to 4. Now we need to limit it to the subject because it now also applied to the background. We are going to use masks for that.
Select our ‘Subject’ layer, hold ALT/OPTION and click on the ‘Mask’ button ![]()
Take the brush ![]() and make sure the foreground color is white
and make sure the foreground color is white ![]() . The concept of a mask is that we have our mask in black, which means it does not show the effect yet, that is why we need a white set as our foreground for the brush to let the effect go through. Now, by painting over the subject with the brush and white foreground color, we imprint shorter strokes for our ‘Subject’ selectively. Now we have a more clear image with the background and foreground converted into a painting. But it still has no color on it, because we were working on its base yet. Our original background layer still has some color in it, all we need to do is just apply it to our Black & White base. Select our background and press CTRL/COMMAND + J on it to copy the layer at first. Then, put it at the top of all our layers. To get only color from this, Photoshop has a nice tool called blending mode. It is right above the layers usually set to ‘Normal’. Open the list down and choose ‘Color’ here to apply color from our background copied layer. Now you can play with the opacity that is right next to the blending mode options to get even better visual results for your image. And that is how you convert photos to painting.
. The concept of a mask is that we have our mask in black, which means it does not show the effect yet, that is why we need a white set as our foreground for the brush to let the effect go through. Now, by painting over the subject with the brush and white foreground color, we imprint shorter strokes for our ‘Subject’ selectively. Now we have a more clear image with the background and foreground converted into a painting. But it still has no color on it, because we were working on its base yet. Our original background layer still has some color in it, all we need to do is just apply it to our Black & White base. Select our background and press CTRL/COMMAND + J on it to copy the layer at first. Then, put it at the top of all our layers. To get only color from this, Photoshop has a nice tool called blending mode. It is right above the layers usually set to ‘Normal’. Open the list down and choose ‘Color’ here to apply color from our background copied layer. Now you can play with the opacity that is right next to the blending mode options to get even better visual results for your image. And that is how you convert photos to painting.
If you have a hard time understanding how to turn a photo into a painting in Photoshop, we have our team of professional designers to help you. All you need to do is download the RetouchMe app from your Google Play or the App Store for your Android device or iPhone.
Then do the following:
Co-founder of RetouchMe. In addition to business, he is passionate about travel photography and videography. His photos can be viewed on Instagram (over 1 million followers), and his films can be found on his YouTube channel.
Moreover, his profile is featured on the most popular and authoritative resource in the film industry — IMDb. He has received 51 international awards and 18 nominations at film festivals worldwide.


