


2022 Color of the Year: Very Peri
Apr 19, 2022
Freezelight or light painting is a whole separate form of art. One of the first light paintings belongs to Picasso but even earlier, such experimental paintings were made by the artist Man Ray. This type of photography has an incredible number of uses. You can shoot unusual portraits, landscapes, paint logos with light, and a bunch of other different things.

If we compare the light painting with the usual drawing, you need to imagine that the light itself is your paint and the darkness becomes your canvas.
Freezelight is one of the types of long exposure photography. If you have a camera on which you can adjust the shutter speed and you have a tripod, then you are in the game.
Shutter speed is the time during which light hits the film and fixates the image on it. And if the light source moves while the shutter is open, then this pattern remains on the sensor.

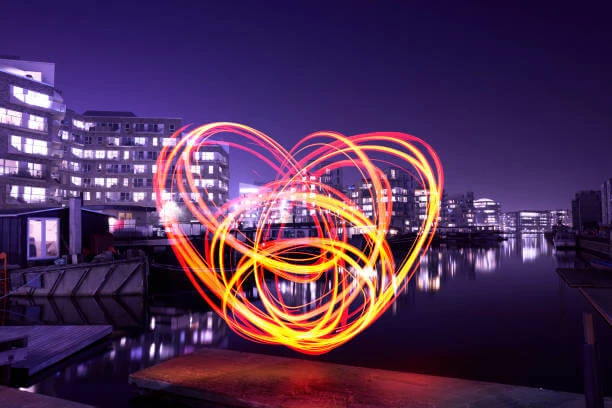
If you set the camera to a long exposure, and cars with their headlights on a pass by are in the frame, they will leave a trail as shown in the image above. At the same time, everything that was static in the frame remained clear and not blurry. This trick can also be done not only with the light. On a fine day, if you stand in the middle of a stream of people on a busy street and set a long exposure, the running people will smear, and the objects that were motionless at that moment will remain clear.

This technique is commonly used for portraits. A tripod is required for such photography, as it is very important to set the camera absolutely still. Even pressing the shutter button will get an extra vibration and even static objects will be blurred at such a long exposure. It would be a really good use if you have a wireless shutter release control for the camera, but if you do not have one, then just set up the self-timer. It is also highly recommended to set the continuous shooting to not miss anything.
Our settings for the shot above was as follows:
However, if you just increase the shutter speed and leave the rest of your camera settings untouched, then you will get an overexposed picture with objects indistinguishable on it in most cases. To avoid this, you should lower the ISO and cover up the aperture.
In this topic, we will do a more in-depth analysis of all of these settings, as well as the device of the camera itself because more accurate knowledge is needed to understand how to use all of this.
First, let us understand the camera device. There are two main elements, the first is the object-glass or in the language of the pros “glass” and the camera itself “body”.
In object-glass, the lens is the most important part, same as the sensor in the camera.
The sensor is an electronic analog of photographic film, it reads the information of incoming light and translates it to the final image. Each time you press the shutter button, the light passes through the lens and focuses on the sensor forming an image. The sensor digitizes it and a digital photo or video is obtained. Even if you shoot with a mobile phone, all these devices are there too but small and compact. Let us move on to manual settings.
The main three parameters that were described above could be found in any camera, those are aperture, shutter speed, and ISO. All of these settings affect the frame exposure that is the total amount of light received by the sensor. Simply put - how enlightened the picture would be. There are multiple settings to discuss so let us go in order.
This is an optical parameter referring to the lens.

These “petals” allow you to increase or decrease the opening for the transmitted light. Aperture clearance affects the illumination of the frame as well as the blurring of the background.
The more you close the aperture the smaller the gap and the less light hits the sensor. This parameter is indicated by fractions. It sounds complicated but in order not to fill the mind with unnecessary information let us just say that the lower this value in the settings - the more the aperture is open and vice versa. That way, if 1.8 is the maximum open aperture, a lot of light comes in, the picture is bright. 22 is as close as possible and almost nothing is visible in the frame. Now about blurring the background.
This image was taken with a 50mm lens with a maximum aperture of 1.8. The object in the center of the frame stays in focus and the rest of the objects are blurred around the edges. If we rotate the focusing ring we will notice a barely noticeable line that is the focusing area. The size of this area is called the depth of field.

By gradually closing the aperture we get rid of the blur effect and see that all objects in the frame have become clearer. Thus, an open aperture is more often used for shooting in the dark and for creating an artistic effect with a strong background blur. A closed aperture is used when there is too much light or when more objects are needed to be in focus.
Shutter speed is the time during which the sensor records information about the light going on it. It is measured in fractions of a second. The more dynamic action you shoot, the faster the shutter speed has to be, otherwise, objects in the frame will be blurred.
But it is important to not forget that long exposure also affects the amount of incoming light. The better comparison is explained in the picture down below.

With a longer exposure, we can do impressive shots when the light conditions are not that good but it was given enough time to let the light go through to enlighten the frame for a certain amount.

This parameter is responsible for the light sensitivity of the camera sensor. The higher the ISO value the brighter the image will be. With this setting, we make the camera sensor more responsive to the light. In this case, ISO does not affect either the depth of field or on the dynamics of the picture; in fact, this is almost an ideal tool. But there is one con that still exists. With an increased ISO, the image becomes noisy. There would appear some image interference all over the place. Phones begin to create this interference already at an ISO of 400. Amateur Canon 60d cameras start making noise at ISO of 800. And only some professional cameras like Sony can raise these numbers to an incredible value without spoiling the image itself.

Having the knowledge of how to adjust current settings we can have a practical usage for it changing values in different conditions and also do long exposure light painting with it. So let us get back to our main narrative.
Since you are already an advanced user and you know how to work with the long exposure by shooting cars, running people, etc, It's time to move on to light painting. Painting with light ideas could vary depending on your imagination.
If you want to get some kind of specific drawing, for that matter you need to train, and sooner or later you will definitely get complex shapes. It's good if you already know how to draw in the usual sense of the word, in this case, it will be a little easier with light painting. If your main goal is to achieve abstract forms, then it will be necessary to use your imagination at full potential.
You don’t require some specific tools for that. The simplicity here is the case, nevertheless, talent is not less important. But if you are willing to make this your constant hobby try to get the following tools.
Probably the only must-have tool would be a tripod. As being said before, any camera movement during a long exposure shot is inadmissible. Even the slight shaking might spoil and smear your whole image, so make sure to fixate your camera on the spot.
We would also advise having wireless shutter control if you are planning to make light painting your daily routine, the preset timer might not be an option for that case.
The color gels are mostly used in professional photography. The purpose is to use it as a light filter, but if in professional photography there are a variety of different approaches of how to use the gel, for our case we can use it as a color filter covering our camera lens with it to achieve different effects. That way you can make your normal flashlight to be colored with that filter.
The light source can be various objects, such as:
You can also use a variety of other light sources of your choice all you need to do is just adapt to its usage. For example, we used the steel wool put into a whisk which was wired with a cord in order to rotate it around yourself to make circle shapes and stuff like that.
Important note: with all the variety of tools, it is not recommended to use a laser pointer as you can easily damage your camera.
Here we want to share with you a small light painting photography tutorial.
The best time for light painting is at night. A good piece of advice would be to wear darker tones clothes to be barely noticeable in such pictures, dark cloth blends more with the environment. As the tool for drawing, let us use a flashlight for easy light painting photography that you can control with your wrist. Fix the camera on a tripod then check the settings. We should set the ISO to 100, that way the sensor will produce as little noise in the picture as possible. Set the shutter speed in accordance with the length of the picture, usually, it is around 30 seconds. Then adjust the aperture accordingly to the shutter speed. As being said your ‘brush’ is now your wrist with a flashlight in it. It is important to remember all the key points during light painting because you will not be able to see what will remain in your drawing until the end.

You can draw shapes or letters and even make logos with that. It may not work the first time if you try to make some difficult images with a flashlight but practice makes perfect.
You can draw with any light source of your choice.
With different light sources, you can achieve different visual effects and it would be even hard to tell if that is artificial VFX or the actual light painting. For example, if you watched "Dr.Srange" by Marvel you might notice that there were portals that characters were using to travel through space.

You can make one by yourself and to reach the same effect you may use Bengal lights drawing a circle around yourself. We show the settings that we used for that photo.

There were described just a couple of light painting ideas but there is no limit for imagination.
You may wonder if the camera matters to achieve better results. You may choose between DSLR or Mirrorless cameras, but the only thing that is actually important is to have adjustable manual settings on any device. But for the best quality, we would advise trying a DSLR camera in the first place.
Light painting can also be achieved using a mobile phone. Some recent iPhones have a night mode setting. We are not sure that light painting with iPhone older models is possible, need to check that there are night shooting settings available.
There are also light painting apps that could be used in a line with your smartphone but they will not guarantee the same quality experience that you can achieve with a DSLR camera device.

Light painting is a great way to relax as well as a hobby. The desire to paint with light will allow you to work with your camera on a different level because it is important to understand how the settings interact with the environment. You do not need a lot of tools or any extraordinary skill for all this, there are enough improvised means that are able to emit light. Make different shapes, draw letters and let your camera capture it all to see results. If you will decide to make it your hobby then you can improve your equipment in order to achieve different and more impressive results. Speaking about improvement, any kind of hobby or professional activity has its best of the bests. You can check out the people who connected their lives with light painting which is quite impressive. We will mention the list of the most outstanding Light artists in contemporary art.
Jean Leonardo is one of the most known light painting photographers. The way he manipulates the light making futuristic and outstanding shapes can even freeze your mind not just a light. He is a light photography master and the creator of that direction in art. At first, it was called Light Art Performance Photography and stands for LAPP. The difference between LAPP and traditional light painting is that the movement of the artist is choreographed. Eventually, the project LAPP-PRO has been made of that, worthy to check for more details.

Another outstanding artist is Hannu Huhtamo. The artist was born in Helsinki and has been working on light art since 2008.
Hannu Huhtamo slogan says: “I paint with light to create new worlds into darkness”
His art is hard to differentiate from CGI scenes sometimes.

And last but not least of the artists that we would like to mention is Michael Bosanko. This person bases his art on the otherworld, creating shapes that can include nature, humans, and our daily life things. As Michael said he discovered light painting by an accident. “The moon formed part of the scene, but the camera shake caused the moon to make a streak. My curious mind clipped the camera from the tripod and, handheld, I attempted to “write” my partner’s name using nothing but the moonshine and the movement of the camera in my hand, and I had success. As soon as I returned home, I adopted the same principles but with torches, and I’ve been hooked ever since.”
Co-founder of RetouchMe. In addition to business, he is passionate about travel photography and videography. His photos can be viewed on Instagram (over 1 million followers), and his films can be found on his YouTube channel.
Moreover, his profile is featured on the most popular and authoritative resource in the film industry — IMDb. He has received 51 international awards and 18 nominations at film festivals worldwide.


