


16 Best interior photography tips
Apr 21, 2020
The Leaning Tower of Pisa, one of Italy's most iconic landmarks, began construction in 1173 and was completed in 1372. Initially intended to stand vertically, the tower's tilt is attributed to unstable soil and foundation issues that emerged during its construction. The tower's distinctive lean is a result of centuries-old engineering miscalculations, accentuated by its soft clay foundation. The architect behind this marvel believed to be Bonanno Pisano, unwittingly created a global symbol of architectural quirkiness.
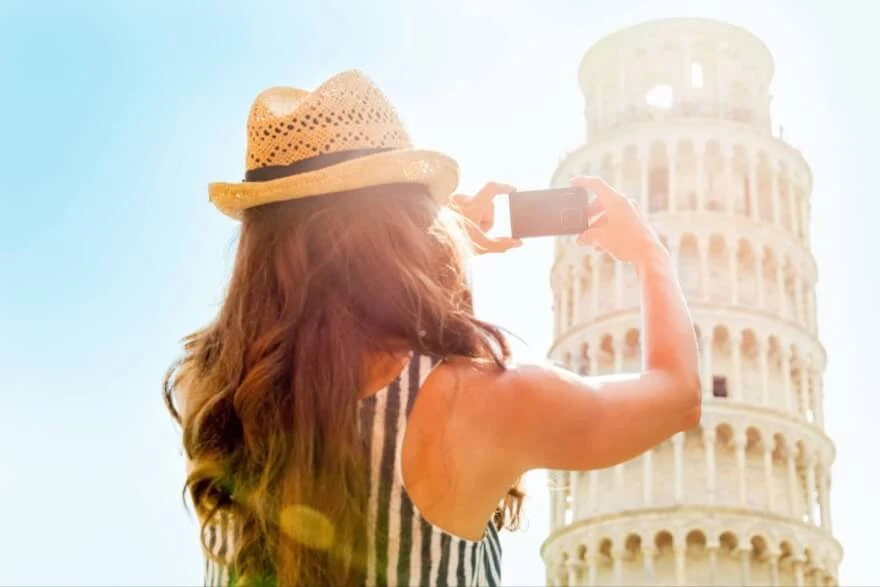
The Leaning Tower of Pisa stands as a legendary architectural mistake, drawing tourists to its iconic location for memorable photographic moments. Capturing the perfect image here involves strategic considerations. Choosing the right time, lighting, and angle can greatly enhance photographic outcomes. In the following sections, we'll delve into tips and techniques for capturing the tower's unique charm, ensuring your photographs reflect its historical allure. This article adds to travel photography tips if you like to travel around the world with a camera, these combined will bring you a whole picture on the subject.
The ideal time to photograph the Tower of Pisa is during the golden hours, shortly after sunrise or before sunset. During these times, the soft, warm sunlight casts a gentle glow on the iconic structure, enhancing its beauty and reducing harsh shadows. The soft lighting also adds a touch of magic to the surrounding landscape.

The site is a popular attraction and can get crowded, especially during peak tourist seasons. It's advisable to plan your visit during weekdays and outside peak hours to avoid large crowds. Booking tickets in advance to access the tower is also recommended, as there is a limited number of visitors allowed inside at any given time.
Plan your visit during the early morning or late afternoon, as these times typically see fewer tourists. Early mornings, just after the site opens, offer a serene atmosphere with softer lighting, allowing you to photograph the tower without the hustle and bustle.
Similarly, evenings before closing time provide another opportunity for a quieter experience. During these times, the warm sunlight during golden hours can add a magical touch to your photographs, enhancing the beauty of the iconic structure. These tips also match the golden hours timing, which is convenient. Additionally, consider visiting during the off-peak seasons, such as late fall or early spring, when tourist numbers tend to decrease.

Additionally, early morning or late afternoon photography provides a unique perspective, with the sun creating interesting shadows that can emphasize the tower's lean and intricate details. Ultimately, choosing the right time to photograph the Tower of Pisa depends on personal preferences, but capturing it in the warm hues of sunrise or sunset often yields stunning results.

Experiment with various perspectives to find a unique and visually appealing composition. Consider positioning yourself at an angle that emphasizes the tower's tilt, showcasing its architectural quirkiness. Shooting from a lower vantage point can accentuate the lean even more, creating a dramatic effect. Additionally, exploring different angles around the tower allows you to frame it against various backdrops, enhancing the overall composition. Keep in mind the play of light and shadows at different angles, as this can add depth and texture to your photographs. By carefully selecting your shooting angle, you can create a captivating photo of the Leaning Tower of Pisa that highlights its timeless allure.

Engaging in forced perspective shots is an effective technique for framing and composition when capturing the image of the Leaning Tower of Pisa. Forced perspective involves strategically positioning subjects, such as people, to create optical illusions that play with the viewer's perception of depth and size. In the context of the tower, this technique can make it appear as though individuals are interacting with or supporting the structure with their hands.

To achieve this effect, place your subjects at a specific distance and angle so that, when captured in the frame, their scale relative to the tower creates a visually striking and amusing illusion. This adds an element of creativity and playfulness to your composition, making the photograph more dynamic and memorable. Experimenting with forced perspective shots allows you to get funny Tower of Pisa pictures, offering a fresh and unique perspective on this iconic landmark. Read about Forced perspective photography in our dedicated article.

In addition to framing and composition, incorporating people into your photographs of the Leaning Tower of Pisa can add a sense of scale, human connection, and liveliness to your compositions. Consider capturing candid moments of people interacting with the iconic landmark or posing in creative ways. Encourage them to engage with the tower, either by pretending to hold it up or leaning in a way that complements the structure's tilt. By integrating people into your Leaning Tower of Pisa photographs, you create compelling narratives that go beyond the architectural marvel, capturing the essence of the human experience interacting with the tower. Mention tips from the Timing for Minimal Crowds paragraph, as including people in the shot may contradict. However, if you don’t get the right timing and see people pose around while you are trying to take a clean shot of the Tower, you can also remove people from the frame using editing techniques described in a linked article.

Moreover, the leading lines compositional technique comes in handy to emphasize the structure among the rest of the landmarks and monuments surrounding the tower. Find what looks like a path to the tower, be it a geometrical play of surroundings or the actual road leading to the tower. Learn more about compositional techniques and leading lines in this article.

You do not have to limit yourself to capturing just the tower. Explore the surrounding area to create a more comprehensive and engaging visual narrative using our angle tips. For that, you may also consider wide-angle lenses as they are better for such landscape-alike shots encompassing the cathedral, baptistery, and monumental cemetery. Also, consider the ND filter usage and tips for the dedicated article.
Besides, get into zoom shots with a zoom lens to show the architectural masterpiece in detail. Highlight architectural elements that may convey a story or simply attract the attention, which many photographers are missing out on, hence, this may get you the best Leaning Tower of Pisa photos.
It turns out that lens selection is important and has a strong connection with compositional techniques, so let’s delve into that subject next.

A versatile lens, such as a wide-angle lens, is often recommended to capture the tower and its surroundings comprehensively. Wide-angle lenses allow you to include more of the scene in your frame, making them ideal for emphasizing the tower's lean against the backdrop of the Piazza dei Miracoli.

Alternatively, a standard zoom lens can be effective for capturing more detailed shots of the tower while providing flexibility in framing. If you're interested in highlighting specific architectural elements, consider using a telephoto lens to bring distant details closer and create a more compressed composition.

Ultimately, the lens you choose depends on your creative vision and the specific shots you want to achieve. Experimenting with different lenses enables you to capture a diverse range of perspectives, adding depth and variety to your Leaning Tower of Pisa photography. There are additional considerations about the travel photography gear that you can add up to your overall photo equipment.
Additionally to lens variety, using a polarizing filter on top of them will help to reduce glare and enhance color saturation, particularly during bright sunlight. This helps bring out the details of the tower and the surrounding landscape.
A graduated neutral density filter can be useful for balancing exposure in situations where the sky is brighter than the foreground. This ensures that both the tower and the sky are properly exposed without losing details.

Additionally, playing with color filters or creative effects in post-processing can provide a unique and artistic touch to your images. Sepia tones or black-and-white conversions, for example, can evoke a timeless or vintage atmosphere.

Do not overuse filters as this may compromise the authenticity of the scene. Experimenting with different filters allows you to unleash your creativity and produce visually striking Leaning Tower of Pisa photos that stand out with a distinct and personalized style. You can learn more about different filters for photography in these articles: Best camera filters for beautiful effects and How to use ND filters for landscape photos.
After capturing the Leaning Tower of Pisa, employ post-processing techniques to enhance and refine your photographs. For that, photographers usually use Lightroom as the most convenient tool for editing photographs in post. For additional flexibility in post, you can opt for RAW image capturing in your camera settings. This will ensure lossless quality during editing but extend the storage space you need, so make sure to have more SD cards to benefit from that.

Begin by adjusting the exposure and contrast to bring out the details in both the tower and the surrounding elements. Fine-tune the color balance to achieve a natural and pleasing look, ensuring the tones complement the historical setting.

Consider experimenting with selective editing tools to emphasize specific areas, such as the tower's lean or intricate architectural details. Crop your images thoughtfully to create a balanced composition and eliminate distractions. Use clipping path techniques that help with that. If you find out that the background does not match your tower’s vision, the sky is cloudy whereas you want it to be crystal clear, use background cleaning to let the Tower of Pisa look outstanding in the shot.

Explore the possibilities of adding subtle vignettes, enhancing sharpness, or applying artistic filters to evoke a particular mood. Strive for a harmonious balance between enhancing visual appeal and preserving the authenticity of the scene. You can use a blur background technique to emphasize the tower of its surroundings.
Remember, post-processing is a tool to elevate your artistic vision, so allow yourself room for experimentation while maintaining the essence and integrity of the Leaning Tower of Pisa in your final images. Do not overdo the editing, just do a creative touch to present the image better.

Capturing the Leaning Tower of Pisa goes beyond mere photography; it is an art of storytelling. Selecting the right time and angle, considering lens options, and incorporating people or experimenting with filters contribute to crafting unique and compelling narratives. Timing your visit to minimize crowds and exploring post-processing techniques further enhance the overall photographic experience. Whether emphasizing the tower's tilt, showcasing its surroundings, or playing with creative filters, each element adds a layer to the visual story. Remember, the key lies in a thoughtful combination of technical skill and creative intuition to immortalize the timeless charm of this iconic Italian landmark, ensuring that your photographs resonate with both authenticity and artistic flair. If you have any problems in post-processing, use our photo editing app which will help you in this regard with a multitude of services for any retouching cases.
Co-founder of RetouchMe. In addition to business, he is passionate about travel photography and videography. His photos can be viewed on Instagram (over 1 million followers), and his films can be found on his YouTube channel.
Moreover, his profile is featured on the most popular and authoritative resource in the film industry — IMDb. He has received 51 international awards and 18 nominations at film festivals worldwide.


