


Difference between DSLR vs Point-and-Shoot Camera
Nov 16, 2021
When we do all kinds of photography, the first thing people usually think about is how to get good quality pictures. And this is achievable with a variety of techniques, settings, and devices. But if devices mean additional expenses in favor of high-quality content, those very techniques mean well-coordinated shooting without any expenses, but only with the use of knowledge. So, how do you make a beautiful shot without spending too much money? Today we're going to talk about that with examples of framing in photography, which can help you improve your photos.
As we mentioned earlier, the main advantage of compositing techniques is that it's completely free. You don't have to incur any extra costs to improve your camera or lens or to buy additional equipment, accessories, or software. Today we're going to look at four basic photography framing tips or techniques that are available to anyone from the amateur to the professional photographer level.
What does framing mean in photography? We will try to make this as simple as possible, to get the main point across and to understand where and when to use certain photography framing techniques. Let us start the analysis with a concrete example. Imagine you have the task of taking a picture of a lighthouse on the shore. How would you do it? Let's run through all four techniques and find a way to apply them to a specific example to see the difference.

Every camera has an option to turn on the grid. Usually, you turn it off, so it doesn't get in the way, but this grid is exactly what the rule of thirds is all about. So if you are just starting your journey into professional photography, we recommend that you keep the grid visible and use it as a reference point. What is the reference point here?
The grid is made of two vertical and two horizontal lines, which divide your frame into nine proportionally equal sections. The intersection points of these lines are called focal points. The positioning of your subject in these focal points helps achieve that very pleasing aesthetic of the shot. So your eyes will literally be drawn to these focal points. This technique helps to balance the shot and give it a certain context or make it storytelling. So, our lighthouse, at this moment, is in the center of the frame. Why is this not good? This is due to the fact that the frame is too common, and we are used to seeing something in the center of the frame. To create more interest, let's place the lighthouse in our frame according to the rule of thirds. So the lighthouse should be in the frame at the intersection of lines on one side or the other because the object has a vertical orientation. In this way, we see that on the left of our lighthouse a space is formed that can be filled with information that tells a story or gives a context, in our case, it is the sea and the grass. This will help the viewer better understand where the lighthouse is.

If our frame has no vertical orientation, and we are just shooting the sea, it is not a good idea to put the horizon in the center of the frame. In this case, use the top or bottom line on our grid as a reference to place the horizon. That way it will be within our focal points. This will allow us to put emphasis on both the sky and the water at once.
Rule of thirds for portraits or interviews.
You have probably noticed that professional interviewers place the interviewee in a certain part of the frame, exactly at the intersection of our grid lines. The idea is to give some looking room by placing the person on the left or right side of the frame.
The next technique is leading lines, and the idea here is really simple. We use elements within our environment to create a visual pathway to our subject or focal point, as shown in the example below.

With the taken shot of the lighthouse, for example, we can also find an interesting angle to capture it with leading lines creating the same pathway to it.

This helps to draw the eye to our focal point. These do not have to be straight lines, they can be with a curved shape, the point is to lead to the main subject of the story with them. Regardless of your location, look for elements within your environment that will help draw the eye to your focal point.
This technique also works great for portrait shots. Just frame your model so that lines within the environment help lead the eye.

The technique is pretty self-explanatory. We are going to frame our shot so that it is nice and balanced with our subject in the middle of the frame.

As we can see, our lighthouse is nicely set between these two houses on each side. As you can see, there is also a color symmetry.
When filming or interviewing a subject placed in the middle of the frame, make sure to have the same natural environmental leading lines within the frame, drawing the eye to the center of the frame, whether it is interior lines or landscape in the background. If you want to have a deeper breakdown into how to use symmetry in your frame, we would advise watching Wes Anderson films. His films are full of beautiful symmetry and really make him stand out as a uniquely stylized filmmaker.
Framing within the frame, we are using elements within our environment to frame our focal point. It is a slightly more stylized approach, requires time and a place for it, and is harder to pull off because it requires having something within your environment that you are able to frame your focal point with.

We can even call it natural framing photography because it's a whole separate art form. If used correctly, it can really help your photographs and videos stand out and be perfect.
We have discussed four types of framing in photography, now let us be creative and look for certain examples of how to implement them applying to your photo.
The first idea is to use the natural environment to shoot through it. It is the case mostly for outdoor shooting. It can be landscapes or the field shot through the branches or a portrait with the face surrounded by leaves. If doing a portrait, make sure that these leaves will not cover the face obstructing the vision. That type of framing stays with the blurred foreground (leaves) and the background area stays in focus. This blur effect is also known as the bokeh effect.
Shooting inside your house, you can still do creative framing photography using windows, door frames, or using handmade framing.

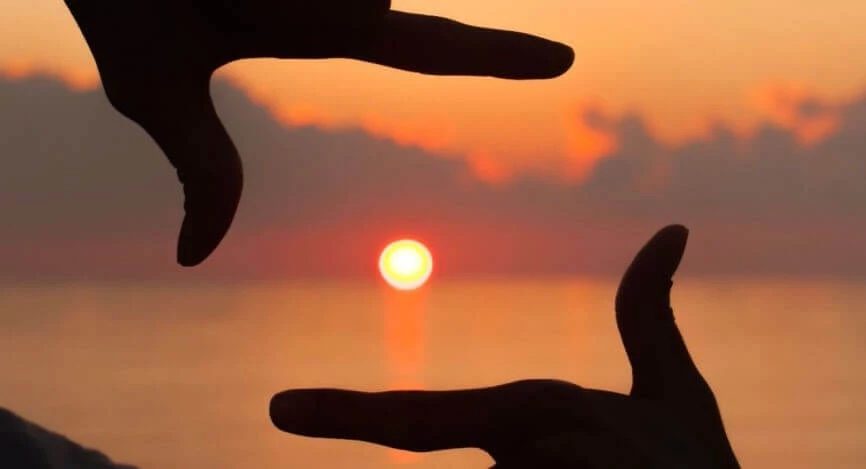
If you have a nice view throughout the window, you can photograph your interiors using that as a storytelling prop. For Saint Valentine's Day, you can shoot your beloved using your hands as a framing tool, making it in the form of a heart. Or you can just enjoy the romantic sun outside with it.

Or if you enjoy the sunny weather and would like to shoot outdoors, you can frame the sun through the leaves the same as with the portrait. That way it will be a nature shot using framing technique.

If you are a big fan of any sort of architecture, whether it is ancient or modern, the best way of framing would be the usage of the arcs to shoot through.

The best way of shooting here is to try to use as many of the framing rules mentioned at the start of this topic as possible. Here you can see in the image above at least two techniques: framing within the frame and leading lines. That should look natural and soft, and not produce any overwhelming feeling. Creativity is in simplicity. Being a fan of architecture, we can find the best-looking building to shoot it with a good angle, which allows us to use one of the framing techniques at the same time. Find the natural environment that looks like surrounding your main shooting object and shoot using it as the frame for it.

To shoot with one of the framing techniques, it is not necessary to completely surround the subject, just enough to further emphasize the scene. In this particular shot, we can see symmetry made with these trees and the frame within the frame technique used, with the grass being underneath the building and the crowns going above it. And even the sky is framed in that shot, which makes it eye-drawing and more depth in it.
Hope these tips and tricks will fill your composition of techniques to do outstanding shots. Do not forget that light and shadow matter too, but that is a different topic.
Co-founder of RetouchMe. In addition to business, he is passionate about travel photography and videography. His photos can be viewed on Instagram (over 1 million followers), and his films can be found on his YouTube channel.
Moreover, his profile is featured on the most popular and authoritative resource in the film industry — IMDb. He has received 51 international awards and 18 nominations at film festivals worldwide.


