


Color theory in photography
Feb 2, 2022

There are multiple purposes for a different type of photography and all of them have certain reasons. We shoot nature, landscapes, and people. Some types of photography are for a hobby, some of them are for professional needs. Flat lay clothing photography is more considered commercial photography. The term is basically taking photos on a flat surface. Then you can promote your online store by uploading your images to Instagram.
Shooting clothes may sound simple, but making an outstanding and stylized photo requires some genuine knowledge and structure for a photographer.
Today we are going to break down three general things for that matter:
The 1-st thing we need to do for lay flat clothing photography is to create a scene of items and objects that we are going to shoot.
Here we have five general points that will help you make a scene for a good photograph:
The scene with different props can tell the story of the shooting item. It is important to make props matching the item that you are photographing. The common issue with making a scene is overwhelming it with different props. It is important to find a match and make your scene balanced. For that matter, if you have something heavy laying on one side it may be good to put something on the other side to compensate for the frame perception.
There is no specification in props, most of them you are able to find at your home. It can also be some antique items. Before setting up the scene you need to create a picture of what you want in your mind first then it would be easier to implement it to life.
For instance, you can base your scene on the idea to make a setup of clothes that match a certain style. Like in the image below we took a shot of the casual setup or tourist setup and props are some sort of storytelling about that.
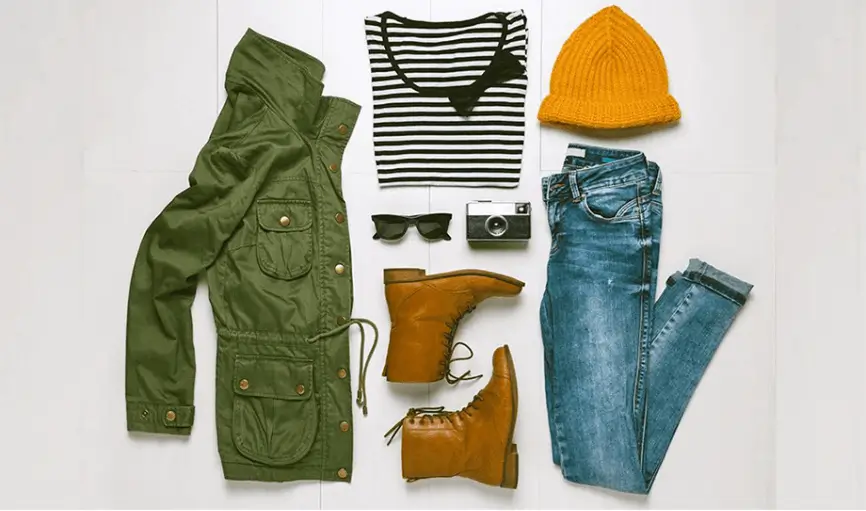
The shown composition also has a color balance. The Black and white t-shirt on the white table fits sunglasses and the camera whilst the shoes and hat have a good color harmony with the jeans and jacket. We have a whole article in case you want to develop a better presentation about color harmony but in this case, it is pretty common knowledge of how the brown shoes match jeans, the same as yellow tints are complementary for blue and cyan.
With a setup like this, you will achieve flat lay fashion photography.
Here we have another example of how correct props match a certain composition.
We have a simple white t-shirt with a dagger sign on it. We choose a low-lit room and the light from a window will contrast naturally with the t-shirt. Also, certain props such as a knife fit this logo the same as these old fashion items around are matching the table background and its color. We keep balance by placing some objects on the right the same as on the left and add some card deck on top to make the photo storytelling and involve some interest for the viewer. Thus, the rule of thumb says that you should always take into consideration the context of your frame if you want to add some accessories to it. All props and accessories you use can tell the story and provide the connection between your product and the customer.

Based on the example above we have shown how natural light can be used.
When it comes to taking photos inside, one of the things you want to do is cut the lights in your house or in the room you are shooting in to eliminate different colored lights that do not match the natural window light.
Another helpful tip when it comes to lighting your scene is not lighting it straight on.
It is recommended to light your scene from aside or behind, this will offer you different interesting shadows and black gradients which is good color harmony-wise, also the shadows will texture your photo that way. Doing that prevents your image from looking flat, even though we are taking flat lay for clothes.
The importance of using natural light sources is that you keep your outfit look also natural. Artificial lights usually have their own colors that can cause a negative effect and spoil your shot unless you use a specific light setup in a studio.
If we shoot formal clothes such as shirts, usually apparels like this are photographed with dummy usage. Dummy is used for a reason to make the shirt get its natural volume on the model. In the case of flat lay photos clothing, we have to do this natural volume by using additional things, otherwise, the product will not have a presentation. Such items can be a simple piece of foam rubber or rolled pieces of paper that can set the required volumes in the right places. Put some into sleeves to make it look like an actual arm in it. Open up the r collar a bit. The other thing we are going to do is to roll the body a little bit because when we wear a shirt it fits around our body. When things look laid flat they can often look larger than they are supposed to be in real life. Thus, fold in the sides a little bit. If the shirt has a front pocket on it, make sure to beef it up a tiny bit with leftovers of your volume-increasing stuff.
That way your photographed shirt will look more natural.
The third thing that we are going to discuss is getting different camera angles for clothes flat lay.
Something to always keep in mind when you are taking photos is where your photos are going to live. In most cases, photos are taken for Instagram shooting vertically.
Top-down is a great angle it showcases your whole setup, it shows shooting clothes very clearly and it also shows all the balance in your photo.
A very natural angle of observation. As if you walked past this scene with the shirt on a table you would look at it with your eyes at 45 degrees which allows you to see the product clearly. Thus, it shows a lot of depth when it comes to that photo.
The print on the product could be emphasized with that close-up shot to show more details. In that case, you need to choose some props that have the best match with the print from your main scene and put it right on the surface of the shirt. Close-up shots are a good option if you are going to do the preview on the main scene or if you are able to have the composition of different images of the same scene.

Each time you are shooting clothing flat lay, you may have different settings for your camera. But the most consistent image can be captured with fast shutter speed and lower ISO. Lower iso with unchanged focus provides crispness to your image
F-stop is responsible the most for accuracy, so set it high.
White balance depends on your lighting conditions and the color of the garment in your frame, thus you need to practice and adjust this setting to get the best results.
As for your photographic equipment, it is recommended to use a professional DSLR with a 50 mm lens. A tripod can also help you maintain your chosen angles for shooting, while you will bring your composition to the necessary condition before shooting.
Also, application of the ladder can be of good use in case you are going to do manual shooting from above w/o any tripod usage or other tricks. If you do manual shots, you need to arrange your settings considering new conditions. Set your shutter speed the way it doubles the focal length. If we use a 50 mm lens then the shutter speed has to be set at 1/100 of the second. Also, do not forget about your aperture setting that shall remain over f / 8 to establish consistency for depth of field. If we set the aperture differently the image you capture may have dark tints or bad focus on it.
When it comes down to editing, a good piece of advice would be to do your standard editing procedure and make sure to not overwhelm your image with tons of filters and effects. Color correction should keep the nature of your apparel and make it look as much the same on-screen as it is in real life. For instance, if you are shooting a teal shirt, don’t blast it with hue and saturation sliders in Photoshop and make it look like a purple shirt instead. Thus, no big deal with post-processing, just make sure to not do more than is needed. Simplicity makes perfect, it is better to focus on setting up your apparel and the scene the most, this will have a better effect on the outcome than anything else.
Co-founder of RetouchMe. In addition to business, he is passionate about travel photography and videography. His photos can be viewed on Instagram (over 1 million followers), and his films can be found on his YouTube channel.
Moreover, his profile is featured on the most popular and authoritative resource in the film industry — IMDb. He has received 51 international awards and 18 nominations at film festivals worldwide.


