


Eye Macro Photography
Sep 2, 2019
Many people have more followers online than friends in the real world. Everyone wants to have their own blog about fashion, healthy lifestyles, food, yoga and everything else, to have a large audience and make money from it. But even if you are a high-class specialist in your field and write interesting texts, your blog will not become popular until your useful texts are accompanied by beautiful photographs.
Pictures are of great importance on social networks, because people first look at a photo, and then read the text. It doesn’t matter if you write a review on fashionable dresses for the upcoming season or teach how to cook a duck, do reviews on cosmetics or workshops on making children's toys. Until your photos are boring and usual, there is no chance to get hundreds of thousands of subscribers.
In this article, we will tell you everything about flat lay photography, which will allow you to pump your blog in a quality manner and make it visually more attractive, which will guarantee new subscribers. You will learn what it is, understand the basic principles of composition and image editing, and get a dose of inspirational ideas for creating your best photos.
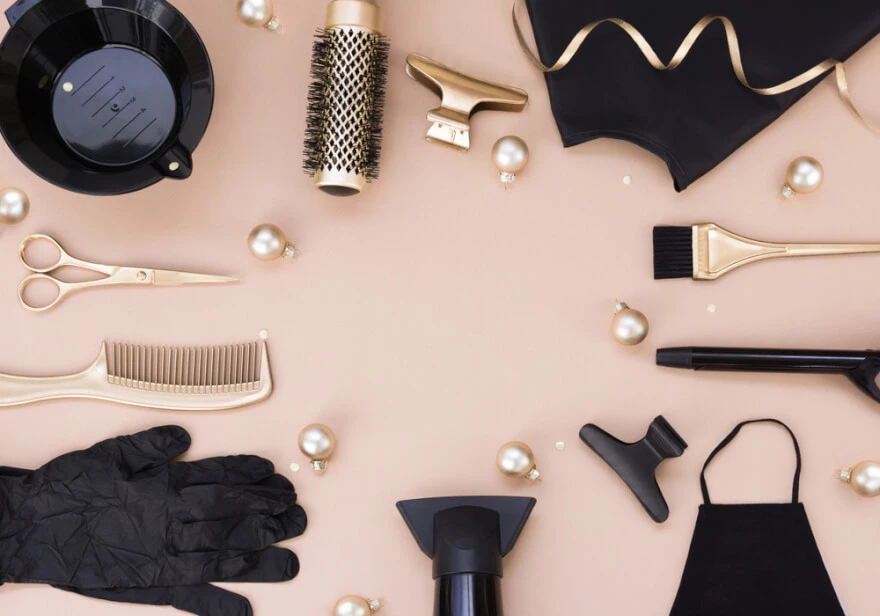
So, for starters, consider what is flat lay photography. It is a picture with objects located on a flat surface, captured directly from above. The golden ratio rule is the basis of such images. The main idea is to take a picture without any angle.
Although everything is simple at first glance, it’s not easy to do it because you are shooting a flat object on a table. And to show the depth of an image so that your photo tells the story, you will need to master lighting, composition, layers, colors, and texture. It is usual to find such images, which show beautiful things: fresh coffee with croissants, new clothes, fresh pastries, expensive perfumes, elegant jewelry, fresh flowers. Therefore, this style is often used to increase sales. Everything looks very attractive and the potential client wants to touch beautiful items.


The key to the correct photograph is an absolutely perfect surface of the background. Add depth and layers with the help of objects that you are going to photograph. Background, composition, light and other items are important factors but still without a perfectly smooth surface, you will not get a real flat lay photo.

When you decide on the subject of shooting and complete all preparations, you will need to get inspired to start shooting. We recommend looking for it on Instagram and Pinterest, these social networks are just made for visuals. Following the hashtag #flatlay there you can find photos for every taste: fashion, food, travel, hobbies, music. Find accounts that appeal to you and pay attention to their design, lighting, and fullness of a frame.
Now let's move on flat lay tips and ideas for creating the best solution with appropriate set up that will decorate your blog and demonstrate to subscribers unique style:
To get started, select the topic of your blog, it should be familiar to you and interesting. If you are really passionate about what you are talking about, it will be immediately visible to other people and your account will quickly gain popularity. For example, you love coffee very much. Delight subscribers every morning with new photos of your favorite drink and accompany them with motivating quotes or start a cosmetics blog to help with tips and tricks on how to choose the right skincare. Maybe you are fond of embroidery and will shoot how you create your work from beginning to end, or keep a blog about the everyday life of a mom and tell the whole truth about maternal everyday life.

Think over the style of a blog to the smallest detail so that it becomes recognizable by your audience. It can be a unique background, certain details in photographs, filters that you use, colors, locations or movements captured. Experiment first to find what you like and what you will enjoy working with and stick to this style in the future. Invest your knowledge, time and resources in finding yourself. For example, you can always add magazines to frame, or you love succulents and they will be in all your photos. Add the nose or paws of a beloved pet sometimes into the frame. These little things personalize every blog and people will recognize your photos at a glance.

The first rule is a flat surface where you place your objects. But for really beautiful photos you will need a beautifully textured background. It is best to choose a background of neutral pastel shades, white and beige are considered ideal. Excessive patterns, over-expressive textures, and vibrant colors should be avoided because instead of looking at the subject, people will look at patterns or will not be able to make out details due to a bright background. To find the background that suits you best you will need to try several different options. First, try capturing on a white background, and then replace it with a beautiful wooden floor or a surface of painted whiteboards and see how different the photo will look. A food blog is a classic example of shooting on the background of a table. Try to make a couple of photos on the background with flour or cinnamon, this will add texture to the frame.

If you have a special lamp with soft lights, even the simplest one, then you can get high-quality pictures anywhere at any time. If you rely only on natural light, then you will have to try to shoot in different places until you find a place with perfect light, for example at the kitchen window or on the balcony. Remember that lighting will vary depending on the time of day and weather, and good light will need to be literally caught. Natural light will best emphasize the beauty of your photos if it is not the scorching sun on a hot afternoon.

The second rule is to take pictures at an angle of 90 degrees. When you decide on a place with the best lighting, you will need to take care of a place from which you shoot. You may need stairs, tripods or a selfie stick. If your objects are laid out on the floor, it will be quite simple to stand above them and take a few frames. But if the subject is located on a table, then you can’t do without chairs or stairs, unless you can climb onto a table yourself.

A competent composition is key to a good photo. Arrange objects evenly, keep symmetry and leave enough space between them. There are several compositional techniques in photography; the most popular are the “rule of thirds” and the “rule of the golden triangle”. The “rule of thirds” means dividing the frame into three equal parts horizontally and vertically. It is based on a fact that objects located at the intersection of lines correspond to the best visual perception. The significantly important subject should be located either along lines or at intersection points of these lines. Enable such a grid in settings of your camera, which will allow seeing how to properly position objects in a frame. The Golden Triangle Rule is based on the golden ratio theory. It is very similar to the rule of thirds but complicates the principle of placing objects in a frame. The frame is divided diagonally from one corner to another from the remaining lower corner, a line should be drawn that will intersect the diagonal at an angle of 90 degrees, the same should be done with another angle. In the area of intersection of short segments, the most interesting part of the frame is located where you want to place the focus point. It is not necessary that all objects fall into the frame as a whole. Take pictures more and more often and over time you will develop a sense of composition without any auxiliary means.

Create composition, but remember not to overdo it and not pile up objects otherwise the pic will not have a layout, but a bunch of unnecessary things. Do not go extreme: minimalism in a frame is good, but a photograph of a lonely cup is not among the best flat lay ideas. Maintain balance, if you are in doubt whether your frame is set correctly. Try to remove or add a couple of objects. The photo should look harmonious and integral. Combine opposites: soft and hard, sharp and solid, square and round. The ability to combine even inappropriate things creating a tandem of meaning and aesthetics is your guarantee of success.
Decide on focus point: what is the main subject in a frame, what is your story. Next, place additional elements around it that emphasize its importance. Correct focus does not mean that the main subject should be strictly in the center of a frame, surrounded by additional elements. Make sure that the focusing object is what catches the eye first, make sure that it is adequately and correctly lit. One of the main ways to highlight the focus point in flat lay is with a contrasting color combination. When different colors combine and reinforce each other, you will get a bright, bold frame. Experiment, don't be afraid to shift the center of a composition. This will only benefit the result.

Nothing spoils the frame like colors that do not look harmonious with each other. Think over the color scheme, and already select suitable objects for it. Monochrome photographs, when all shades are derived from the same color, will give a sense of unity and style. Contrasting, colorful photos will look bolder. When you choose objects for composition, be sure to pay attention to whether they are combined in color. Remember that cold colors always go well only with cold colors, and warm colors with warm. Warm colors look more appetizing, keep this in mind when choosing a color scheme for your food blog.
Sometimes you need to show how this or that thing looks on a person, we do not urge you to add a flat lay of a person, this will be a completely different photo. Taking a photo when both your hands are involved in a composition of your frame is quite difficult, so we will need a “second pilot”. If you capture jewelry, a photograph of a bracelet on a thin wrist of a friend will look better than just a bracelet. A rather popular phenomenon is adding hands for photos in the style of a workshop, when there are elements of your desktop.

Composition does not have to occupy the entire frame, you need to leave free space so that the image is easy to watch. Try to make the free space work for you, and you will see that sometimes less is better. Position objects so that they go beyond limits of a picture, and only parts of some objects fall into the frame. This will create intrigue and use the imagination of a viewer. Make an impression that he is seeing a fragment of a large scene. When you capture Christmas cookies, add a spruce branch with garlands, an orange and a couple of toys. Not all elements will be visible and imagination will draw beautiful fluffy spruce next to your cookies.
If you have flowers or indoor plants, then they are ideal for shooting, because they add depth and texture to pictures. These can be small plants: miniature bonsai and succulents are ideal. Larger plants will add depth to the frame because their top will be out of focus. Use both live and dried flowers, which will look equally good, flowers in pots are no less photogenic. Do not use cheap artificial flowers; buy poinsettia in a decor store to create the most beautiful Christmas images.

Props and accessories for creating compositions are important because they help to solve problems such as balance, associate a composition by color or create contrast, and make the frame consistent with trends. Anything can become a prop, any item that is at your fingertips: magazines, newspapers, old kitchen boards, vintage posters, old faded cards, jewelry. If you are blogging on an ongoing basis, then you will need a lot of decors so that you can periodically change it. Choose objects of different sizes and shapes to create visual interest. Also, details should be in a different color palette to help you coordinate color composition. The main task of decor is to give your photos a holistic look.
You can post a picture on Instagram right after the shooting, but if you spend a little time editing, you can surprise subscribers with a better picture. Therefore, the last step in creating perfect photos is editing. Depending on your preferences, editorial skills, and capabilities, you can edit your pictures on a computer or directly on the phone. Adjust brightness, contrast, glare, shadows, and shading until you get balanced lighting. Remove minor flaws: excess crumbs on the table, a piece of wire that accidentally gets into the frame, erase a speck from the tablecloth, reduce sharpness, so that the photo looks more realistic. Maybe some elements are missing: draw a flat lay background that ends earlier than necessary, add lights or a garland for beauty. Choose an editing method that is convenient for you. Instagram users prefer to process photos through several applications, thus creating a single visual style is an important component of a successful Instagram profile. The easiest way to create a single processing style is to select one filter or a set of filters and apply it to all pictures at the end. Increase the recognition of your profile.

With this knowledge, capture the best pics and constantly improve your skills. Making images in a similar style, you will certainly get a lot of fans. Experiment, try, be inspired and create.
Co-founder of RetouchMe. In addition to business, he is passionate about travel photography and videography. His photos can be viewed on Instagram (over 1 million followers), and his films can be found on his YouTube channel.
Moreover, his profile is featured on the most popular and authoritative resource in the film industry — IMDb. He has received 51 international awards and 18 nominations at film festivals worldwide.


