


Light and Shadow Photography Ideas
Nov 5, 2019
In the last couple of years, the world of photography was full of new words and meanings. So such term as “bokeh” has become so popular that even smartphones have such a filter.
The term itself has Japanese origin and is translated as “blur”, which means that part of the picture was not included into the zone of sharpness. Bokeh is beautiful effect of a soft defocused background, which you get when shooting with a fast lens on a maximum open aperture. In other words, bokeh background is intentionally blurred, which is used to achieve an artistic result with an extraordinary plot.
Some experts may be sure that it is the same as soft focus, when edges still remain in sharp focus. Bokeh technique is supposed to divide the image in parts in order to make intentional blurring to only one element. It can take a variety of forms: from pentagons to blurry circles. This technique is very characteristic, but the shape and size of visible parts depends on the lens.

When using manual focus mode, you start to turn the focus ring out of focus and the object becomes blurry. The most common technique used to add such an effect is the shallow depth of field, which is created through a wide-open aperture.
Ideal from an engineering point of view, the lens focuses the light from a point source in the form of a regular cone. When the top of the cone touches the plane of the camera’s matrix, the image is in focus and an extremely small point is obtained in the photo. The better the lens, the smaller this point and the sharper the image. If the source is out of focus, then the cone of light intersects with a matrix and the point in the photo turns into a disk called a circle of confusion. With a fairly large size of the circles of confusion, they begin to have a significant impact on the aesthetic perception of photography as a whole.

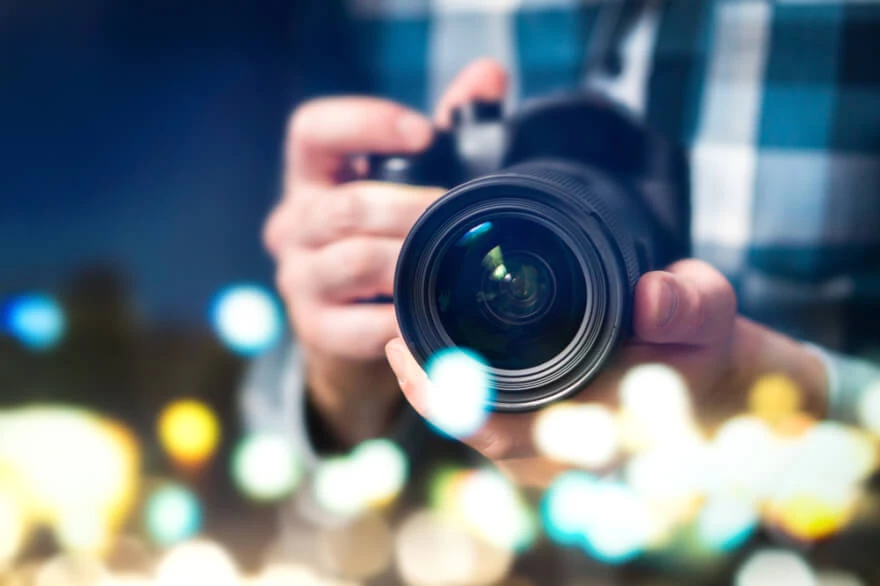
It is great for portraits. And the best option to use such effect for especially good in close-up portraits. Typically, close-up images and macro shots of flowers and other objects of nature are used to demonstrate this effect. If you intentionally shoot holiday lights or other light sources so that they are outside the focus area, they will turn into blurry, shining circles in the image.

A wide-open aperture creates a shorter depth of field, background is blurry and almost unrecognizable, that is why it is called "good" bokeh photography. The key to "good" option is using a fast lens with the widest aperture. The term “bad” is applied to photos, where background is not blurred enough and distracts the viewer from the subject in the foreground. But there is no clear distinction between “good” and “bad”, since the perception of photographs is different for everyone and opinions are always subjective.

Creativity. Before getting into technical aspects and rules with number of complex accessories, let us firstly tell you about nice and funny way to create various aperture shapes. Have you ever admired the stunning blurring in the form of fir trees, hearts and other unusual shapes? The secret is simple and nice, which can be made by your own hands, using only a cardboard, camera with a more or less fast kit lens, pencil, scissors and tape. With a pencil, circle the lens of your camera along the edge. Surely you will get an even circle of the required diameter. You can also add small “ears” in order to fix the structure to the lens later. Strictly in the center, draw what you want to see in the picture instead of circles. The only difficulty is that for different lenses and focal lengths you have to make a cut of a certain size. If you make the figure too wide, you will not see the result at all. If, on the contrary, the cut is not wide enough, you get the effect vignetting on edges.

Lens. Some lenses provide a more pleasant background outside the focus areas than others. Good blurring is especially important for portrait lenses and macro lenses because they usually use a shallow depth of field. Set the value to f / 1.4 and you get a very blurry background, but the subject in the foreground will remain very clear. The ability to set such a depth of field directly depends on your lens, and if this value is not available, simply select the minimum value available. You should work with preset lens of 35mm-55mm to get enough possibilities to achieve great result.

Diaphragm. You need to take pictures with the lens aperture wide open, so it is preferable to use aperture priority or fully manual shooting mode. Manual shooting allows you to choose aperture and shutter speed. In the aperture priority mode, you can set its value, and camera will select the shutter speed for the correct exposure. You can also choose a flexible program mode that helps you find the combination of the largest aperture and shutter speed. By controlling these details, you get the focal length and focus. The value ranges from f / 2.8 at the widest point and up to f / 22 at the deepest. If we use the value f / 2.8, we get a very shallow depth of field, the f / 22 value, on the contrary, will show every detail in focus. Depth of field is how much of our scene or object is in frame and what will be exposed in the image. The wider the aperture, the more blur the background will be in the image. If your camera’s capabilities are limited, don’t worry, you can also get necessary result by increasing the distance between the subject and its background.

Distance. To make the above mentioned effect noticeable on the photo, use the algorithm of increasing the distance between the model and its background. To do this, you can bring the camera closer to the subject. The smaller the depth of sharply depicted space or the more distant its background, the less focused it will be. Bright spots or light sources will help you get a more noticeable effect in the picture. It will look more attractive if you use lighting from the back or side. Keep in mind, that talking about right distance, we mean distance from the camera to your subject, not subject to background. Finding right bokeh photo effects is a search of balance between aperture and distance.

Lighting. The most important and very first rule of any photo is a good proper lighting. Every single tutorial on this art will emphasize its importance. Blurring is known as a tool which softens a brightly lit image. If you use this effect to highlight an object, then even a not very attractive background is suitable for shooting. Due to the blurriness of the background, all attention will be focused on the subject. If shooting conditions allow you to adjust the light, you can experiment with opening the aperture and choose the option that is most suitable for you. If you shoot outdoors, for example in the garden, the light will break through the leaves and you will get a perfect smooth blur. If these are colorful Christmas lights, then the result will also be amazing, when you decide to capture your pictures at night. The light source should not be behind the object, it is better if it is incident light, or penetrating through a well-lit scene. Try different types and choose one that is ideal for you. Do not forget about the golden hour when the sun is very low in the sky and there are more shadows that will be useful to you in the frame. This balance between light and dark creates a nice contrast for the bright parts of the photo that shine through the blur. By combining a good lens, a properly set aperture, the right distance to the subject, and the right lighting, you already increase your chances of getting great shots.

1. Think about the future frame. You need to find an object for shooting that will satisfy all the need for a perfect shot: it must be close to the camera, the background must be correct to ensure the right effect, the distance from the object to the background should be large, you also need to pay attention to lighting of your future shooting location. Firstly, you need to find an object that will be easy to capture into the lens at close or short focus. The camera should be close to the subject, and the distance from your subject to horizon should be much larger. This emphasizes blurring, creating more visible effect. You need to pay attention to the light, this will allow you to focus on points of light behind and create a blur, which is so typical for these images.
2. Define your object. After you determine the suitable subject for shooting, you need to place the camera on a tripod and use settings to manually set the subject to sharp focus. The next step is to slightly defocus the color so that the background is completely blurry, but the subject itself is still a recognizable element.
3. Think more about foreground. It is sometimes obvious to think of blurring the background, but what if the foreground has to be edited as well. It can be absolutely stunning to use addition light points in front of the model to blur the image. Usually night time pictures permit to use string lights. Do not be lazy and look for great options and patterns to fill the frame. A good help can be obtained from reflective surfaces. Because windows are able to create good foreground blur. Such light spots enter in the frame to fill the space in front of your model. It is better to experiment with different angles, because not all reflection can assist, but sometimes can destroy a great shot. You can accidentally make a picture with a reflection of yourself in a mirror or window glass.mistake will request more post-processing work and time. Many experts for this reason are used to apply various tools to avoid such unwanted reflections. Step away from the window and continue moving until you will not be able to see yourself in the frame any more. It will mean that the best position for blurring effect is found.
4. Make exposure settings for the image, such as shutter speed, aperture, and ISO. Settings will depend on the light and distance to the subject. If the shooting location is well lit, then you can start with ISO 100 at f / 2.8 aperture, and try to decrease or increase the values, depending on the first results. ISO settings should be no higher than 400, so that the extra grain does not spoil your photos. But one should not forget that a high ISO and a wide aperture can also cause digital noise.
5. Take a picture. Your camera should be close to the subject, and the distance from the subject to horizon has to be larger. A wide open aperture will create an even shorter depth of field, and a background that is already blurred will become even more unrecognizable and dotted with bright points of light.

Even if you do everything right, and the result corresponds to your expectations, here are some tips to consider and problems to solve:
- image is too dark. When you change the aperture settings to get the right effect, do not forget to set the other bokeh lights background correctly. If the images are still dark, increase the ISO to 200.
- background is not blurry enough. This is a consequence of incorrect aperture setting, you need to shoot at f /2.8 or lower. If your camera’s settings do not allow you to shoot with these settings, then set aperture to the lowest value and move closer to subject.
- lights in the background appear and disappear. This happens when you take a picture of light bulbs. Therefore, you need to set the shutter speed to less than 1/60 of a second and capture the frame again.

When the shooting is over, photos are already on the memory card, but there is something to edit still to get full happiness, then there are pro editing app at your disposal - RetouchMe. Professional software is created to ease your life and learn important tools for future. Most editors will apply all needed tools only after your request, without making you learn basic rules of Photoshop.
If you prefer to take pictures with iphone or another mobile digital device with built in camera, then you will need a compact smartphone with two cameras or you can get desired effect using photo editing programs. Usually application provide great number of vectors to apply to every single portrait. You can play with your models and subjects any time of the day and night. Just choose necessary template on your pc and find out real definition of what is bokeh in photography. Sometimes even unbelievable 3D surfaces can become a right sample to work with to create your own meaning of the image.

There are different criteria for determining the quality, but still there is a very personal perception. One person may like this effect in a photograph, while another will not like this pattern at all. The pattern itself directly depends on optical scheme of the lens. It is obvious that pixels always make the difference so keep it around 1080p to be sure that you will create necessary effect. High resolution of 4k will permit to create marvelous wallpapers and ideas for magic picture gallery.
The best tip to remember is to enjoy the general process, because there is nothing so exciting and interesting as feeling yourself an artist. You are free to discover new horizons of photography and to decide own rules. Art is limited only by imagination and way of thinking. Open your mind and let the creativity explode in your pictures to become a significant contribution to development of photo industry.
He started his career as a professional photo designer and retoucher. Professional commercial photographer with 20 years of experience. He is a leading advertising photographer and has worked as a food photographer with Michelin-starred chefs. His work with models can be seen on the calendars of many leading companies in Ukraine. He was the owner of the photo studio and photo school "Happy Duck".