


Best ways how to improve photography skills
Dec 3, 2018

Talking about vanishing points in photography it is better to start with the definition of a perspective, which is a powerful tool in presenting frames. This option relates to rendering distance and depth in a 2D environment. Perspective refers to manipulating the viewer's perception of the three-dimensionality of images.
This is a great tool when you want to make a subject in the center of the frame stand out, which is especially useful in architectural photography. The reason for this is the geometric shapes and lines present in this niche. The next most useful and beginner-friendly rule of composition, which immediately follows the rule of thirds, is linear perspective.

Such perspective begins by defining the horizon line. This line is theoretically the line that separates the sky from the ground. However, in many photographs using perspective, this line is only implied and is instead just the viewer's line of eyes or "line of sight".
After the horizon line is set, vanishing points are placed in the frame. So the vanishing point definition is the point on the horizon where objects begin to disappear due to distance. For example, usually the vanishing point is where the road's visibility ends.

It is enough to tilt your camera when taking pictures, thus adding a diagonal framing. Just take and rotate linear perspective, bringing it to the frame's diagonals. Some photographers can argue for a long time about the justification of this tilt, from the point of view of its possibility, but no one can say that this tilt spoiled the picture. Diagonal composition of the frame works great in many cases. And it definitely makes sense to turn the camera when shooting to check the diagonal alignment.

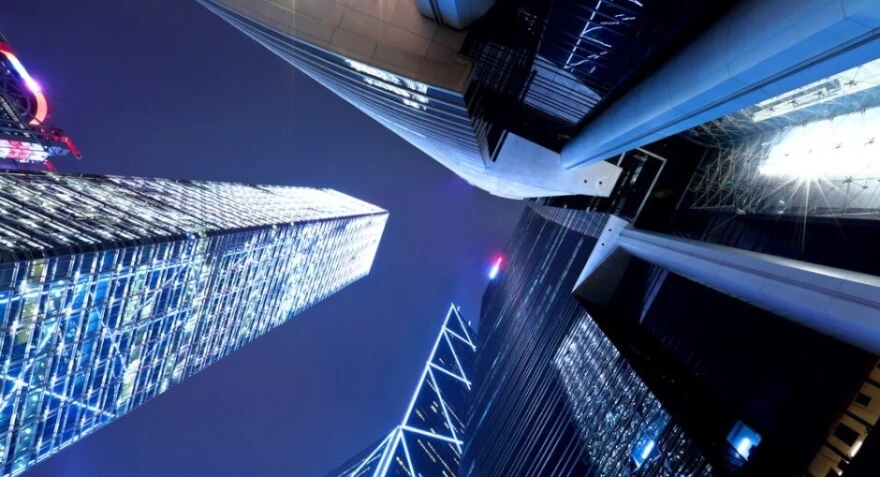
Usually in such photography two vanishing points are placed on the horizon. These two points must be spaced apart to prevent distortion. Both vanishing points do not have to be within the image plane as long as they are on the horizon that extends beyond the image plane in both directions.
By using a single perspective point in a composition, the vanishing point grabs the viewer's attention. And vice versa, the two vanishing points "hug" the main subject of the picture. Two-point perspective means that there are two vanishing points on the horizon line.
Lines from the dots indicate what to look for. Guides can help the viewer's gaze move from one part of the image to another. This creates movement in the photo and makes it more interesting for viewers. This kind of perspective, when used correctly, gives photographs a unique and monumental look. It focuses in the middle of the image, creating a sense of depth using leading lines.

This is one of the easiest and best ways to use depth in your shot. Find a place with repeating objects, such as a row of trees, lampposts, or a wall receding into the distance, and remove these repetitions.
To the best play out this scene, get very close to the first object in the line so that it looks very large in the frame. This will give the impression of significantly reducing the size of the repeating objects, so that the last object will appear insignificant compared to the first.
Anyone can create a great picture with vanishing points: you need to have two starting points on the horizon. Always ask yourself, where is the attention directed.
In order not to delve into the physics of this wonderful compositional rule, you will need to remember only two of its fundamental conclusions:

All we need is to find the lines that go away from us into the distance and into the frame. In reality, lines are usually parallel to each other and do not converge. But, due to the peculiarities of our vision, it seems to us that these lines tend to converge somewhere at one point. Notice how the deeper guide lines create and emphasize the perspective and depth of the overall image. This is the magic of linear perspective.
All parallel lines are enough to easily form a three-dimensional and compositionally interesting frame. But, for all its volume, linear perspective has one significant drawback. It is not a particularly dynamic composition, unless there are objects on it that move explicitly, such as cars or people.

You can create this style in any type of vanishing point photography. Although it will be especially useful in architectural images. You might want to highlight a specific building using two vanishing points on its side. Architectural photography is the best niche for experimenting with crisp lines and shapes. Lines also allow you to experiment with the placement of vanishing points.

1. Find a suitable location.
The correct positioning for such is critical. You need to find a spot where straight lines lead to your subject. Unlike a one-point perspective, they should lead outward, not inward. These lines usually start from the horizon line. Photographers recommend choosing a rectangular building as your subject as your first try. Due to its shape, such a building is ideal for photographs from a two-point perspective.
2. Find the location where you will take the photo.

Choosing where you will stand with your camera is always an important decision for a photographer. And even more important when creating a two vanishing points photo.
You need to stand in a place where the object will be in the middle, and the lines will lead to it. Buildings are the easiest subject for two-point perspective photographs. If you are photographing architecture, stand at the corner of a building. From there it is easy to compose the picture that is referred to in the next step.
3. Compose the shot.

Once you're in front of your subject, it's time to think about how you will compose the photo. Central composition is an eternally controversial topic among photographers. But it's a different story when it comes to a vanishing point element. This is where it is usually useful to center the subject. After all, this type of shooting is used to draw attention to what is in the center of the image. This is especially true for architectural photographs. Here the corner of the building should be at eye level and in the center of the frame. The two vanishing points should be either on the horizon line or in the corner of the future image. You can change the location of the vanishing points while editing. If you prefer to have them in the corners, you can crop the photo in post-processing. However, it is still not recommended cropping too much, as this will reduce the image resolution.
There is one very simple trick to find out if you put together a photo well or not. Take a look at your picture. Can you identify two vanishing points? If yes, then you have successfully used the rule of two vanishing points.

You can easily make a linear composition dynamic without tilting the shot. It is enough to place the vanishing point on the left or right side of the center of the frame. In the first case, the gaze leaves the frame, which is perceived as movement in the frame; in the second case, the movement returns to the viewer. A compositional construction is not limited to the frames, but goes beyond them. The open composition is additionally supported by the rhythm of the elements in the frame, which creates the overall content and plot of every photo. Open framing provides dynamism and movement. You should know, open composition is not limited to just guidelines, but works great in any other genre of photography, for example, in portrait photography. Linear perspective has another big plus, which is that it can easily be used as a basis for other compositional decisions. That is, linear perspective can be easily supplemented with the rule of thirds, symmetry, center placement, or tonal perspective.
Tonal perspective remarkably enhances the depth and volume of linear perspective. And if you have even the slightest opportunity to combine them in one shot, then never neglect this chance. You will get just an incredible picture.
The longer the focal length of the lens, the more the background of the picture will be pressed to the front, which will lead to some loss of volume and depth of perception, which will contradict the very essence of linear perspective. And, therefore, for better rendering of linear perspective, it is worth using a hyperfocal len camera or shooting at open apertures to blur the background more and separate it from the foreground.

There are many ways to incorporate and enhance the perspective effect in our work, using vanishing points. There are a number of basic visual and compositional techniques that are easy to master and understand.
Focus on developing your photographic vision, keeping perspective and depth in mind as you shoot. It is necessary that you understand the basic principles and techniques in order to be able to fully understand the importance of these components. To amplify their impact, you need to internalize them and incorporate them into your photographic understanding so that the next time you shoot, your eyes will automatically grasp the possibilities of using perspective in the frame. Learn to use your eyes effectively, perceive the space, details and nuances located in it, and notice what is happening around.

This technique consists of using lines in an image to create a sense of depth. The best way to apply it is to find two lines converging in the distance, such as railroad tracks and photograph these lines.
They will look like they are gradually getting closer to each other in the frame, as if the distance between them is getting smaller, which will not only add a sense of depth, but will also guide the eye through the image. To maximize this effect, try shooting from a low point, so that the lines appear to be very far apart at first, and then converge to a vanishing point. In this case, you really get the maximum view of the converging lines.

One of the best ways to shape perspective in a shot is to scale by comparing the size of objects in the image. As photographers, we can make sure there are recognizable objects in the frame to help the viewer judge the scale in the frame.
For example, all people are about the same size, varying a few centimeters, and therefore, if you include a person in a frame with a mountain landscape, the viewer will be able to match the two objects and estimate the size of the mountain. Likewise, you can use trees, animals, cars, or any other object of approximately standard and commonly known size.
You can use less from technique and more from observation. When working depth is perceived by the eye through distance, which is not an option in 2D photography, you can use layers in a scene to convey depth by emphasizing that one object is closer to the camera than others.
You will also notice that the different layers in the frame will have different shades, which again will increase the sense of depth. This is especially important in the case of landscape photography. You want to capture the stunning beauty of the scene in front of you without making it look flat and lifeless. By including layers and an interesting subject in the foreground, you can capture the scene correctly and convey its magic!

Along with all the compositional techniques to help you maximize the impact of perspective and depth in your shots, you can also improve your performance by choosing specific equipment. Using special lenses will significantly affect the perception of depth in an image.
Wide-angle lenses will enhance the perception of depth by making objects stand out and therefore appear to be in the foreground. A telephoto lens that is zoomed in will reverse the impression by compressing perspective, reducing the sense of depth, and flattening objects in the image. So choose your tool wisely depending on the type of work you are doing.

Changing the depth of field through varying apertures is a great way to highlight one aspect of the image to showcase its part in an evolving sequence and show its depth in the frame. Try opening the aperture down and focus only on a specific subject. This will blur the adjacent and distant areas of the frame, giving depth to the focal point.
If you are confident that the composition of the photo will provide depth by itself, set the aperture to f / 22 to ensure that the entire frame is in focus, which will showcase the length and depth in the image.

It's amazing how many photographers shoot at eye level, or at the maximum height of their tripod. If this is about you, you are missing out on a lot! Try to change something a little. Drop, get high from above and use your legs! The perspective of the scene in front of you can change a lot if you move the shooting point a couple of steps to the right or left, so at the location you should not just choose one specific place and stick to it, explore the surrounding space and try to find the best vantage point for your shot.

An alternative to all of these techniques and tips for enhancing depth is to experiment with completely removing the sense of depth or scale from the frame, almost to the point that the viewer cannot understand the scale of the image. You can try to create almost abstract images that are not connected by any converging or guiding lines, have few layers and do not include the aspect of reducing objects. That way, your image will look very flat, but that doesn't mean it won't be fun or exciting, you just need to get creative.

Now it's time for you to take a step. Make sure you understand these tips and techniques. The next time you go for a walk with your camera, you can experiment with enhancing perspective and depth in your shooting. Using these tips effectively will help create vibrant images, and remember that practice is the path to professional approach. Practice and develop your technique and when you find yourself in a new location, you will be able to put these rules into practice more effectively.
Co-founder of RetouchMe. In addition to business, he is passionate about travel photography and videography. His photos can be viewed on Instagram (over 1 million followers), and his films can be found on his YouTube channel.
Moreover, his profile is featured on the most popular and authoritative resource in the film industry — IMDb. He has received 51 international awards and 18 nominations at film festivals worldwide.


