


Neon photography: the ultimate guide
Mar 3, 2020
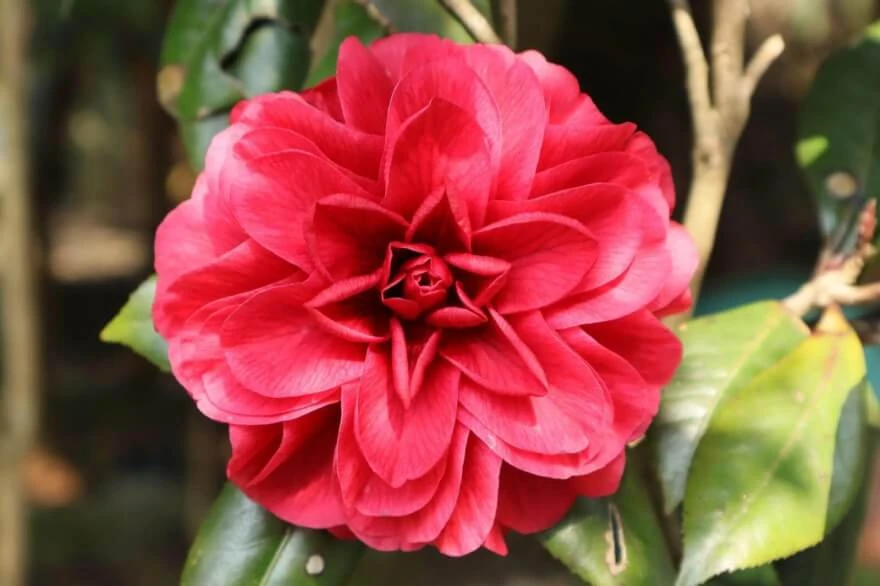
There is a saying that children are the flowers of life, but what makes for such a flower's allure? Plants are all around us and when we go out in nature, surrounded by flowers, trees, and plants we may not see the beauty in the details, which becomes more obvious if we are armed with a camera and the right equipment for it. Today we are going to get outside and photograph some flowers in the wild to capture the intricate details and vibrant colors of nature. There are all kinds of colorful flower species you can find that makes for simple and complex subjects. We are going to cover what gear you will need, how to compose a shot and give you basic and advanced flower photography tips and techniques for creating compelling flower photographs

Gear is an important factor when going out to photograph flowers. Depending on the types of shots you are looking for a macro lens would be your best bet for close-ups. It is great for capturing small fine details while doing macro flower photography. But you can also use 50 mm, 85 mm, or even telephoto lenses to shoot flowers.

Prime lenses tend to be faster and allow for a shallower depth of field. Depending on your desired outcome a shallow depth of field can really make your subject pop out from an out-of-focus background.

Additionally, you should have a tripod on hand to minimize camera shake as we are doing shallow depth of field, so we do not want the plane of focus to go somewhere else and lose crucial details with that. Make sure to turn off any stabilization your lens or camera might have when using a tripod.

When scouting out for a subject to photograph try looking for a flower or a group of flowers that have interesting lines, unique colors, and fine details that you can capture in close-up shots. You can photograph any flower you would like but try to find something interesting and different.

Make sure that there is contrast between your subject and the Background. If you are photographing a flower that matches the background color, then it won’t stand out even with a nice bokeh. You can also create your own background by placing something behind the flower. You can use some small pieces of black foam board of a color that contrasts the best with the flower to make it stand out. Dropping it behind the flower eliminates a busy background and makes the colors in the flower really pop. It instantly creates contrast and draws all the attention to flower details.
From there you will have to decide how much of the flower and background you want in focus. For that, you adjust your aperture settings to make it close or wider.
A lousy background can ruin an image and needs to be taken into consideration for every photo. As we already said, the aperture is your main tool to adjust the background. The lower the number the more shallow the depth of field is going to be.

The camera lens is made on the principle of the human eye’s pupil. The aperture in your camera lenses is used as the iris and the hole in the middle acts as a pupil that either contracts allowing less light to go through or becomes larger and allows more light to get in. Accordingly, the aperture of your camera can change the depth of field by analogy. When we look up close, our pupil is wide, when we are looking in distance it becomes smaller. The higher the aperture value the more closed it is, the lower the number, the more open it will be. This is quite counterintuitive because it does not take into account the division icon presented by the values of F/1.4 or F/22 for example. So at F/22, we get a narrower slit in the center of the aperture, while at F/1.4 it will be wide open. This also affects what the focus will be. The more closed the aperture is (F/22) the wider the focus, i.e., we will see both the background and foreground in focus. If we use values of F1/4-F/2.8, we can isolate the foreground from the background and create the so-called bokeh effect. This method is widely used in various types of photography and is also well applicable to color photography.

Try different angles, look for symmetry and for compositional elements, and how they interact with the subject. The rule of thirds is a great way to properly compose the subject in the frame. In essence, it is a grid overlaid on the frame consisting of two vertical and two horizontal lines forming nine equal sections in the frame. The intersections of the lines are power points where it is best to place the subject in the frame. The rule of thirds is a simplified model of the rule of the golden symmetry rule, which just converges in these very intersections of the rule of thirds lines. Just by nature, our eye is more pleasant to look at photos that are composed according to these rules, even as these rules obey our universe. 
Flowers themselves grow according to the principle of the golden rule, in the same way, galaxies are formed according to the principle of radial symmetry. So placing them on the lines’ intersection of the rule of thirds is essential. The rule of thirds allows the frame to have negative space that conveys that there is also something else that exists around the subject.

The rules of symmetry are not that complicated as explained by the golden rule or the rule of thirds. You can find symmetry everywhere as the term talks for itself. For instance, you can see it in reflections or in repetitive shapes. The water glare is the best reflector and lotus is the best subject to photograph on water. Doing lotus flower photography set on the water surface angle your camera the way you reach the reflection in the frame perfectly. Do not forget to place the flower in lines intersection of the rule of thirds to enhance the compositional effect!

If the flower is in direct sunlight you may end up with some harsh shadows. Look for ways to diffuse the sunlight, whether that is using a reflector or just standing between the sun and the flower. This will disperse light evenly over the flower and eliminate harsh shadows. Ideally, you want to keep your ISO low and around the 100 range if you can.
For additional control over the lighting on your subject and background, you can employ a flash or strobe light. Use a diffused modifier to soften up the light and direct it at the flower, so it is lighting up the area that needs the most light. Try to avoid coming from directly in front, since that will make the flower appear flat. Instead, try lighting from the sides, above, and even behind to get some contrast in your subject and give it more volume in the image. Using a flash is a good way to control your background brightness as well. Since a flash is so fast you can increase your shutter speed to darken a background without affecting the light on your subject. This gives you the latitude to fine-tune just how much brightness you want in your backgrounds.
If you are shooting micro details, bring a small spritz bottle and add some fresh dew to a flower. These water drops will make your flower pop in the frame especially using a macro lens. A small detail but so good to prepare your subject to shine!
The other way to diversify your photoshoot is to do black and white flower photography. Black and white photography carries a special mood and can evoke different emotions from nostalgia to sadness and longing. Some black and white photos are able to convey emotions as color images cannot. We remove all unnecessary things and leave only the essence cutting off all distractions such as color and leaving only the contrasts to speak. The black-and-white shooting of flowers in the same macro mode will allow you to emphasize the very contrasts and highlight the details that were previously blurred in the colors.

To do this, we need to shoot in a monochromatic mode of the camera. Set the ISO to 200 and choose Monotone or Monochrome in Picture Mode. It is also recommended to set the sharpness to +2 for better contrasts, as well as the contrast setting itself which should be also set to +2. In the same menu, you are going to find a black-and-white filter that allows certain colors to look different in B&W images. Thus, we pick green color there, and it will make other colors appear darker. You can also experiment with this setting for different colors depending on what flowers you shoot and the colors that prevail. An additional setting presented by the FN2 button is the highlights and shadows adjustment. Decrease shadows and increase highlights to make the curve appear wide S on the graphic. Use a shutter speed of 250 and an aperture of 2.8 to 5.6. These settings will underexpose the shot which is good for B&W contrasts that will be presented with a negative -EV value on the screen. You can also isolate all ambient light to use only flash. For that, we need to underexpose the shot up to minus 3.0 EV value by closing the aperture down to F/14, so that less light goes through. If done correctly, you will see nothing after taking the shot. Now, put the flash as close as possible to the flower without it getting into the frame, that way it won't cast harsh shadows as the angle of attack is narrow. Try to experiment with flash from different angles and see how it goes. With that, you should get interesting pictures with isolated ambient light and off the background.

Experiment with different colors, and black and white filter settings. Have a Sunflower photoshoot in black and white, your imagination is the only limit here.

If macro photography is not the only way you want to have your flowers captured, and you are more into open landscapes, you may want to shoot the whole flower field from various distances. For that, we recommend visiting Carlsbad flower fields. It is situated between Los Angeles and San Diego right off the freeway of Palomar Airport and the exact address is 5704 Paseo Del Norte, Carlsbad, CA 92008. Here you will find a mind-boggling array of floral palettes on a grand scale. Visited by 150,000 people every year, this place is not only great for summer vacations but also great for photographing flowers and flower fields in Carlsbad. The fields are usually open starting in March and close by mid-May. It costs about $25 for a half hour of photography. You need to reserve a ticket for the time slot you purchased. Fields are available to shoot from 9 AM to 6 PM daily.

If you want to shoot landscapes, you will also need to change your lens to a wider lens and change the aperture to F/14-F/22 to make everything stay in focus. Find a good angle to capture a whole palette of flower fields and maybe do some close-ups of interesting flowers if you bring a macro lens with you.

Co-founder of RetouchMe. In addition to business, he is passionate about travel photography and videography. His photos can be viewed on Instagram (over 1 million followers), and his films can be found on his YouTube channel.
Moreover, his profile is featured on the most popular and authoritative resource in the film industry — IMDb. He has received 51 international awards and 18 nominations at film festivals worldwide.