


Abstract Photography for Beginners
Sep 23, 2019
The vast expanses beyond our planet called space have always beckoned us with their immensity of unexplored. Astrologists armed with telescopes and еру people who chose space exploration as their profession used to be the only ones who could afford to look into the depths of space from the front rows. In the era of advanced technology, an average person now has the opportunity to participate in the development of celestial bodies. In this article, we will tell you how to become one of them, as well as share the best DSLR cameras for astrophotography that are suitable for exploring the wonders of deep space!

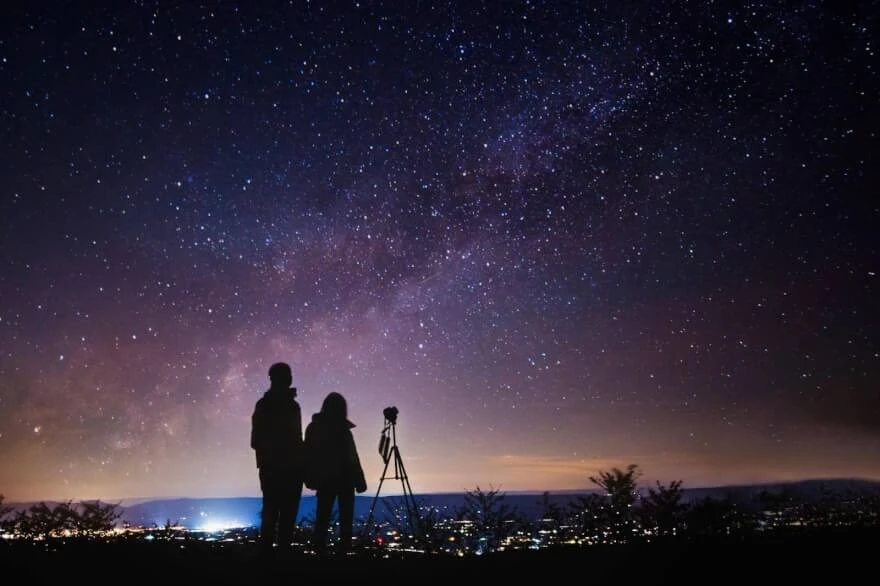
There are many genres of photography, including street photography, portrait, fashion, macro, and landscape, the list is endless. Astrophotography is one of these genres and until recently it has been an obscure one as one being captivating and challenging at the same time. Strictly defined it is the term for photography of astronomical objects and appearances, like planets, nebulae, galaxies, and other space objects. Primarily confined to the Astronomy community in the past when most people think of Astrophotography they think of giant expensive telescope setups with computers guiding systems and hours and hours of exposure time. And it makes sense for them to think that because for a long time, this was the only way to capture images of our galaxy and other deep night sky photography objects. But now, Astrophotography is more accessible than ever. The technology has advanced, the equipment is cheaper, and the community has grown. All you need to get started is a decent digital camera with a manual setting and a tripod. With the right exposure settings, gear, and post-processing, stars, nebulae, and galaxies that are invisible for the human eye can be revealed. Capturing your first images of the Milky Way, the Orion Nebula or Andromeda may change your perspective on photography and the universe we live in. Astrophotography is all about capturing the exotic beauty of our universe and reminding us that we are a part of something more than just our own planet.

Let us share the list of the best suitable cameras for astrophotography. Those are expensive and advanced technologies featured with the best sensors and adjustable settings that will allow you to have a power to explore previously strict areas due to technological limitations for common people. Now all of this is available to please our curiosity.

Mirrorless Sony A6600 is a flagman of the APS-C products line with a crop factor of 1.5 and is an amazing option if you are looking forward to capturing some astonishing start trail time-lapse in UHD 4K@30fps resolution even in the darkest skies. The camera comes with a 24.2 megapixel APS-C Exmor CMOS sensor which is able to generate detailed and higher resolution low-light images up to 11 frames per second. It boasts a BIONZ X image processor with a wide range of ISO from 100 to 32000. This means no matter if you are capturing the start trail or taking piggyback astrophotography, you will be getting fantastic picture quality even where light is limited. It also features a shutter speed of one by four thousand to thirty seconds and nearly no shutter lag. If you are someone who is into capturing time-lapse, then this camera will provide you with a 4K time-lapse feature and some really incredible footage. Also, the camera has a 4K video recording feature which makes this camera less affordable. Overall with all the sensors and components, the Sony A6600 becomes an ideal choice for those who are looking for a camera that will capture incredible time-lapse with higher resolution plus high-quality video footage use.

Capture the cosmos in even more brilliant resolution with the successor of D800 the Nikon D850 – a balanced combination of the sensor, low light capability, dynamic range sensitivity, and battery life. When it comes to its sensor, this camera has got a 35.9 millimeter by 23.9 millimeter 45.7 megapixels CMOS sensor that features 5x sensor format. This allows you to shoot low-light pictures of higher sensitivity with lower noise. The sensor also has a dust-reduction system that helps you keep it clean without any hassle. This camera also comes with electronically controlled vertical travel, a focal plane, and a mechanical shutter that provides you with clear and precise shots. The shutter also features an electronic front curtain that provides you with a more quiet shutter release. From 1 by 8 000 to 30 seconds shutter speed, this camera is able to capture up to 7 frames within just a second. It features TTL exposure metering using an 180000 pixels RGB sensor while having an ISO Range from 64 to 25600 for your astrophotography. With all these top-notch features and components the Nikon D850 comes at such a reasonable price for a premium camera becoming an amazing option.

With the huge success of EOS-R, Canon presents you with the Cannon EOS-Ra. This is their first full-frame mirrorless camera with new technology and hefty features especially for astrophotographers. It has a 30.3 CMOS sensor and a pixel size of 5.36 millimeters square and is able to capture remarkable Astro-images with lively color thanks to the RGB primary color filter. This camera will deliver you about four times more transmission sensitivity of hydrogen alpha-rays which results in more vivid and deep magnetic use of nebula. The camera has got Canon’s DIGIC 8 image processor which offers you enhanced noise reduction along with a vast range of ISO according to your need. You can choose from 100 to 40 000 which can be expanded to 50 to 102 400. Not only that, the processor will help you capture up to 4K resolution videos at 30 frames per second so that you never forget your memorable moments. It is compatible with an RF lens mount so that you get the perfect shot without even connecting the camera with the telescope. Meteor showers can be easily captured with a fisheye or wide-angle lens with this camera. In short, the Canon EOS-Ra is actually offering something beefy and dedicated for astrophotography after 10 years of Canon EOS 60 Da. Although they discontinued this particular model, yet it is one of the best mirrorless cameras for astrophotography.

With an insanely noisy low-light performance and ISO, the Sony A7 III sets a benchmark for all the other mirrorless cameras out there while becoming the favorite choice among astrophotographers. Equipped with a 24.2 megapixel Exmor R CMOS sensor this camera features a black illuminated structure in combination with the latest Bionz X image processing engine giving you super speedy high precision autofocus, exposure, and white balance. A7 III offers an insane ISO range from 100 to 51 200 which you can also expand to 50 to 204 800. Furthermore, you will also get more accurate and lifelike color reproduction straight out of the camera, so it is clear that you will not have any issue with its details at all which makes it an ideal camera for astrophotography. You do not need to worry about battery life in your session anymore as this all-rounder is compatible with an NP FZ100 battery, which can easily deliver you up to 710 photos without breaking a sweat. In conclusion, with comparably small size, hefty components, astonishing ISO, low-light capability, and amazing battery life the Sony A7 III becomes a powerful and stable option for astrographs.

Wrapping up with the Nikon Z7II – a premium grade full-frame mirrorless camera to deliver every little detail added versatility for astrophotography sessions. The camera boasts a stunning 45.7 megapixel CMOS sensor and without an optical low-pass filter the Z7II successfully stood out with an overall dexomark score of 100, which is the highest for full-frame cameras which in turn offers you excellent low-light performance. To provide you with class-leading performance, this camera is equipped with not only one but two EXPEED 6 processors. In collaboration with these two processors you will be getting faster image processing and not to mention the amazing ISO range from 64 to 25600. It also comes with dual card slots and N-EL 15c rechargeable Lithium-ion battery that allows you to enjoy more storage and extended battery life for your longer astrography sessions. Lastly, it is justified to say that the Nikon Z7II is an absolute beast and is good money value not only for astrophotography but for daytime usage as well.

Astrophotography might become a very expensive hobby as the best solutions cost ranges from 1200 to 2500 dollars. If that is not affordable for you, we glad to show you the Canon EOS Rebel T5i as one of the best budget cameras for astrophotography that is still currently available on Amazon. Costing $319 it provides a CMOS (APS-C) sensor with an ISO ranging from 100 to 12800 which is expandable up to 25600 which is capable of shooting in low-light conditions and features DIGIC 5 image processor to get exceptional image quality and processing speed. It shoots at 5 frames per second for time-lapses and has a max shutter speed of 30 seconds for long exposure shots. Considering the price tag and specifications it could become your best DSLR friend in astrophotography, especially if you are just about to begin your journey into the depths of space and unknown.

For most cases, having just a budget camera with a good sensor and having a tripod is already enough to start shooting celestial bodies. However, it is impossible without having an appropriate lens choice. So here is a short list of good lenses to shoot the deep sky.
As you can see those are all wide-angle lenses with wide aperture openings from 1.8 to 2.8 which is a moderate value to not get light distortion as is the case for the F/1.4 number.

As for settings, here you need to have the knowledge to make everything work the right way. We are going to show the settings on the example of using Canon EOS-Ra but whatever camera you have these settings will work.

Setting number one is the Aperture. Pretty much across the board whatever you are shooting, whether it is wide-field Milky Way or deep-sky imaging, you are going to want your aperture set to wide open which is the lowest number or the largest opening in the lens accordingly. That lets the most amount of light through and allows us to use a lower ISO to prevent image noise. The way to adjust this is by spinning one of the dials on your camera and the number 1.4 is usually the lowest, however, you may want to raise it to something like 2 or 2.8 to avoid distortion as light physically distorts of such wide opening but may not be a case but be aware. Aperture is your lens’ setting thus you want to get a lens with the lowest number possible for the aperture setting.
If you are trying your stars to stay perfectly round and you are not going for star trails, you are going to need to make sure that your shutter speed follows the 400 rule. The 400 rule states that you take 400 divided by the focal length of your lens and the result is the longest shutter speed in seconds that you should use in order to ensure pinpoint stars. Even the 400 rule can still result in some trails in some cases, so the best way to do this is to use a tracker that extends the number of seconds to 30 or even to 60 for shutter speed. The Tracker is designed to follow planet rotation to prevent the trails from appearing on a still image taking into account the direction your camera is looking at.
This one is variable and depends on previous settings we have just set. Start your ISO at 3200 and take a test exposure by looking at the histogram. The histogram can be used to identify how bright or dark the resulting images are. What you want to look for is a histogram with the bulk of the information about ⅕ of the way across. Any darker than this the information will be slid to the left and might be touching the left-hand side, which means that we are clipping or losing information in our darkest shadows and we want to avoid that. We also don’t want to reach the middle of the histogram which will mean that the sky is too bright and we are going to lose a lot of contrast in the image.

LENR - setting stands for short. If you are not stacking and looking for a one-shot good Milky Way image or deep sky image, you want to turn on noise reduction. What this will do is the camera will take a second exposure right after the first, and it will use that to reduce the noise in the original image. This does tie up your camera for twice the amount of time for each image, but it can reduce a lot of noise in your final shot.

Setting your camera to shoot in RAW is probably the most essential setting. If you were shooting JPEG in the past, this is the time to make it shoot in lossless mode. RAW picks up all the information and does not compress the output image. RAW allows you to adjust minute details in post without much trouble which some JPEG compression is not capable of.

We need to turn this to manual mode as most of the cameras are not able to autofocus on stars without specialized software. Going to manual focus our lens stops hunting for focus itself, and we set it to infinity preferably going on live view, zoom-in on a star or the moon, and get that focus perfect. What you are looking for is for your stars to be as small as possible and as you turn that focus ring on live view and zoom in you are going to see the stars change from “donut” shapes to nice sharp stars.
Co-founder of RetouchMe. In addition to business, he is passionate about travel photography and videography. His photos can be viewed on Instagram (over 1 million followers), and his films can be found on his YouTube channel.
Moreover, his profile is featured on the most popular and authoritative resource in the film industry — IMDb. He has received 51 international awards and 18 nominations at film festivals worldwide.


