


TOP-9 Christmas Lights Photography Tips
Dec 6, 2018
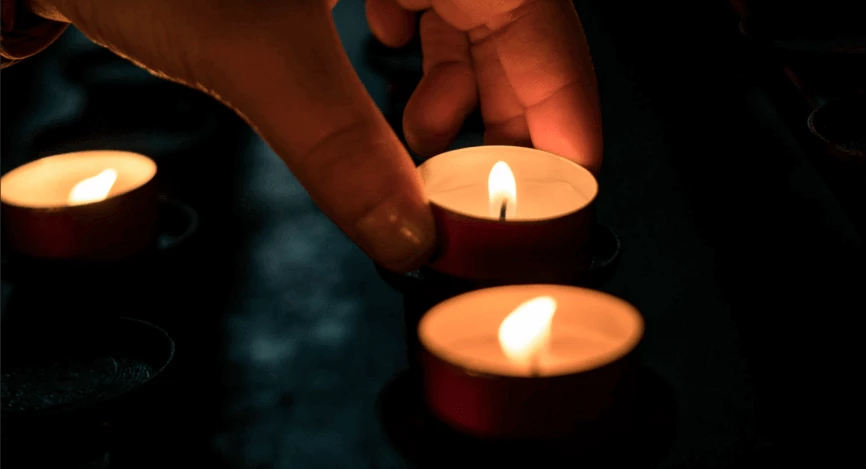
Candle light photography is a great way to add some romanticism to your everyday photography. Also, shooting candle photography can convey different moods and emotions, it can be something mystical or fabulous.
Most often, candlelight photography is used in portrait photography. Such photographs convey a calm environment in the context of soft light, the portrait can open up from different perspectives. In addition to the light itself, a candle can also produce smoke, which can also be used in a line with other props for candle photography and thereby produce even more creative candle photography.
Today we are going to discuss how to take great pictures in low light conditions. This method will be good not only for shooting by candlelight, but also for shooting in dimly lit rooms, for example, in an apartment, in a museum, in a cafe, in an underground passage, or on the street when it is already dark.
To create a luxury candle product photography, you need to understand how to properly configure your device settings. ISO settings will help your camera increase its sensitivity to the light, as candlelight photography is about a limited amount of light. The shutter speed variability also depends on the ISO value. For example, if we want to make a candlelight portrait photography and to have a high definition image at the same time, we need to very much raise the ISO value and already adjust the aperture depending on your preference for the style and tone of the photo.
It is also recommended to use a wider aperture and lens to provide enough light. More light entering the lens allows slower shutter speed.
All of these three settings are interchangeable. The amount of light required for the camera to build an image can be the same for different three values of shutter speed, aperture, and ISO. Thus, at values of 1 / 60, F 2.8, ISO 100, the camera will receive the same amount of light as at values of 1 / 30, F 2.8, ISO 50 or 1 / 60, F 5.6, ISO 400. In order to compensate for raising ISO, you need to close the aperture or reduce the shutter speed. The opposite is also true, so you can increase the shutter speed, open the aperture, and lower the ISO.

If you would conceptually disassemble what is candlelit photography, then in fact it is an object contrasting with the area of light, and the darkness around is like a vignette. Based on that information, it is necessary to adjust the settings of your camera, as well as select the appropriate lens.
The first rule that you should use when shooting in low light conditions is to adjust the shutter speed in your camera. You need the shutter speed to allow you to get a clear shot without blurring because even your pulse can distort the image if you do not use a tripod and remote shutter release control.
There is a rule of thumb such as the unit being divided by the focal length. For instance, when using lenses with a focal length of 50mm, the shutter speed should be around 1/50 sec, which allows you to take good shots without using a tripod or remote shutter control. But if you are assured that your hand will not tremble, then you can even lower the shutter speed to 1/40 or 1/30 of a second. Just do three to four takes and a couple of those shots would usually get pretty good and blur-free results.
The second but no less important rule is to observe the static nature of the photographed object. Therefore, if you want to make a creative candle portrait photography, then ask the person to freeze and maintain a pose during the frame.
If you are using a wider lens, let us say 18mm, then you can set the shutter speed to 1/20 or even 1/10 sec. Do more takes again so that you can choose the perfect shot afterward. If your lens has an Image Stabilizer, you can make the shutter speed even slower. But it is important to understand that even if the subject being portrayed freezes like a stone, then at a shutter speed of more than one-fourth of a second, you will still notice some unwanted blurring in the image that will spoil your shot.
The third rule, which is also important and applied for cheap lenses usage, is the correct use of the aperture. Cover up your aperture with one value off the maximum opened. That way if you have a lens with an aperture of F 1.8, then cover it at least to F 2.0, or better to F 2.2. The fact is that budget optics lose sharpness at open aperture values.
The fourth rule is to choose the best focal point so that the sharpness is exactly where you want it to be. As a rule, if we are talking about entry-level and mid-range DSLRs, the most tenacious focal point will be the center one. The center focal point uses all focusing sensors (horizontal, vertical, and cross-type) that can see and focus up the contrast. In the expensive cameras, these focal points will have a much larger variety and the choice of one point or another will no longer be that important compared to the low-budget devices. After we have chosen the focal point, we just have to aim precisely at the very contrasting object. In the case of a portrait, it is recommended to aim at the eyes, since the white around the pupil and iris will just contrast best in the picture.
Make sure that white balance is set to manual because if it is set to auto, then you can miss the “warm” candlelight effect in your image. You can also experiment with different presets in white balance settings. Take a look at such presets as ”indoor shooting” and “incandescent lamp”. It may get you the desired effect in case you don’t bother trying to do it manually.
Speaking in general, the candle photography ideas contain lots of variety. As we mentioned above the most popular product is portrait photography. But you may also be interested in minimalist candle product photography due to more flexibility and self-sufficiency. Minimalistic candle photography is about shooting simple objects making different compositions of your choice with them. Since we are now more experienced with the camera settings, it would be also great to know some basic tips and tricks for doing different compositions with the candlelight.
There are two ways of shooting candles. You can use the natural light of the candle and shoot objects using it with candles being out of the frame or you can shoot candles with items and use different props in it. Creating a good composition might be a bit overwhelming if we have no clue where to start. But if you look around you probably have all the needed items sitting around you. It can be bowls, a cup, books, flowers or other plants, journals.
As taller are elements such as plants, better you can use it for backdrops. More flat elements may take the role of being the core of your composition, such as tiles, pieces of wood, and stone. You can spice up your scene with different candle photography props. If you have already chosen elements for your scene, think about what surface and texture are more fit for it to lay on. If you use candlelight as the only source of light in your scene, the best background would be stone or wooden objects because it fits the style of medieval for instance. If you want to make some modern style it would be better to use simple shapes and colors as a background. That way simple shapes and contrast objects would be the best use as the background, for example, a white wall and a picture in a black frame on it.
As you have chosen the style of your scene, make sure that your candle stays focused. Tall objects stay back of the frame and smaller items stay in front.

A different type of candle product photography contains the smoke effect of the put-out candles. The main core of compositions like this is considered the smoke itself.
Aperture settings should be around f/8, that way smoke will remain in focus. ISO is recommended to be set to 100. This will provide a noise-less picture because smoke is a very complicated object and a high-definition image contains a lot of details. As higher the ISO the more visible the noise. Shutter speed set to 1/200-250 to provide a more alive effect.
You can use natural candlelight as a background for the smoke, that way it will highlight the smoke path and emphasize the detail in it. But if you decide to take an exclusive shot for smoke only, you may also use flash, make sure your flash settings correspond to shutter speed settings in that case.

Shooting a candle portrait you should not use any other source of light to prevent detraction of the scene composition.
This rule is applied for camera flash the same as for any other artificial light sources such as lamps. If you want to fill the scene with additional light you can put some candles in the background which would be outside of the frame but its light will still be there and combined with a foreground light natural way.
If you are using multiple candles in the foreground, make sure that they are far enough from each other to evenly spread the light to prevent hard shadow transitions on the portraiting subject. Nonetheless, you can be creative with that, and probably for the specific scene you want to play with shadows to get some dramatic effect.
If we use more candles we get more light, this is obvious, but not that obvious as using natural reflectors. For that matter, the white curtain, walls, and ceiling can serve a great job. In the same way, you can use polished table glare as you can see in the image below.

Producing candlelight portrait photography has also a different variety. You are not forced to just take a photo in complete darkness using only candles. Candles can be used as props to fill the scene. That way you can make different compositions with background, candles, and portraited person the same way as we mentioned with minimalist candle product photography.

Depending on how you would use candlelight do not forget to adjust your camera settings accordingly taking into consideration all conditions of your scene.
As a child, my mother used to say, "Don't play with fire!" This metaphor can be used in a variety of contexts, but the main point does not change much. Make sure that the candle flame does not come into contact with flammable objects during photography. Do not leave candles untouched after your photoshoot. It is also better to put out candles between shots and during their preparation until the moment of the shooting itself. That way you will at least save on the candles themselves and you certainly will not get burned when placing the objects of your composition.
Now we have a better understanding of what is shooting candlelight photography. The most enjoyable aspect of that is the fact you can flex your scene the way you like it and only imagination is the limit here. You can make your objects barely visible dissolving in the darkness. You can give the viewer a hint to look into exposed shadows or send a completely different message. Photography is not just an image-making, it is the art to make the picture alive. You will feel if the shot is good by that, so do not hesitate to take as many shots as you need to get the best results. But do not forget to play with your camera settings considering what your scene is about. And last but not least do not forget about safety during your photo session.
Co-founder of RetouchMe. In addition to business, he is passionate about travel photography and videography. His photos can be viewed on Instagram (over 1 million followers), and his films can be found on his YouTube channel.
Moreover, his profile is featured on the most popular and authoritative resource in the film industry — IMDb. He has received 51 international awards and 18 nominations at film festivals worldwide.