


The Exposure Triangle Understanding: Guide for Beginners
Mar 30, 2021
What is the actual difference between the types of photography? There could be an endless list, but if we talk about the basics, it is the approach, the knowledge, the gear, and the device setting. These are the basic variables that can change depending on what you are shooting with your camera. Today, we are going to talk to you about all of that and give you some good wildlife photography tips for beginners, and also discuss the best settings and the gear to use for a better experience.
The main difference between wildlife photography and other types of photography is the need to be able to wait. As cliché as it sounds, the animal is not really going to pose for a nice shot. You have to learn how to catch those moments and capture them right away. Despite that coming to you naturally with the experience, there is a certain piece of equipment that can help us with it. And perhaps the most important thing is your camera lens. As we mentioned earlier, wildlife photography requires you to have a certain amount of patience and to wait for the right moment in position. It can be compared to sniping. That is why you need a good lens in the first place. But not every lens is good enough. You need a special lens, such as a telescope lens. And the problem here is mainly the price, telescopic lenses are usually very expensive. But if you buy one, that enables you to work from long distances, which is one of the key points when shooting wildlife.

The second important component in terms of gear is having a tripod. When shooting from long distances, even a slight twitch can ruin the shot, smearing it.
Even a neat press of the shutter button can ruin everything, so in addition to a tripod, it is a good idea to have a remote shutter release.
You may wonder what is the best camera for beginner wildlife photography, but the camera itself does not matter much in the beginning, but it is a matter of your budget. However, if you are planning to develop in that direction, you should know that your camera should be able to deal with low light conditions and fast-moving and have a certain focal length.
The camera’s main feature is the sensor. We have a whole article about camera sensors. What you should take into consideration at the beginning is that there are full-frame sensors and crop sensors. The crop sensor enables your camera with a better zoom, which is worth it in case you do not have an expensive telescopic lens, and it can actually compensate for that lack, but there would be a limited frame size as a con.

Our gear is set, now we need to figure out what camera settings to use.
In most cases, modern cameras can work through autofocus. It is good for static shots as well as for capturing moving objects.
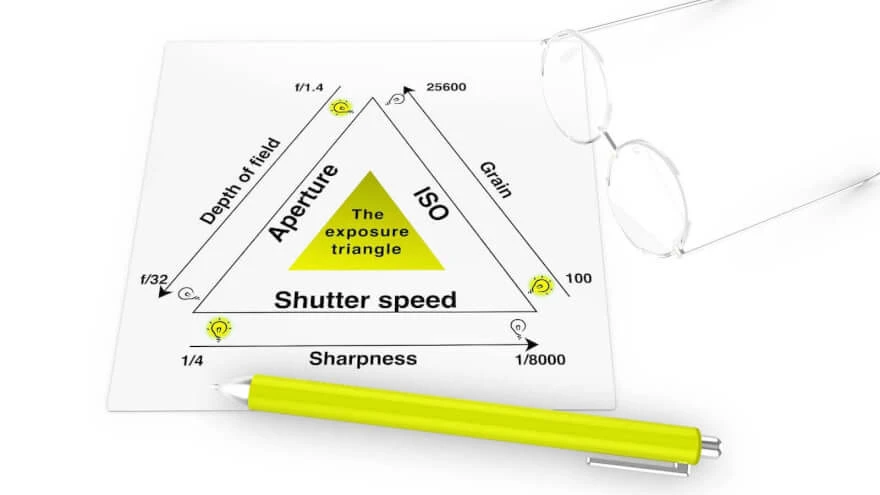
The shutter speed should be set to a fast mode. If you are shooting without a tripod and using a telescope lens, the fast shutter speed will help you compensate for a possible shake.
It is recommended to use a wide aperture for good backgrounds. Values from f/5.6 to f/8 will give you a slight bokeh which is a background blur effect while still allowing your depth of field to keep more animals in focus. These values will also give you some margin of error in case the animals in the frame start to move suddenly.
If you are having trouble figuring out all these manual settings, you can use sport mode for moving animals or portrait mode for static shots.
There are also finer settings, but today we have a topic for beginners, so explaining the above is enough for you to get started.
Now that we have figured out the gear and setting, we can go directly to the shooting itself. So, how do you take a wildlife photo?
If you are a beginner, you can start shooting in your backyard. Look for birds flying around or chilling on the fence, try to use the tips above the first, and take a look at what you get.
As you get bored doing practice in the backyard, you can go to the city zoo to get more photography experience with the different kinds of animals there. Here you can vary the shooting from a distance by taking pictures of the tigers in the enclosure, or you can take closer pictures in the terrarium. Shooting in the zoo will also allow you to learn about your animals for advanced wildlife photography.
And level 3 would be some actual travel to safari or hiking to work in a field, but here you have to know what you are doing because it is an uncontrolled environment where your safety is the most important thing. Doing safari you are planning everything piece by piece, that is for very advanced photographers, but we are just showing the path. We would advise watching some documentaries about wild animals to learn their behaviour, and the way they move and react at first. And you can also look for the techniques from it to use by yourself and even improve it in advance.
Make sure that your frame is well-structured. The way your image looks depends on multiple factors, such as angle, lighting, and some theoretical compositional rules. We will cover a part of it that will help you at the beginning.
There is such a thing as the rule of thirds. Its essence is that the shots will look better if you lock the subject in a certain position. Many beginner photographers put the subject in the center of the frame, but such pictures usually look boring. You need to accentuate and diversify them in some way. That is why it is better to put your subject at the intersection of the so-called focal lines, moving it away from the center. To get a better idea, you can activate the grid in your camera, and you will see your frame is divided into nine equal areas. The areas of intersecting lines that create these areas are the best placement in the frame. So you are following one of the rules of thirds called framing. The idea behind it is that you leave a room on the side of the shooting object, which hints that the photo is not just about that, but there is something else and beyond, there is some story behind it. This trick attracts the view more than center framed objects.

The second rule is called leading lines. Imagine that an animal is on the bank of a river. The shoreline can lead our view to the main point of the photo. They can be completely different lines, but the point is the same, they lead to the main story of your photo, and they give some extra meaning. Such photos are just more interesting to look at, especially if all the rules are followed at once.

The third rule is called symmetry, it is not mandatory, but if you see a pattern, you can use it as part of the story. For example, you shoot a family of giraffes, and in the middle goes the tallest one, and the giraffes in front and behind him are shorter. That can be a great shot, and there is a lot of symmetry like that, you just have to learn to notice it in the shot.
is also a good technique. It works the best as a variety and when you are unable to follow the rule of thirds. You can start framing through the objects that will set a border around your frame. For instance, shooting through some branches or holes in structures like ice or stones, even a fence in the zoo can be a good framing feature.

Here is another rule of thumb for wildlife photography, explaining the influence of the angles you are shooting animals from. Many beginners usually shoot from above, and it makes the animal look small and insignificant. If you shoot from the same eye level, you make it equal. And if you shoot from below, you make the animal look greater than they are in real life, which is impressive and respectful.

Most of the time you will hear from the other photographers to shoot with the sun on your back. This could be a nice tip for the beginning, but if you want to advance you can also try to shoot when the sun is in other places too. You can use the sun going from the side, and you will get a completely different image of your animals.

When you are shooting with the backlight, make sure that you have a dark background.
Probably every photographer does some sort of editing of their photographs. You can be very creative doing wildlife photos, but digital processing and polishing the image is an inevitable part if you are looking to compete in photography. Therefore, start with basic color curves and levels adjustments in Adobe Lightroom or Photoshop and see the difference.
Co-founder of RetouchMe. In addition to business, he is passionate about travel photography and videography. His photos can be viewed on Instagram (over 1 million followers), and his films can be found on his YouTube channel.
Moreover, his profile is featured on the most popular and authoritative resource in the film industry — IMDb. He has received 51 international awards and 18 nominations at film festivals worldwide.


