


How to airbrush a photo in few taps
Apr 13, 2022
If your true passion is night photography you get into the right place. No, we are not going to talk about shooting stars or city lights or anything like that. In this article, we are going to add flair, a spark of light into the night. We are going on a journey into the darkness and long-exposure light art to show you how to create amazing images out of your imagination with simple light painting tools, basic digital camera gear, and a lot of creativity. Get ready to bring light into the darkness with our light painting photography tutorial!
So what is light painting? Light painting photography is the art of using a handheld light source to paint light on a subject or to draw light in a scene while the shutter of the camera is left open during a long exposure. It is a branch of other types of long-exposure photography in general. When our camera is set to long exposure and let us say we are photographing cars moving down the street we will see that their headlights leave a trail of painting light.

This effect is noticeably better in the nighttime, however, if you do the same trick in the daylight, any moving object will start smearing in the image, and the still objects would stay clear at the same time. So it is the way to capture the motion and whatever we see reflects the light, so we are going to use it to our benefit and paint with the light! It is worth mentioning that colour splash technique is another great tool that combines great with such nighttime effects. Do not hesitate to check it out and learn more about it later on.
There are three different light painting techniques.


So let us dive into camera settings. It is recommended to shoot in RAW format because this format allows us to capture the most amount of information without any compression and is good for editing. So we basically get images the way our sensor captures them unlike JPG or any other format that makes a compression in order to reserve memory space. With the compression, your image may lose some details that are very essential to have during long exposure shots, because if we lose details or lose quality the light magic may not happen.

We are also going to shoot in manual mode. This means all the settings would be adjusted in accordance with particular exposure requirements. We can also use bulb mode which is available almost in any camera model. The mode allows shooting at a longer shutter speed like 30 seconds, and it has a lot of pros. The term bulb has a history. Simply put the older cameras had these pneumatic valve bulbs to use as a cable release. The bulb looked like very similar to the pump we use to measure blood pressure. As you hold the bulb pressed the shutter stays open and as you release the shutter closes. Why this mode is so great because if we set an appropriate exposure for the background we will only see the added light to the frame and not overexpose the ambient light. The way it technically works is that makes a live composite of long exposure light. You will have to hit the trigger three different times. The 1st time is for the base exposure and to capture the ambient light. Usually, it takes from 0.5 to 60 seconds of exposure. The next time you hit the trigger it starts the live composite, the camera is taking picture after picture and composing them together – that’s the time for actual painting in the frame with your light tools. The next trigger hit will end the composite with a bit of noise reduction, and then you will see the result right in your camera.

So when we are shooting at long exposures we need a trigger for this, because even a faint shaking would spoil the image on such long shutter speeds. For that, you can purchase a remote shutter control available at any market of your choice.
The white balance setting could stay in auto because we are shooting in RAW format anyway. However, try to set the temperature to a value that better matches the scene.
Turn off long exposure noise reduction. Because it takes double the amount of time, and we are typically going to be shooting at low ISO values. The ISO is the main villain for the noise in the frame.
Turn off lens stabilization and shoot on a tripod. A tripod is the same mandatory as remote shutter control to have in our kit.
So when it comes to choosing your exposure they are going to vary based on your location. For instance, if you are shooting in a big city like New York compared to shooting in the Catskills mountains they are going to be very different. Because for one you are exposing for the city lights and the other one you are exposing for starry nights.
The 1st step coming up with exposures to expose for the background. Do a test shot exposing for the background, and you will notice it may seem like daylight, and we want to avoid that. We need it to look like it is dark. Underexpose for a stop or two and see how it looks now. Make sure that you are able to see the location still, but it should be dark enough to have an opportunity to light paint and actually see your light painting tools.
For the city exposure setting we recommend using an ISO of around one hundred. And then you decide how long are you going to do the light painting creations for. Let us say we choose 10 seconds then we adjust our aperture, so it is slightly underexposed.

If we shoot in a natural environment we can capture star trails and as such we have to expose for the stars. This means we are about to shoot at a higher ISO compared to the city. The ISO of 3200 and aperture opened to 2.8 is a good starting point to let more light in.
Shutter speed also controls the ambient light of the photo. Ambient light is caused by all the light sources we may have in a frame, be it stars or moon, and even streetlight from far away that is still hitting your sensor. Those are all ambient. The aperture is a hole that let light in and also controls the depth of field. But when it comes to light painting it actually controls the brightness of your light painting tools. To elaborate, let us say that you are shooting with a light tool, and it is too dim, you can open up your aperture to get more brightness into your picture.

ISO is your camera sensor sensitivity. It controls the brightness straight way of both the ambient light and the brightness of your light tool. In the course of raising ISO, not only you will be making the ambient light more bright, but you will also be making the flashlight tools even brighter.

These tools will be our brushes, and their brightness would be a feature that is essential here. You can control that by powering them up or down. But it is also essential to take into account the duration they stay on. Flashes and strobes are easy to use because they have set brightness, and you just fire them away, so they are consistent and easy that way. But if we use a constant light source that turns on, like a flashlight or a video light you turn it on, and you have to power it off which brings a lot of room for inconsistency. So we need to count the duration of how long we are using them for. Let us say we are going to be light painting a barn with a flashlight, we need to count every second that it is on to be able to replicate the same look afterward. For instance, doing your test shot you will see it is too bright then you can adjust the time of use by lowering it down to 2 seconds or 3 seconds instead of 10.

You can also use different sticks to bring some color variety to your image as they come in colors of any taste. To implement more colors into the same image you need to master simple techniques first which takes a lot of time. But when you do, you will be able to draw any shapes and even add color to your image. We recommend searching for famous light painters on the net and seeing their artworks. They are amazing and may inspire you to dive deeper into the most creative light photography.

Let us delve into instructions on how you can perform light painting by yourself. As we mentioned earlier there are three different techniques, you can choose one you prefer from the following examples and even add your own sign to improve them. Besides, do not hesitate to experiment with new tools and other options available, such as the various color change apps that can elevate the overall quality of your final footage.

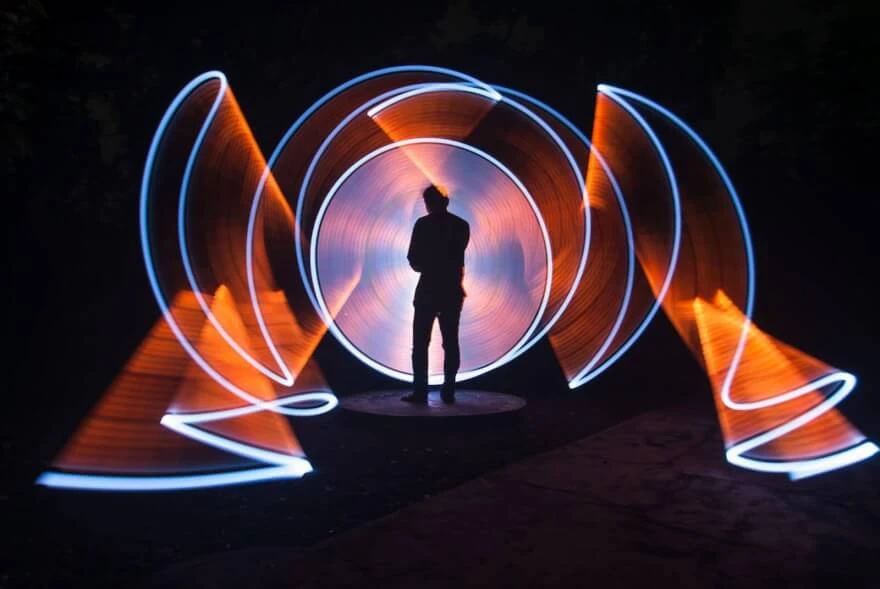
The most popular and basic way of light painting is drawing or riding the light as we mentioned earlier. It is the most preferred for beginners because It is the same easy as drawing with a pen, but instead, you are going to have a light source in your hand. The only difficulty here is that you need to fully understand what are you going to draw because the light is now your brush and everything around you is your sheet of paper, so you are going to go for it from start to end without any breaks to avoid any seams in your final image. Let’s say you want to draw a start or a letter, you need to imagine it in the air and all the key points where you turn your light to the directions it should go for the sign. When we draw on a sheet of paper we see the result in real time, but when it comes to light painting we can only use our imagination as the final image would be in our camera.

There is a variety of applications for light painting. If you watched Dr. Strange you will remember these portals they made to hop in and out. In the movie, all this is CGI-based, we can actually make it by light painting. We just need a light source that produces sparkles and has the same light temperature for a yellow-red hue. Bengal lights are the best use for it as they do sparkles when fired up, and you just need to draw an imaginary circle around whatever you want.

If you are into night photography, nature, and landscapes, shooting stars may not be just your astronomical taste, but you can actually do a whole art with it. On a super long exposure, you are allowed to see the way stars are moving in the sky as our planet moves around its axis. With enough time and dedication plus a very stable tripod and very long shutter speed, you will see how starts do trails described by our planet's rotation.

We have an entire article about shooting this phenomenon. Shooting Northern Lights that are more dynamic requires a lot of preparation, but we can not leave it unmentioned in this article because shooting Auroras is the same way of using long exposures to see how the light draws its trails.

Co-founder of RetouchMe. In addition to business, he is passionate about travel photography and videography. His photos can be viewed on Instagram (over 1 million followers), and his films can be found on his YouTube channel.
Moreover, his profile is featured on the most popular and authoritative resource in the film industry — IMDb. He has received 51 international awards and 18 nominations at film festivals worldwide.


