Green Screen Magic: Mastering the Art of Green Screen Photography
- Crafting Your Green Screen Canvas: From Hollywood to Home
- Selecting Your Emerald Backdrop
- Staging Your Green Screen Spectacular
- Illuminating the Green Scene
- Lighting Like a Pro:
- Mastering the Green Screen: From Camera Clicks to Digital Tricks
- Dialing In Your Camera: Settings for Success
- The Art of Subject Positioning: Finding the Green Screen Sweet Spot
- Avoiding the Green Monster: Battling Spill
- Choosing Backgrounds: The World is Your Oyster
- Creating Your Own Backdrops: The DIY Approach
- Digital Alchemy: Transforming Green Screens into Photographic Gold
- The Green Screen Makeover: A Step-by-Step Guide
- Green Screen Photography Ideas: Unleash Your Creativity
- Green Screen Photo Booth: Bringing the Magic to the Masses
- Some setup tips to make your photo booth a hit:
- Avoiding the Green Screen Gremlins: Common Mistakes and How to Vanquish Them
- Wrapping Up: Your Green Screen Journey Begins
Have you ever marveled at how your favorite movie characters seamlessly traverse fantastical realms? Or perhaps you've chuckled at a meme featuring your buddy "vacationing" on the moon? The secret behind these visual illusions isn't as complex as you might think – it's all about mastering how to use a green screen in photography.
Whether you're an aspiring shutterbug, a social media maven, or simply someone intrigued by cutting-edge tech, green screen photography can inject a whole new dimension into your visual narratives. In this deep dive, we'll unravel the mysteries of this captivating technique, equipping you with the knowledge to transform your images from mundane to magical.
So, what exactly is this green screen sorcery? At its core, green screen photography, also known as chroma key photography, is a clever trick that allows you to swap out backgrounds in your images. The process involves capturing a photo with green screen background, then using software wizardry to erase that background and replace it with... well, anything your imagination can conjure!
But why green, you ask? While technically any solid hue could do the job, green takes the crown for several compelling reasons:
- It's the antithesis of human skin tones, making it a breeze to separate your subject from the backdrop.
- Digital cameras have a particular affinity for green light, enabling a cleaner separation.
- Green rarely makes an appearance in clothing or props, minimizing the risk of accidentally erasing parts of your subject.
Now that we've pulled back the curtain on the basics, are you ready to dive deeper into the world of green screen magic? Stick around as we explore everything from setting up your first green screen to advanced compositing techniques that'll make your photos pop!

Crafting Your Green Screen Canvas: From Hollywood to Home
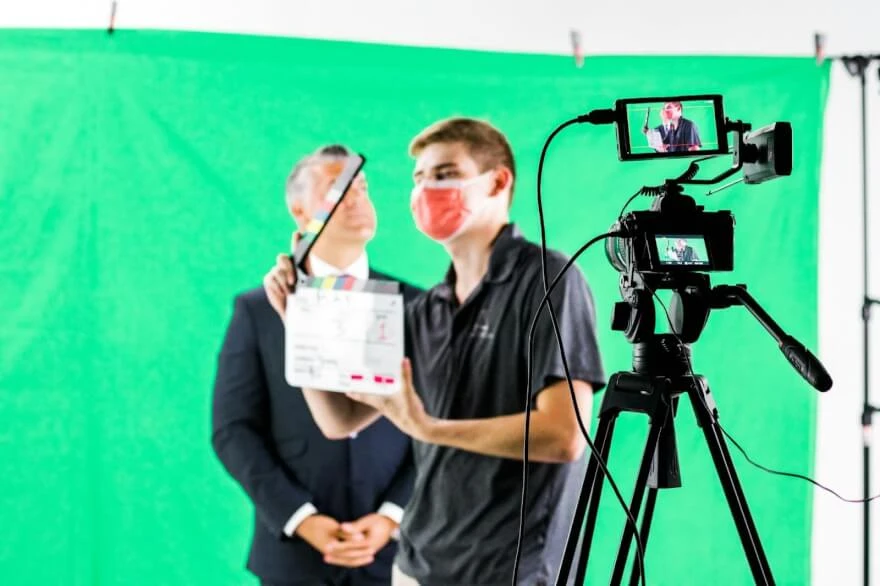
You might think you need a Hollywood-sized budget to dabble in green screen photography, but fear not! With a bit of creativity and know-how, you can set up a professional-grade green screen studio right in your living room. Let's paint the picture of how to make a green screen that'll have your friends green with envy.
Selecting Your Emerald Backdrop
When it comes to choosing your green screen material, you've got options:
- Fabric Fantastic: For novices, wrinkle-resistant cloth is your best bet. Hunt for materials labeled "chroma key green" – they're the gold standard in our green world.
- Paint Perfection: Feeling more permanent? Consider giving a wall a makeover with specialized chroma key paint. It's like turning your room into a year-round St. Patrick's Day celebration!
- Paper Paradise: For the occasional green screen adventure, large rolls of green paper can be your wallet's best friend.
Whatever you choose, consistency is key. Aim for a uniform shade of green, free from patterns or variations. Think less "forest camouflage" and more "freshly mowed lawn."

Staging Your Green Screen Spectacular
Now, let's set the stage for your green screen photoshoot:
- Space is the Place: Find a spot where you can hang your screen and position your subject at least 6 feet in front of it. Think of it as social distancing for your photos.
- Stretch it Out: If you're using fabric, channel your inner yoga instructor and stretch it taut. Wrinkles are the enemy here – we want smooth sailing (or smooth screening, rather).
- Size Matters: Ensure your screen is large enough to cover your entire shot. Nothing ruins the illusion faster than seeing the edge of your green screen in the final image.
Pro Tip: When setting up your green screen, keep your end game in mind. Visualize the final background you'll be using. This foresight can help you position your subject more naturally within the scene. After all, you wouldn't want your subject appearing to float awkwardly in the air when your plan is to replace background with a serene beach scene!

Illuminating the Green Scene
Proper lighting is the secret sauce in the recipe for successful green screen photography. Your goal? To light your screen as evenly as a perfectly toasted marshmallow, eliminating shadows and hotspots that can throw a wrench in your editing process.
Lighting Like a Pro:
- Embrace the Soft Side: Opt for soft, diffused light. Softboxes or LED panels are your friends here, creating an even illumination that'll make your green screen glow (but not too much!).
- The 45-Degree Rule: Position lights on both sides of the screen, angled at 45 degrees towards the center. It's like giving your green screen a warm hug from both sides.
- Consistency is Key: Use a light meter or your camera's histogram to check for even exposure across the screen. We're aiming for the Goldilocks zone – not too bright, not too dark, but just right.
- Spill the Beans (or Don't): Use flags or gobos to prevent green light from reflecting onto your subject. Nobody wants to look like they've had a bit too much green juice!
Remember, your subject needs their own spotlight too. We'll dive into the nitty-gritty of subject lighting later, so stay tuned!
Mastering the Green Screen: From Camera Clicks to Digital Tricks
Now that we've set the stage, it's time to dive into the nitty-gritty of capturing that perfect green screen shot. Buckle up, because we're about to explore the world of camera settings, subject positioning, and the art of choosing backgrounds that'll make your photos pop!

Dialing In Your Camera: Settings for Success
Getting your camera settings just right is like finding the perfect recipe for your favorite dish. Here's your ingredient list for green screen success:
- ISO: Keep it low and slow, ideally between 100-400. This minimizes digital noise, ensuring your green screen is as smooth as butter.
- Aperture: Aim for the middle ground with f/5.6 to f/8. This sweet spot ensures both your subject and the screen are in focus, like a photographer's version of depth perception.
- Shutter Speed: Start at 1/125 second and adjust as needed. We want to freeze the action, not create a blurry mess!
- White Balance: Get personal with a custom white balance using a gray card. This ensures your colors are as true as your grandmother's stories.
- File Format: If possible, shoot in RAW. It's like giving yourself a digital safety net for post-processing acrobatics.
Focus is crucial in green screen photography. Use your camera's autofocus to lock onto your subject, then switch to manual focus. This prevents any focus-shifting shenanigans during your shoot.

The Art of Subject Positioning: Finding the Green Screen Sweet Spot
Proper subject placement is the secret sauce in creating convincing green screen photos. Here are some green screen tips to position your subject like a pro:
- Distance Makes the Heart Grow Fonder: Keep your subject at least 6 feet away from the screen. This minimizes green reflections and shadows, ensuring your subject doesn't look like they've been dipped in lime jello.
- Frame it Right: Position your subject within the frame as they would appear in the final composited image. Think of it as pre-planning your photographic magic trick.
- Perspective Matters: Consider the perspective of your planned background. You don't want your subject looking like a giant in a miniature world (unless that's your goal, of course!).
- Move it, Move it: If your subject will be channeling their inner dancer, ensure they stay within the bounds of the green screen. We don't want any disappearing limbs!
Avoiding the Green Monster: Battling Spill
Green spill occurs when light reflects off the screen onto your subject, giving them an unfortunate Hulk-like tinge. To keep your subjects from looking seasick:
- Use a hair light or rim light to separate your subject from the background. It's like giving them their own personal halo.
- Play the distance game: The further your subject is from the screen, the less likely they are to pick up that green glow.
- Employ gobos or flags to block reflected green light. Think of them as tiny bouncers, keeping the green riffraff away from your star.

Choosing Backgrounds: The World is Your Oyster
The background you choose can make your green screen photo a masterpiece or a mess. Here's how to select backgrounds that'll make your photos shine:
- Perspective is Everything: Ensure the background's perspective matches your subject's position and camera angle. We're aiming for seamless integration, not a funhouse mirror effect.
- Light it Up: The lighting in your background should complement the lighting on your subject. If your subject looks like they're in broad daylight, a nighttime background might raise some eyebrows.
- High-Res or Bust: Use high-resolution images to maintain quality when compositing. Pixelation is so last century.
- Keep it Real: Consider elements like depth of field and motion blur to match your subject. The goal is to make viewers question whether you actually traveled to that exotic location!
Creating Your Own Backdrops: The DIY Approach
For ultimate control, why not shoot your own background plates? Here's a crash course:
- Steady as She Goes: Use a tripod to keep your camera as still as a statue.
- Match Game: Align the lens focal length and camera height with your subject shot. It's all about creating that perfect illusion.
- Go HDR: Consider shooting multiple exposures for HDR compositing. It's like giving your background superpowers.
Pro Tip: When shooting backgrounds, you might need to remove objects from photo later. Keep this in mind and try to shoot clean plates when possible. It's easier to remove a stray dog from your original shot than to try and digitally erase it later!

Digital Alchemy: Transforming Green Screens into Photographic Gold
Now that we've captured our green screen masterpiece, it's time for the digital magic to begin. Grab your favorite editing software, and let's dive into the world of post-processing and compositing!
The Green Screen Makeover: A Step-by-Step Guide
- Import your images into your chosen editing software. Whether you're team Adobe, a GIMP enthusiast, or using specialized chroma key software, the process is similar.
- Use the chroma key tool to banish that green background. It's like using a magic eraser, but for photos!
- Add your new background layer beneath your subject layer. Think of it as digitally re-staging your photo.
- Refine the edges of your subject to blend seamlessly with the new background. We're aiming for "natural inhabitant" not "obvious cut-out."
- Adjust color, contrast, and lighting to match your subject with the background. This is where your photo truly comes to life.
- Add shadows or reflections to ground your subject in the new environment. It's these little details that sell the illusion.
For the adventurous souls out there, advanced techniques might include using masks for precise control, adding motion blur for action shots, or using multiple background layers for complex scenes. The sky's the limit!

Green Screen Photography Ideas: Unleash Your Creativity
Now that you've got the technical aspects down, let's explore some creative green screen photography ideas that'll make your imagination soar:
- Globe Trotter: Place your subjects in exotic locations without leaving your studio. Paris for breakfast, New York for lunch, and Tokyo for dinner? No problem!
- Fantastical Realms: Create magical scenes with mythical creatures or sci-fi environments. Who says you can't have a tea party with a dragon?
- Time Travel Adventures: Transport your subjects to different eras. Victorian England or the roaring 20s, anyone?
- Sports Spectacular: Composite athletes into stadiums or action scenes. Make your local little league team feel like they're playing in the World Series!
- Product Perfection: Place products in ideal environments or abstract backgrounds. It's like creating a Hollywood set for your water bottle.
- Edu-tainment: Create engaging visuals for learning materials. Make history come alive or shrink your subjects down to explore the human body.
- Music Video Magic: Develop surreal or story-driven backdrops for musicians. Let's make MTV jealous!
- Social Media Sensation: Start a trend with imaginative green screen transformations. #GreenScreenChallenge, anyone?

Green Screen Photo Booth: Bringing the Magic to the Masses
Want to spread the joy of green screen photography? Setting up a green screen photo booth is easier than convincing a cat to pose for a photo. Here's what you'll need:
- Green screen backdrop and stand (your trusty green canvas)
- Camera or tablet with a green screen app (your magic wand)
- Lighting setup (at least two softbox lights to banish those pesky shadows)
- Computer or tablet for processing and displaying images (your digital crystal ball)
- Printer for instant photos (optional, but who doesn't love instant gratification?)
Some setup tips to make your photo booth a hit:
- Ensure enough space for the screen, lighting, and guest movement. Think of it as a mini dance floor, but for posing.
- Use a wide-angle lens to capture full-body shots in limited space. It's like giving your camera superhuman peripheral vision.
- Prepare a variety of digital backgrounds for guests to choose from. The more options, the merrier!
- Consider props that complement your background options. A tropical background? Throw in some leis and sunglasses!
- Use a fast-processing computer or app for quick turnaround. Nobody likes waiting in line, especially for fun!

Avoiding the Green Screen Gremlins: Common Mistakes and How to Vanquish Them
Even seasoned photographers can run into issues with green screen work. Here are some common pitfalls and how to avoid them:
- Uneven Lighting: Use multiple lights and check for hotspots or shadows on your green screen. Think of your green screen as a prima donna – it needs perfect, even lighting to perform its best.
- Color Spill: Keep your subject well away from the screen and use rim lighting to separate them. Nobody wants to look like they're auditioning for a role as an alien!
- Poor Edge Detail: Use a high-quality green screen material and ensure your subject isn't wearing green. Unless you're going for the "floating head" look, of course.
- Mismatched Perspectives: Pay attention to the camera angle and subject position relative to the background. We're aiming for "seamless integration," not "obvious Photoshop disaster."
- Unrealistic Compositing: Add shadows and adjust color grading to match your subject to the new background. It's these little details that separate the amateurs from the pros.
- Low-Resolution Backgrounds: Always use high-quality images for your backgrounds to maintain realism. Pixelation is so last century!

Wrapping Up: Your Green Screen Journey Begins
And there you have it, folks – a whirlwind tour through the magical world of green screen photography. From the basics of how to use a green screen in photography to advanced techniques that'll make your head spin, we've covered it all.
Remember, like any skill, mastering green screen techniques takes practice. Don't be discouraged if your first attempts look more "green mess" than "green screen" – keep experimenting and refining your approach.
Whether you're setting up a home studio, creating content for social media, or planning a green screen photo booth for the next big event, you now have the knowledge to create stunning visual effects that'll make jaws drop and imaginations soar.
So, what are you waiting for? Grab your camera, set up that green screen, and let your creativity run wild. Who knows? Your next green screen masterpiece might just break the internet!
We'd love to see what you create with these green screen photography tips. Share your creations on social media and tag us – you might just inspire the next generation of green screen artists!
Remember, the key to great green screen photography is experimentation and attention to detail. Now go forth and create some digital magic!
Co-founder of RetouchMe. In addition to business, he is passionate about travel photography and videography. His photos can be viewed on Instagram (over 1 million followers), and his films can be found on his YouTube channel.
Moreover, his profile is featured on the most popular and authoritative resource in the film industry — IMDb. He has received 51 international awards and 18 nominations at film festivals worldwide.

with RetouchMe


