What is light painting photography?

- Benefits of light painting photography
- Techniques used in light painting photography
- Examples of light painting photography
- Equipment needed for light painting photography
- Tips for getting the most out of a light painting session
- Common mistakes made when doing light painting photography
- Creative Ideas for Light Painting Photography
- Light photography with spinning wheels
- Light painting with laser pointers
- Creating light trails with sparklers
- Combining light sources for unique effects
- Post-Processing Tips for Light Painting Photography
- Adjusting exposure and white balance in post-processing
- Enhancing colors and contrast for a more dramatic effect
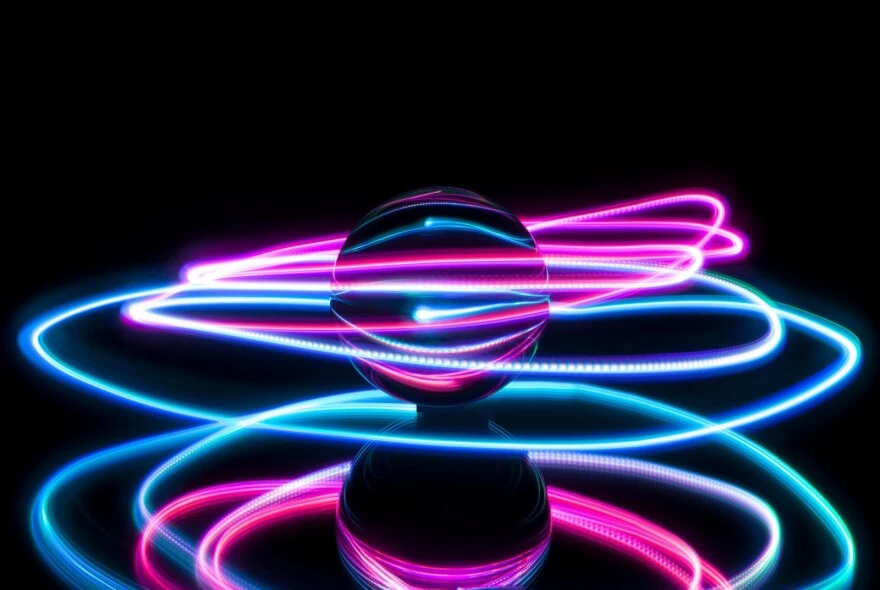
Light painting photography is a creative form of photography that involves capturing light sources as they move through the frame with long exposures. This can be done using direct flashlights, sparklers, spinning wheels, lasers, and other techniques. Such photographs often have a unique level of quality as a result of the manipulations mentioned above. The photos are also known for their beautiful colors and dramatic effects. Such effects help create unique and captivating images. Light painting photography requires patience, creativity, and experimentation. However, with a little bit of practice, anyone can become an accomplished light painter.
Benefits of light painting photography
The primary benefit of light painting photography is the ability to create stunning and unique images that capture movement and light in a way that is difficult to replicate with traditional photography. Light painting also allows photographers to extend their vision and perform something truly extraordinary. Furthermore, it can be used for a variety of occasions such as weddings, charity events, advertisements or simply creating artwork for your own portfolio. The possibilities are endless.

Techniques used in light painting photography
The techniques used in lighting photography are based on the desired outcome. Common techniques include using direct flashlights, spinning wheels, sparklers, and laser pointers. Each of these tools can be used to create different effects such as light trails, abstract shapes, and more. On top of that, photographers can experiment with exposure settings, such as shutter speed and aperture, in order to create the desired photo. Last but not least, there are various post-processing techniques. Such as adjusting exposure, color saturation, and contrast manipulation.
Examples of light painting photography
There are numerous examples of light writing photography. They range from abstract and surreal images to more practical ones, such as capturing a wedding or concert. Light painting is also widely used to create stunning artwork that is sure to capture viewers' attention. The examples are endless, as there are pretty much no limitations from the creative standpoint. The more unique or even bizarre the photo is, the better.
Equipment needed for light painting photography
The equipment is relatively basic and consists of a camera, lens, and some form of light source. Most cameras will do the job, but it is important to have one that has manual settings which you can always adjust. Those settings include ISO, shutter speed, and aperture. The choice of lenses is up to you, as various lenses will give you different final outcomes. They can vary depending on the effects you are trying to achieve. Lastly, some form of light source. It can be anything, starting with a flashlight and ending up with laser pointers or sparklers.
By combining creative techniques with the right equipment, light painting photography can result in one of the unique art forms ever created. Light painting is sure that one tool that any photographer should explore at least once in their lifetime.

Tips for getting the most out of a light painting session
There are different light painting photography tools that can help you out in several ways. Here are some tips to help get the most out of your working session:
- Plan ahead and practice – Before beginning, always plan ahead and practice the techniques you will be using. It is important to understand how different tools work and what you need them for.
- Use a tripod – Utilizing a tripod is key for light painting photography as it allows you to capture high-quality drawings with no movement issues or unnecessary blur. Using a tripod will ensure that there won’t be any camera shakes or stuttering during the process.
- Experiment with different light sources – Play around with different light sources and always learn from the various outcomes. This will help you improve your overall skill and add another important aspect to your abilities. As the more you explore, the better you will be at understanding the necessary light source that will be perfect for your own specific scenario. There are various tutorials across the internet that can help you out with some new ideas.
- Adjust exposure settings – Adjusting exposure settings such as the ISO, and shutter speed will always bring something new into your photos. Experimenting with these settings is always a good way to adjust the picture according to your preferences.
- Post-processing techniques – Once your images have been captured, post-processing techniques such as adjusting exposure, brightness, and contrast can help to get the most out of an image. Additionally, applications such as Photoshop or Lightroom can be used to further enhance your photos.
Do not hesitate to experiment and always try something new. It is the best way to quickly progress and generate a lot of new light painting ideas.

Common mistakes made when doing light painting photography
There are numerous mistakes that can be made while painting with light photographs. The common ones include avoiding the tripod, forgetting to adjust exposure settings, using the wrong light source for the desired effect, not experimenting enough with post-processing techniques, and not planning ahead. All of these points are important and cannot be overlooked.
Using a tripod or other form of stabilization is absolutely crucial. Without it, your images will be blurry and of low quality. Do not forget to adjust the exposure settings such as the ISO, shutter speed, and aperture. It will help you perform the exact picture that you have in mind.
The light source you choose is also one of the most important things when working with light painting photos. Choose the one that suits you the most by experimenting with various light sources.
Lastly, post-processing techniques can help bring out the best features of a light painting photograph. That is why it is essential to take full advantage of them.

Creative Ideas for Light Painting Photography
Light photography with spinning wheels
Light painting photography with spinning wheels can create stunning effects and add an extra dimension to images. Spinning wheels are usually made from metal or plastic and come in different sizes. To perform a light painting with spinning wheels, attach the wheel to a tripod or other form of stabilization and use flashlights, laser pointers, or sparklers to light up the wheel. Do not forget to adjust your camera exposure settings as well.
Spinning wheels can create interesting patterns and designs in light painting photography, such as circles or spirals of light. Additionally, colorful lights can be used to create unique color combinations that will enhance the quality of your image even further. By experimenting with different types of light sources, such as LED lights and flashlights, you can achieve something unique, such as a colour splash effect, or other interesting end results.
By using spinning wheels in colored light photography, photographers create interesting visuals that make their images stand out from the crowd. Do not hesitate to use them.
Light painting with laser pointers
Light painting photography with laser pointers can create amazing visuals that are sure to impress. Laser pointers come in a variety of colors and patterns, giving photographers even more creative space and ideas to work with. All you have to do is to attach the pointer to a tripod or other form of stabilization. It will add another pattern to your light painting image.
Laser pointers can be used to create various shapes such as circles, spirals, and lines. The light from a laser pointer can be used to draw objects of absolutely any shape.

Creating light trails with sparklers
Light painting with sparklers can be a fun and exciting way to create stunning visuals in photography. Sparklers emit streaks of light when waved around, making them a perfect choice for creating light trails. It is also not that difficult to perform a photo with such effect. Attach the sparkler to a tripod or other form of stabilization and wave it around while adjusting your camera exposure settings.
Sparklers can create amazing light trails when used correctly, adding color and sort of movement to an image. Different sparkler colors can be used to create unique visuals that will catch the eye of some of the most experienced photographers.
Combining light sources for unique effects
Photographers always tried to combine different styles and effects to boost their skills to another level. Combining different light sources is no exception.
Flashlights and laser pointers can be used together to create interesting color combinations and patterns.
Combining different light sources for light painting photography also gives photographers the opportunity to explore new ideas and create interesting compositions.

Post-Processing Tips for Light Painting Photography
Adjusting exposure and white balance in post-processing
Just as with any other photography, light painting photography can be enhanced with post-processing techniques. By adjusting the exposure, photographers can add more brightness to an image and bring out details that weren’t visible before. On the other hand, decreasing the exposure can help to create a darker, moodier look.
It is worth mentioning, that there are several color change apps that could come in handy while working with your images. Do not hesitate to use them. Anyway, let’s get back on track.
Playing around with the white balance in post-processing is also important for getting accurate colors in your light painting images. By adjusting the temperature and tint of an image, photographers can ensure that the colors in their light painting photos are accurate and according to their preferences.
Enhancing colors and contrast for a more dramatic effect
Increasing the saturation of colors and adding contrast to an image can create a certain atmosphere in the photo.
On top of that, using various filters and special effects in post-processing can help you achieve the desired results. By experimenting with different filters and effects, photographers can add a creative touch to their light painting images.

All in all, light painting photography is the perfect way to create something new and unique. With various tools and tricks under your sleeve, you can perform on another level. Playing around with different techniques and settings will help you understand and adjust any picture to your own preferences. At the end of the day, it all comes naturally with experience and light painting photography is a perfect way to boost your skill. The options are endless, and you are not limited by anything.
He started his career as a professional photo designer and retoucher. Professional commercial photographer with 20 years of experience. He is a leading advertising photographer and has worked as a food photographer with Michelin-starred chefs. His work with models can be seen on the calendars of many leading companies in Ukraine. He was the owner of the photo studio and photo school "Happy Duck".

with RetouchMe


