


How to avoid reflection in glass photography
Oct 5, 2021
A man's beard and mustache become part of his style as he ages. Young guys tend to grow stubble first, then a beard and mustache, until it becomes their usual look. You get used to it over time and forget how you look without facial hair. Nostalgia or simple interest makes people wonder, "What would I look like without a mustache or a beard?" It would seem that you can simply shave off unwanted vegetation, but the problem is that you do not know the outcome and there is no way back because growing a beard and mustache requires more time than shaving.
In such cases, the help comes in various kinds of software that remove beard from photo.
This tag can be used to summarize the meaning of the set of applications, which in turn can be divided into categories, having this or that functionality with cons and pros. Googling a beard photo editor can be as easy as searching for a mustache photo editor.
Usually, apps can add facial hair as easily as they can remove it if they are based on skin retouch, so you do not have to look specifically for a beard remover. Let us figure out some examples for those applications and their use.
Photo hair removal apps are a very convenient way to remove facial hair. There are countless options and each app has its own specific features to achieve the desired results.

The app has a number of tools designed for the general correction of facial features, including eyebrows, beards, and mustaches. The app allows you to isolate an area for editing, to which you can apply a beard remover filter or any other filters to reduce or increase the visibility of the beard or mustache.

The other tool-rich application we could suggest is called RetouchMe app. It is placed top10 within other apps for face and body tuning by all means. The app provides all possible features to adjust body shapes and skin retouch. The specific app does not use any automated algorithms but instead does manual retouching by professional designers that receive your photos, do the job then send you quality results back. If you ask yourself how would I look without a beard or mustache, or the opposite in case you want to try it on, the RetouchMe app would serve you the best job no matter if that is just for men selfies or for full body photographs. Simply choose a photo from your gallery, look for ‘add beard to photo’ or ‘remove mustaches’ in options, whatever you like and send the photo for processing with chosen options and your commentaries.
Another app that we could advise is called Pixel Retouch. The app is used more as an object remover, so the algorithm works well to use it as a beard or mustache removal app too. It is very simple to use with the built-in ‘Object Removal’ brush. What you need to do is to draw over the area with that brush that you want to get rid of and see the results.

There are a group of apps that you can use just for fun trying on haircuts, beards, and mustaches in your selfies. Those apps are very simple, they just have templates for haircuts that you can apply to your image. Those apps are very strict in terms of photos they require you to make to work with the app. They require pretty much a perfect selfie, with emphasized limits that will fit your photo into the template borders of the app. If everything is done right, you can get a sketch of your new look with a beard, mustache, or haircut at best.
‘Hairstyle Makeover’ and ‘Hairstyle Changer Men’ are the apps that feature male mustache and beard templates to apply. There are dozens of different hairstyles, beards, mustaches and so on to choose from. But as we said earlier, it will not make a perfect representation of your possible look. This group of apps is for non-precise experiments only.

The results for each app can vary from photo to photo, and you should understand those simple algorithms do not provide the best of it. Sometimes you have to choose the best selfie angle to allow the light to highlight the areas that you want the app to work on. The algorithm’s feature is to remove objects, usually based on scanning backgrounds, and define pixels by contrast. When you choose an area to remove or replace, it basically takes the sample of existing pixels and replaces the chosen area. Being automatic with just slight adjustments, it can achieve different results depending on the photo’s overall quality and image resolution. On the other hand, apps can do good results pretty quickly, that is why you need to have a set of apps to try each of them for a specific case.
If you require fine-tuning, we would recommend you to read the next chapter, where we describe Adobe Photoshop editing.

Such a program as Photoshop needs no special introduction. The ultimate software allows us to do any kind of magic with photos, so we can easily remove mustache, beard, and stubble from any photo thanks to a wide range of tools. Nevertheless, we do not need to know the whole interface by heart, and there are literally a few tools that we need.
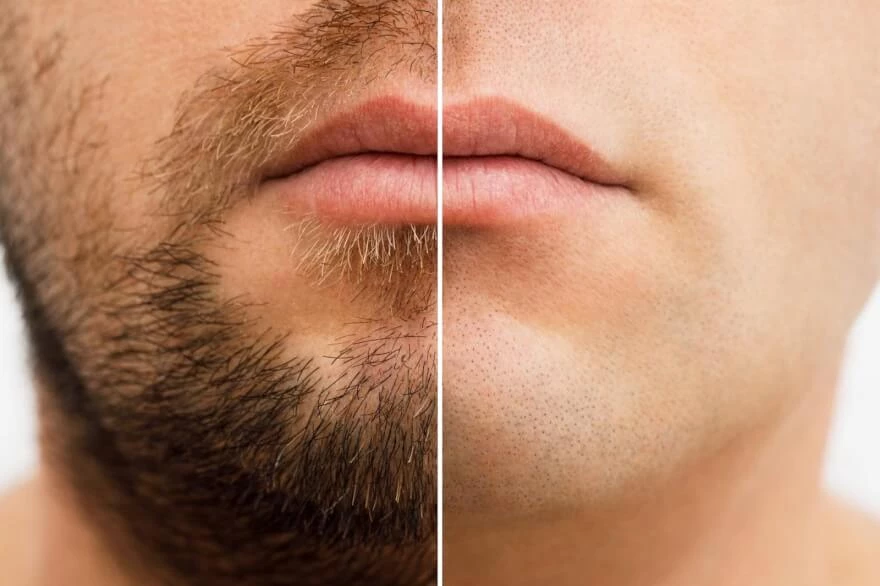
Removing facial growth is different from photo to photo. Some photos you have with just a slight stubble you want to get rid of, and some photos are with an actual beard. So there are different methods for each case.
If we have a slight stubble, we can pretty much use the clone stamp tool. This tool allows us to take a sample of nearby skin and replace the hair area with it. This tool is great because the sample it takes contains the skin texture in it, that way the replacement area will look natural. To take a sample, press the ALT key and left-click while the clone stamp tool is active. Take a sample, make sure that your flow and opacity are somewhere around 30-50 %, and then paint with it on nearby areas. Adjust the flow and the opacity from time to time to get better results. If you only need to deal with stubble only then you can change clone stamp tool mode to ‘Lighten’ with the flow of 40% and opacity 100% and that way it will perfectly erase just hair and not touch the skin. Make sure to not paint a lot of the area around, to keep the original skin tone and the texture taken from the nearby area only. That will make the image look natural. Here is a simple example, we took a sample from stubble skin and made it look clean. Spend less than 1 minute, so you can do a more accurate job.
This method is good for even a thick beard case, as shown in the image below

You just need to be more accurate doing samples from the area to the area and make sure to not spoil the shadows while painting.
Here is an example of before and after using only the clone stamp tool, made in 10 minutes.

The key to working with the clone stamp tool is to adjust the flow, and opacity, also choosing the right mode of the tool, and taking precision samples while painting small areas. So it requires some precision and may look like a routine, but Photoshop does an excellent job with the tool. The only problem here is that we have no information about the skin that is covered under the thick beard. So we have to be tricky here to not miss the skin tone and shadows and their transitions, adjusting the flow and opacity of our clone stamp tool.
The other very old method was to use just a brush sampling nearby colors. But that way you lose a lot of skin texture, and the image will look flat and unnatural. However, we can replace the skin texture if we have a reference image.
The major problem can appear in the high-detailed area where the chin line goes to the neck. If that is the case, or you have lost a lot of texture shaving your image with the old-school brush method, you can always get a reference image with a similar face to take the texture from it and put it onto your image. The reference image should have a similar angle of shot and lighting over it. To line up the reference picture over the original, we can wrap it around until we match the edges. To use the wrap tool, press CTRL+T then right-click in the area and select ‘Warp’. If you right-click again, then you will see an option to add more warp lines (horizontal and vertical). Pull the lines to match the edges until you will be satisfied with the results. You do not have to be super precise here because we will hide it under the mask anyway.

After matching edges, you need to desaturate the reference image (Image - adjustments - hue/saturation), that way we do not take any color from it but the texture only. Convert our reference image into a smart object (Right-click on the layer and find ‘Convert to a Smart Object). Now we change the blending mode of that reference image from normal to overlay. Then add the ‘High pass’ filter (filters - other - High pass). Set the radius of the high pass to the appropriate range (usually 10 pixels is a good value). Now, all we need to do is to put a black layer mask on that overlay texture layer (alt + click on a layer mask icon), and it is going to hide everything. Then we just pick the brush with white foreground color and paint the needed areas to apply the texture from our reference image from the masked overlay. You can paint with black to erase some areas that you find not a good match for the texture, like wrinkles. You can also decrease the opacity of your mask to find an even better balance.
He started his career as a professional photo designer and retoucher. Professional commercial photographer with 20 years of experience. He is a leading advertising photographer and has worked as a food photographer with Michelin-starred chefs. His work with models can be seen on the calendars of many leading companies in Ukraine. He was the owner of the photo studio and photo school "Happy Duck".


