


How to choose the right reflector for photos?
Mar 24, 2021
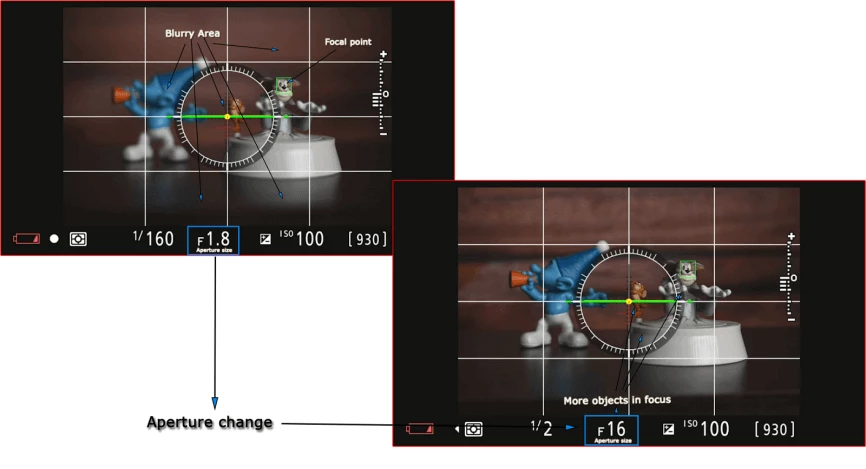
No matter of photography skills, probably every person that held a camera once in his life is familiar with such a term as focus. Focus as a setting is required to let your camera know what you are focusing on in your frame to get a clear image. The problem is that camera focus depends on other settings, such as aperture size and depth of field. Let us say we have a lot of objects in our frame, but the focus appears in the center of the frame or its set focal point. The closer to the edge, the blurry it is. Aperture setting helps with that, we can set it to F / 16 or even F / 20 to make our frame able to focus on all objects. Thus, having a lower aperture increases the depth of field and makes all objects in the frame stay in focus.
Does It look like adjusting the aperture will solve all the issues with focus? Unfortunately, every lens has its sweet spot where narrowing aperture to a certain degree will make your frame lose sharpness gradually. And losing sharpness means fewer details in your shot and poor quality as a result. This dependency is shown in the scheme below, how the sharpness corresponds to the aperture.

So, even at f/22, everything is in focus but because the sharpness is reduced the quality is affected. We want everything to be in focus, but we also want an optimal image quality.
That is why the focus stacking technique becomes a good solution to avoid that issue. Let us break down how to do focus stacking.
The basic concept of the method is focusing on different areas with your camera and shooting multiple photographs like that. Stacking means combining received images in post-processing in order to extract different focal points into one image. That way, focus stacking has two steps. The 1st one is shooting, and the 2nd is editing focus stacking images. So let us take some photos first!
Choose the frame you want to shoot, let it be a landscape for instance. Since the landscape is a wide-open area, it has a foreground, mid-ground, and background by the nature of the frame. If we use a narrow aperture, it will cause lens diffraction. Diffraction is an optical effect that causes sharpness to decrease, no matter how good your camera is.

To make everything right, we need a tripod to make our frame stable because we are going to shoot multiple frames, and the received images should be perfectly aligned. It would be a good addition to have a remote shutter control as well for that matter. Then, we need to choose settings, make it manual mode, so it doesn’t automatically change focus during shots. Then focus on the foreground — do the image, then the same with midground and background. There is no rule of what number of images you have to take. Sometimes taking two or three images is enough, sometimes you require 20+ images, especially if you do macrophotography, thus it depends on the situation. For better understanding, let us shoot some small objects as well.
Shooting a small object up close requires a specific macro lens, thus the depth of field will be very small due to that. In order to make everything stay in focus, we have to do a lot of images. Professional photographers do over hundreds of images to make sure each detail in their shot will stay sharp.
The method is the same, we are shifting the focus manually just by a bit and clicking multiple images. To be more flexible during the post-processing, it is better to have a bigger number of images, it may increase quality as a result, especially when you do macro.

If we use a tripod shooting landscapes, it is mandatory in macrophotography.
As we are done doing photographs, it is time to move to the next step.
In the modern world, it is difficult to imagine macrophotography without focus stacking techniques. From young to old, photography professionals and enthusiasts strive to keep up with trends and use Focus Stacking to achieve outstanding results. There is a variety of different software that helps with that task.
It is worth mentioning the top 3 software for that:
Today we are going to discover the 1st two software having the most common usage in the process of focus stacking photographs.

In Photoshop, to load your stack of images, we need to go this path:
File – Scripts – Load files into stack
There, choose the folder where your stacks of photographs are located. Select all the images in the folder and press the ‘open’ button. There would be a checkbox ‘Auto-align images’ do not forget to check it. It helps to reduce most of the possible frame jitters made during the shooting process. If you use Lightroom for image editing, you can load layers into Photoshop after you finish your color corrections there. As images are completed loading into layers, select the 1st layer and the last one via the shift button to select all the layers together. Then go to this path:
Edit – Auto-Blend Layers, make sure you check the box with ‘Stack Images’ and ‘Seamless Tones and Colors’ and press the ‘OK’ button. Rendering will take a while depending on the number of images in the stack. What Photoshop does is mask areas with a bad focus on the images, and then blend the best values of that within the stack. Each masked point becomes transparent on certain layers, that way you receive only good parts of the images through each other.
As you get your image rendering done with a stacked focus on it, you can now save it as a file with any preferable extension and enjoy your photo.

If Photoshop’s main feature is auto-blending layers, Helicon has also different rendering options and not only that. Helicon has 2 divisions, known as the main program which is Helicon Focus and Helicon Remote.
Helicon Remote is a computer-controlled shooting software compatible with all the latest Nikon and Canon DSLRs. Additional features are that it allows you to connect your Nikon or Canon DSLR to a computer or mobile device to automate depth-of-field bracketing, exposure bracketing (HDR), and time-lapse photography. You can also combine all of these methods together.
Navigation in main software for focus stacking is also intuitive. If you have a ready stack of images, you just need to upload them into the software using the main menu. Select smoothing and radius settings relatively and press render. Helicon has a consistent render speed compared to Photoshop where it is varied. The quality of the outcome is outstanding. Do not fall for the preview image that is shown. You need to open the rendered file to see the factual result.

The software itself has no tools for focus stacking as Helicon or Photoshop, but it allows you to merge the project with Photoshop after you are done editing your images. Lightroom is a very powerful tool to manage the color balance of your photographs. Post-production is very important if you want to achieve stand-out results, and is good for commercial use that way. Make sure to become familiar with the Lightroom to be able to prepare your stack of photos.

If previously we discussed how to do focus stacking by shifting focus from the foreground to the background through the mid-ground, our camera was on the spot and not moving. The advanced technique requires a macro slider. The trick is to get different focal points by zooming in on the static objects. This allows you to use your macro lens to its full potential. With this method, you are able to change grounds manually via the slider. The slider attaches to a chosen surface via a special tripod or the holder that is usually included. A slider allows you to adjust the frame not only back and forth but also horizontally. With that manipulation, you are able to manually separate focal points of the blurry background in one frame and get bokeh-effect.
With that method, you do the same series of shots but at different distances. Each shot covers some part that you want to stay in focus. And then we just merge it together with the sharpest parts of the photo.
If you do not have a remote shutter control, you can use a timer to avoid frame jittering. Since we have a tripod, ISO values can be neglected and set to a minimum. There are also pretty expensive tilt-shift lenses available on the market for grip manipulations. It allows you to change the density of the depth of field on the sensor’s surface.
Co-founder of RetouchMe. In addition to business, he is passionate about travel photography and videography. His photos can be viewed on Instagram (over 1 million followers), and his films can be found on his YouTube channel.
Moreover, his profile is featured on the most popular and authoritative resource in the film industry — IMDb. He has received 51 international awards and 18 nominations at film festivals worldwide.


