


How to shoot dance photography?
Apr 3, 2020
If you are a newcomer to product photography, you probably already heard about the equipment you need. Some of the equipment is very expensive on the market, and we want to make a cheap alternative to get pretty same quality product photography as an outcome. Today we are going to show how to make a photography lightbox DIY within $10-15 cost and even cheaper alternatives.
In professional studios, photographers use softboxes, light boxes, and reflectors. Names speak for themselves, but let us do a quick recap about what is what and what purpose these pieces of equipment serve to have a better understanding of what we are going to do with it.

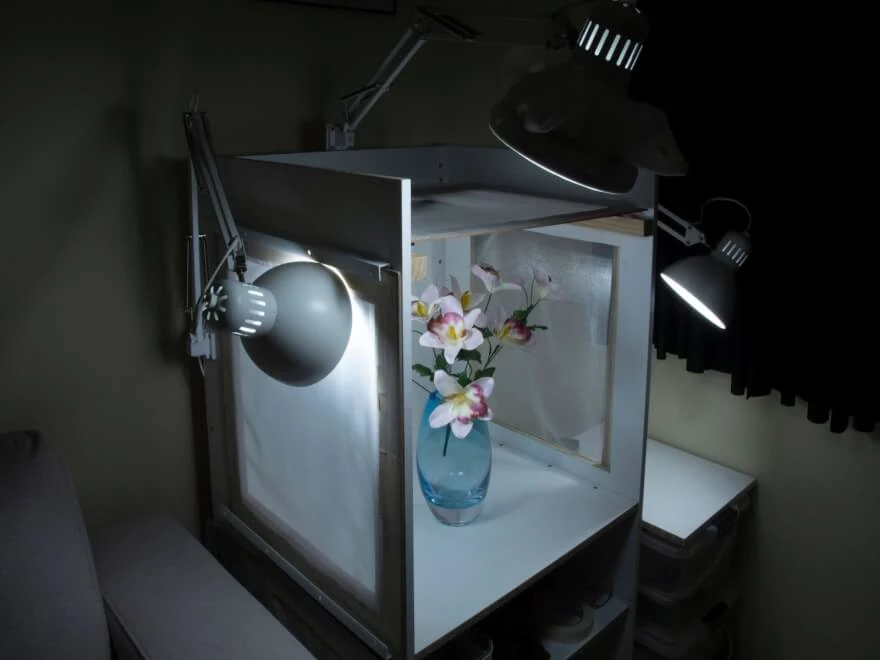
Lightbox is a photography equipment whose purpose is to create the best environment possible for product photography. And by saying environment we mean perfect white light, no background exposure, and soft or non-casting shadows from the photographed object.
All that 3 in 1 is achievable in a lightbox. A lightbox is a box with one side open that we use to photograph the object. The backside of that box will be a background that we need to cover with something. We can use the Left and right sides for the artificial light to go through.

As we have collected all that we need, let us now build photography light box step-by-step.
Cut your cardboard into pieces that we use for the sides and top. You can also make the bottom side, but we can just use our table surface instead. What we need is three sides attached together via glue or taping.

Depending on your image’s format, make sure to make your box in appropriate dimensions, so that it matches the 16:9 image format. This is very important because we are going to cut the sides in our image by zooming in with the camera afterward.
We need to make windows for our right and left sides and even the bottom if you want the lights to come through it. Use the marker to line the cuts.

Use scissors or a stationery knife to make a cut for the left and right sides, here you do not have to be super accurate because those edges will be covered with light-softening baking paper in the end.


If we just photograph with direct light rays on the subject, it will cast harsh shadows. The baking paper structure works well as a softbox, it softens the light and allows it to go through. It works like clouds on a sunny day, we still see everything but we also see how casted shadows become softened. That is our goal in using baking paper, it is our cloud.
Cut the baking paper to cover those windows which will serve to soften the light. Tape it on the inside of our box’s walls to prevent the edges from casting unnecessary shadows when the light goes through.


Tape the sides into a form of a box or glue it if you want, just make sure the structure is strong enough to hold its form and there are no gaps on the joints to prevent any influence of the outside environmental lights to come through it.
Now let us figure out the background. We need a piece of just pliable paper which usually costs around two dollars. You can get that one at Walgreens. Make sure that it is bendable because that is a crucial part of making the background for our softbox, and make sure that it is clean white as well. Here is a trick. If we simply place our sheet of white paper on the back side of our cardboard, we are going to see edges in our image if we place the sheet of paper just flat on the backside. What we need to do to prevent crease from happening is to bend a sheet of paper and tape the top to our backside and tape the tail to the table, so it has room to be bent to get a nice even curve and it does not slide off.

That bending curve will remove the bottom edge, and now we can just zoom in on our subject in the middle to hide the other 3 edges in our final image. That way we get rid of the background and make it white and easily edited in post-processing. If the sheet of paper is long enough, you can also bend its top tail to the top side of the box, so that we only need to zoom in to hide the left and right sides of our box.
Now we set up the light. We can use a table lamp, which most of us already have in our homes. Here is one important nuance, one thing that is going to be important, is you are going to want a clean white light. A lot of lights are those orangey colors, so go and find a white light bulb. Because that orangey tint will be cast on the object and may spoil the image.

But if your lamp is a bit orange and you do not want to buy another one, that is fine, because that light will go through the white baking paper which will consume the red specter a bit by itself. But it is still better to use pure white bulbs for lighting, the image would be just more clear if you are chasing perfect results.
So, we have our bulbs ready and placed on the sides where we have our baking paper already attached to consume direct light rays. That way it will not cast that many shadows on our photographing subject.
We have our filler unused. We need it in case you have only 1 lamp. That way we can set it inside the other side of our lightbox. We use it instead of the second light source as it reflects the light a bit so it fills in. If we use that method, then we only need to cut 1 window for 1 side, and cover the second side with that piece of white surface that will reflect the light. That is an option if you are looking for the cheapest way to complete your lightbox.
And here is our light box homemade ready to use! Turn on the lights, place the product on our white sheet of paper, zoom in to cut the top and side edges, and take your 1st shot. Now we are able to photograph still life, do food photographs, and even photoshooting in low light conditions with our DIY lightbox.
Here are comparison photographs where we use a complete light box, then we use a light box without the reflector and one without the reflector and baking paper, so you see the quality difference.

Do your product photography and enjoy your cost savings! Learn more about photography in our blog articles of any taste!
He started his career as a professional photo designer and retoucher. Professional commercial photographer with 20 years of experience. He is a leading advertising photographer and has worked as a food photographer with Michelin-starred chefs. His work with models can be seen on the calendars of many leading companies in Ukraine. He was the owner of the photo studio and photo school "Happy Duck".


