


Flat lay clothing photography
Jan 26, 2022
At school during math and geometry classes, students usually yawn out of boredom looking at these geometry pictures of different shapes. And this is mainly due to the fact that if a person does not understand why he needs this knowledge and how it can be used, the subject will simply not be interesting to him. And this is normal. In our today's article, we will show you how your knowledge of geometry can be useful in photography. Whether you are a beginner or an advanced photographer, theoretical knowledge of how to apply geometry together with the magic of numbers in your profession or hobby will definitely not be superfluous, and on the contrary, will bring more charm and creativity to your photos.

Before we go deep into geometric photography ideas, let's start with the basics. Why do we need geometry in photography at all, don't we just take pictures of whatever we are interested in? Geometry is the basis of many fundamental rules in nature, which apply just as well to photography. In particular, knowing rules such as the rule of the golden ratio or the rule of thirds can help you frame your composition in a way that looks harmonious and creative. Even people who know nothing about geometry will notice the difference. And all because the harmony in the image is visible even to the naked eye, and we notice it on some unconscious, intuitive level.

Have you ever admired flowers for example? What is so fascinating about plants? And all the matter is in proportion, which was noticed even by the ancients. This can be obtained by dividing a line into two parts so that the long part corresponds with the short one in the same proportion as the whole line corresponds with the long one. It is the rule of the golden ratio, and the proportion is calculated by the number Phi which is equal to 1,618. At the level of numbers, the rule of the golden ratio is traced in such sequence 1-2-3-5-8-8-13-21. In this sequence, each following number is equal to the sum of two previous numbers and if we take two numbers following each other in this sequence and then divide them on each other, then we receive the number Phi. This is called the Fibonacci sequence. Let's see how the rule of the golden ratio will look on the graph.

Even without delving deep into fundamentals, we can see the pattern to which many natural phenomena can correspond. The way flowers grow, spider net developed, the way hurricanes and cyclones are formed are all images of geometry following one of the fundamental rules. Even if we go beyond our planet and out of the solar system, we will see that the rule of the golden ratio applies to galaxies formation with the same geometric aesthetic. It turns out that in math and geometry, there is a kind of magic of numbers and shapes that are constantly interacting with each other. And when we are actively interested in such facts, we will start noticing them everywhere, including photography. It is enough just to think at the level of subconsciousness, and we will be able to say which frame we like more and which one we like less with high probability. The photo which will have more harmony in it would be connected with numbers and geometry to some extent and please our eyes.
So, what other geometry pics can we obtain besides the Fibonacci sequence and the golden ratio to our composition in photography? We mentioned the rule of thirds earlier, let's break down what it is.

If you have ever used a camera, you have probably noticed that looking through the viewfinder or your camera's display you may see the grid. This grid is there for a reason, it represents the rule of thirds. The rule of thirds on this grid is made as two vertical and two horizontal lines crossing each other at 90 degrees and thus forming 9 equal sections with 4 cross-sections. These intersections of the lines are the power points. If we place the main subject of our photograph in a certain way above or below the lines, or on the crossing point, it will give different effects of perception of the overall composition.
Let us go through a few examples of how you can easily apply the rule of thirds to your geometric form photography. First, if you do not have the rule of thirds grid turned on by default, find it and turn it on. Once enabled, we need to think about what we want to photograph. We can start with the most available and easiest to find and go to photographing landscapes. Get out with our camera away from the hustle and bustle of the city, to a place where we can see the horizon line and large open spaces. If we align the horizon line with one of the grid lines, we will get a more harmonious shot than exposing the horizon line in the center of the frame.

But which line is better to set the horizon line on? You need to evaluate which part of the frame is more interesting for your specific geometry photos. What looks more attractive, the sky or the ground? For example, there is an airplane flying in the sky, or beautiful clouds, lots of birds, and so on, then we level the horizon line with the bottom line, thus allowing the sky to occupy most of our frame. If the horizon stretches along the sea line, you have a beautiful sunset that is reflected in the water and stretches across the entire width of the frame, it will be better to capture less sky and more land or the water surface. So we even out the top line with the horizon line. These were the compositional basics for landscape photography.
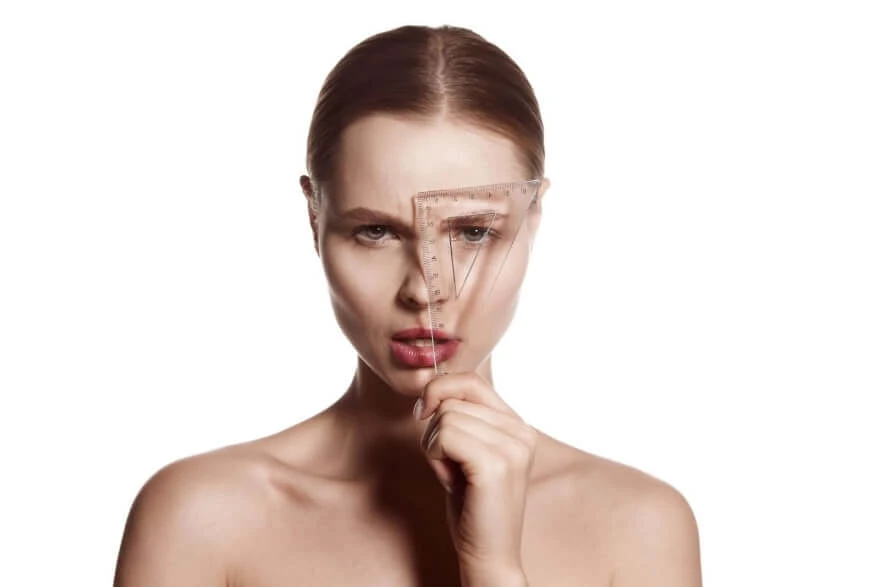
Let us now consider how the rule of thirds is used in portrait or more subjective photography. We mentioned earlier the power points of intersections. These are where our subjects of interest should be placed in the frame. Here everything works on the same principle that we applied in landscape photography: we try to avoid rigid centering of the subject in the frame, and line intersection points help us in this by setting the right coordinates. You can point your camera lens at a person's face so that one of their eyes is at the intersection of the lines, for example in the upper right intersection. Make sure that you do not leave any empty space towards the subject, otherwise, the shot can appear as intrusive as if we positioned our model just in the center of the frame. Empty spaces can be distracting and ruin our narrative. But why does this happen? That's where the rule of symmetry comes in.

Symmetry in photography can also form harmony at the expense of order. It can be direct or indirect depending on our tasks. As we found out in the example above when working with the rule of thirds, we do not want to have a lot of empty spaces in the frame. This is passive symmetry, which allows us to emphasize our main subject by filling in the blanks with something less important.

Symmetry can also be active or direct. Returning to landscape photography, we can use this compositional rule if we have an expanse of rivers or lakes and mountains in front of us. We can find the reflection of our hill or mountain in the river, thus mirroring the image, which has a little more meaning than just a beautiful view of nature. There is nothing to stop you from applying the rule of thirds and the golden ratio.
The rule of thirds is a simplified version of the golden ratio and symmetry rules. If we display the rule of thirds grid, we can superimpose the golden section graph on top and see that the concentric formula will be going to infinity exactly at the point where the lines of the rule of thirds cross each other forming power points.

Symmetry is perfectly applied in photography of architecture, buildings, and landscapes which allows us to bring a variety of spatial perspectives. You just need to learn to notice it and adjust the composition of your shot accordingly. For example, you are in the center of your city, where business centers grow like mushrooms and skyscrapers rise high into the sky. Most of these buildings are proportioned and may provide simple geometric images. The exterior is usually made up of solid windows or reflective surfaces in one way or another. We have already learned how to use reflections in nature, so try to find an interesting angle that will also allow you to capture geometric shapes pictures seasoned with symmetry in the frame.

Symmetry has good use in repetition. Imagine you have perfectly lined bicycles parked nearby some KFC or McDonald's. You can frame through that on to the brand logo telling the viewer how convenient it is to get to your restaurant or any other service. And we can find those shapes and repetitions everywhere to shoot through, thus framing our main subject and accentuating the viewer's attention where we need it.
Symmetry is the same harmony that is closely intertwined with other rules of photography. Imagine that you have an architecturally beautiful building in front of you, with a water channel or swimming pool in the center and plants and towers on the sides of the pool. We can place the building exactly in the center of the frame, thus following the symmetry due to the towers and plants on the sides and the water channel will be the leading line to the subject of our interest in the frame being symmetrical at the same time. Now we have introduced the concept of leading lines on photo, let us dwell on it in detail!


Leading lines inherently speak for themselves. These are any geometric shapes that somehow lead us to the object of interest in the frame. They can be straight lines, such as buildings or a road leading into the distance. It can also be curves or curved lines of rivers also leading to the point of interest.

Leading lines are everywhere, we just have to start looking for them. For example, the same railing that a person holds on to, with the right approach to the composition in the frame can directly point to the main subject in the frame manipulating the viewer's attention and as if hinting to look here. That is why the composition in the frame is so important, knowing how to manipulate the attention can cause more interest to the image. Thus, it will be evaluated as more creative and will allow you to stand out against other photographers with your work by the right approach to creating the composition.

Have you ever heard about the Bokeh effect? This effect allows us to emphasize the viewer's attention on our subject by blurring the background, thus cutting off the unnecessary but preserving the composition of the frame. The aperture setting is responsible for the depth of field, which is a part of the lens in the camera. Aperture works like our eye, the narrower our pupil is the more we see, the wider it is, the more blurred everything is in the distance and the better we see up close. The camera and the iris are made on exactly the same principle. The diaphragm has a hole in the center, which is formed by its expansion or contraction. This hole in the center allows a certain amount of light to pass through, which is directly responsible for the depth of field. Depth of field is a plan in the frame within which the subject remains equally sharp, and everything outside goes into a blur.
The aperture parameter is measured in F-stops and the smaller the number, for example, F/1.4, the greater the depth of field and the clearer the entire image. Such depth of field values are usually used in landscape photography where a uniform level of detail is important. This allows our camera to focus on the most distant points, making the entire frame sharp.

By increasing the aperture value, at F/14 which is 10 times bigger, we will get a shallow depth of field and the very same bokeh blur effect. That way we can now only focus on a nearby subject and the depth of field will only allow this subject to stay in focus and make the background blurred. This has common use in portrait photography and night urban photography. You can get interesting light effects with bokeh. Imagine you are sitting in a restaurant and looking behind the glass or window onto the street where traffic is going, glowing headlights and traffic lights. You can focus on your dish placed on the table while keeping the widow in the frame. Open your aperture while keep focusing on the dish, and you will see how nicely all these lights will blur in the background.
All the mentioned rules can be applied both separately and in combination to compose geometric images. You can spend hours looking for a landscape in which symmetry, the rule of thirds, and the rule of the golden ratio will give the maximum of composition. But it is better to start with the basics, and you will gradually begin to notice more and more geometry and harmony around you, which you can capture. Photography is first and foremost an art, and understanding how numbers and geometry can affect the perception of your work should be considered but not blindly followed.
Co-founder of RetouchMe. In addition to business, he is passionate about travel photography and videography. His photos can be viewed on Instagram (over 1 million followers), and his films can be found on his YouTube channel.
Moreover, his profile is featured on the most popular and authoritative resource in the film industry — IMDb. He has received 51 international awards and 18 nominations at film festivals worldwide.