


Tattoo Photography Ideas
Oct 30, 2019
Nobody can deny the fact that sharks are both beautiful and dangerous. Thus, many photographers dive deep down to take the best picture of these magnificent creatures. However, it is one thing to shoot on the surface, where we can move freely and feel confident on our own two’s, but it is a whole other different thing to shoot underwater. In addition to diving skills and proper equipment, we need to understand what kind of dive photography equipment we need and what kind of environment we get in. Today, we are going to break down tips and tricks to shark photography, as well as discover the equipment and settings.
Before we go on our underwater adventure, we need to decide where we are going to photograph. Probably the most shark population is at Tiger Beach, which is about 20 miles from Grand Bahama Island in the Bahamas. The number and variety of sharks here make it one of the “sharkiest” places on earth. Most of the dives are about 30 feet deep, the water is very clear.

The first thing most people think of is their safety interacting with sharks. If you are an experienced diver, you may already know that sharks usually never attack you if you are not threatening them and stay calm. However, additional safety would not be out of place. It is recommended to use cages to photograph from the inside if this is your first experience. But most stunning shots are attainable when you are in the middle of the action.


Besides the diving equipment itself, photo equipment to dive with is also unique. You need a dome for your camera to cover it and strobes to work in low light conditions.
A 230 mm dome port is a good way to get quality shots underwater and is also very handy for doing split shots and for some beach pictorial ideas when you photograph both under and above the water in one frame.

Using something like a 4-inch mini dome port, you need to take into consideration your aperture settings. To prevent distortion and edge softness, you need to lower your aperture accordingly. Especially this important when going deeper at the reef level, in that case, you have to either lower your shutter speed or increase ISO.
Sharks are different kinds and behavior, so the lenses should correspond.

There is also a good option for compact camera users with wide-angle screw-on lenses with a 130-degree angle. This lens allows you to shoot up close and fit the subject in your frame without getting back away from the subject.
Kraken, Inon, and Fantasea are good options for this representation on the market. There are two types of these lenses, made of glass and perspex. Make sure to get the glass one for better quality.


Strobes are essentially making the difference in terms of lighting color and details. The deeper you go, the more ambient light we lose. Especially the red light and the orange light coming from the sun is what we lose in the first 10 meters, and that makes all the pictures look more flat because water is like a filter for reds and oranges which makes the image look green as in the image below.

If you bring a strobe in, now the light travels not from the surface to the subject 20-30 meters away, but from the strobe right next to the subject. That way we do not lose any reds and oranges anymore because it is just a couple of meters of traveling time. And what it does with sharks, is it really brings out the color and separates the subject from the background. That is something you want to achieve in order to create depth and also to make the picture look more interesting if the subject is lit in a different color than the background. That way, strobes allow you to do subject separation as well as create details.
Place the strobes behind your dome port or behind your lens because that helps us avoid backscatter. As long as you draw a visual line at the front of your lens, you want to have the strobes behind it.
Here is another thing that is recommended to do with the light. We never use a direct light beam shooting directly at the subject. The light should be aside from the subject to prevent overexposure, since sharks have white bottoms.
The general setup is wide-angle, but when the shark comes really close, almost touching your camera, you need to adjust your lighting setup and make it closer as well. So with a wide angle, you want to have the strobes further out, so you can cover with your fringe light the entire photo. But if a shark is going to come close, then you need to bring your strobes really close to the camera, so the light actually lights up whatever is in front of you. If you let your strobes be wide in the close-quarters shots, you will receive annoying shadows on your subject. Therefore, the closer the shark – the closer the strobe.

So, how do we photograph these awesome animals? Tiger sharks can grow up to 15 feet or more, and the hammer head is 12 to 15 feet easily, almost as large as the great white shark and half the size of a whale shark. To photograph large sharks, we need to get as close as possible and use a wide-angle lens. If you use a DSLR camera, you will want something around 15 millimeters, and a fisheye lens is even better to fit your subject in the frame. A GoPro or action camera has a very wide field of view too, which is exactly what we need.
Luckily, a lot of marine animals are very curious and willing to get close if we remain calm and non-threatening, which leads to our next tip – always keep calm. There could be situations when a great hammerhead shark is approaching you and even hit your camera. This is not aggressive behavior, but someone can consider this a shark attack. As soon as their teeth touch the camera, they will recognize that this is not food and move on.
Another thing you want to do in shark photography and pretty much all underwater photography is to shoot up. Point your camera somewhat towards a surface, this produces a pleasing effect.
If you are using strobes, which is the same thing as a flash, make sure to turn them to fairly low power. Most sharks have a white or light-colored underside, and it is very easy to blow out and overexpose that part of the image if your strobes are too strong.
You would be surprised how challenging this can be, even with the use of fisheye or wide-angle lenses. Sharks are enormous and they come in super close. If you cut off part of the shark, that is a failure. This could be fixed only with trial and error, comes with experience.
As you look around for good subjects, you will see lots of other sharks swimming nearby. These include reef sharks and lemon sharks. They are all quite docile and could sometimes bump into you accidentally, you may not even pay too much attention to them, looking for larger sharks. One species that lurk around that we do need to watch out for is the bull shark. Bull sharks look like reef sharks, but with a more athletic look. They are stocky and streamlined. These sharks could be dangerous, so you need to keep an eye on them. So make sure to learn your subjects before diving in the open, cage-free.
Probably the biggest challenge to photographing sharks is the constant multitasking you need to do. It requires being on all the time, always looking around for big sharks, and never forgetting that sharks are sneaky hunters, so you never want to let one sneak up on you.
In addition to camera angle usage, we should mention that shooting from below is probably the best option, however, sometimes you can get stunning shots from the top-down. It works great, especially if you want to do some storytelling shots showing sharks' socialization. While doing a baby shark photo shoot, try to catch them moving around with big sharks and find interesting proportion interactions.
Do not forget to experiment. Trying to do some black and white shark photography. Black and white photography usually brings some new life even to bad photos. It can cover unnecessary shadows and blend bad details into something new looking. So make sure to run all your bad shots through some photo editor to see if it may change something.
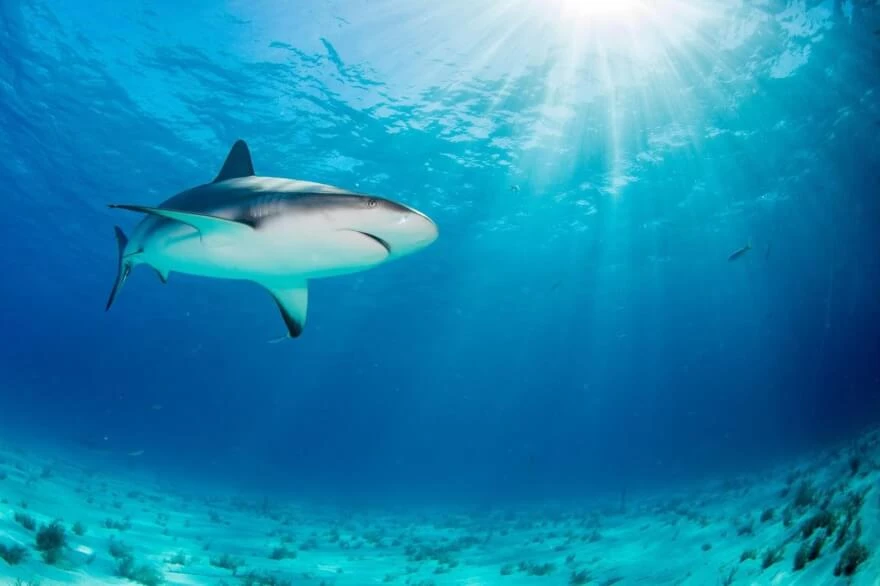
There are also some good photo manipulation ideas, like shooting a shark from straight below when the subject crosses the sun and covers it with his body. That way you get the sunburst effect and do not spoil your lighting setup with it. For that, you need to be in a right place and put your strobes on maximum power to beat the ambient light of the sun at the surface going through the water.

And also, when you shoot from deep down, you can make some silhouette photographs with it for the storyline in your collage cover.
Let us bring up some numbers. It depends on the region. For example, the average photographer in the United States makes around $50 000. The lowest considered salary is around $10 000. The most famous shark photographers make above $250 000.
He started his career as a professional photo designer and retoucher. Professional commercial photographer with 20 years of experience. He is a leading advertising photographer and has worked as a food photographer with Michelin-starred chefs. His work with models can be seen on the calendars of many leading companies in Ukraine. He was the owner of the photo studio and photo school "Happy Duck".


