


Reflection Photography Ideas
May 23, 2024
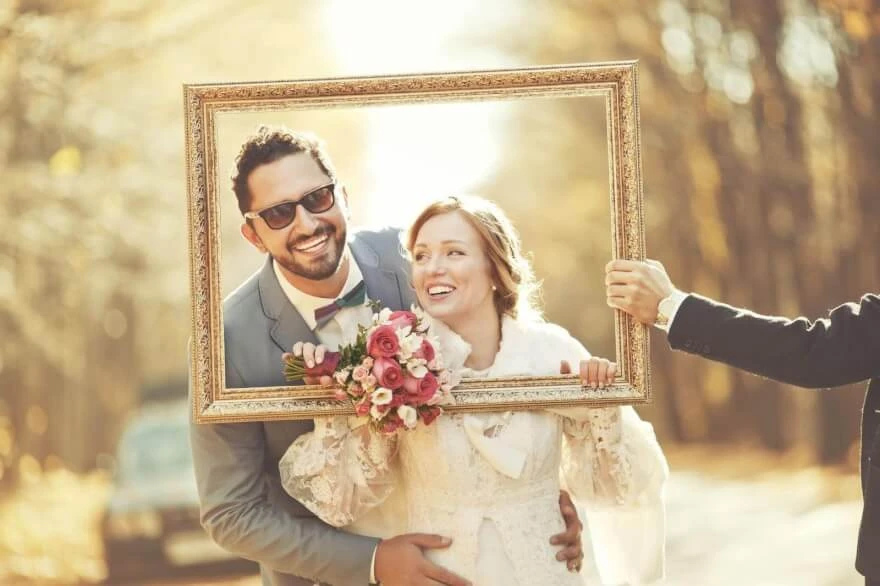
A wedding is an event that often happens at least once in everyone's life. This has elevated the photo industry to a degree of necessity as such an event takes place in people's lives on a constant basis. The specificity and permanence of wedding photo shoots have introduced special styles that are constantly changing. If we pay attention to the wedding photos of the last century, people were just capturing the joyful moments of their lives, and by today's standards, we strive for uniqueness. This trend makes adjustments in opening up new spaces for the introduction of new styles in wedding photo shoots. And light and airy wedding photography is one of the things which we are going to talk about in this article.

The light and airy photography style is best described as a soft fantasy implemented in the image. This way we usually see dreams when we sleep, good dreams though. No vibrant colours or harsh shades makes you look like an integral part of the place you are photographing in and make you dissolve into it. This style is very good for couples who prefer outdoor shots that will stay as sophisticated as they are and encrypt that image into their photoshoot. Light and airy wedding photos appear to be one of the major wedding photo styles in line with Dark and Moody, Traditional and many others. The best way to describe light airy wedding photography style is to look at the Dark and Moody style in comparison and you will get a better idea. This style borderlines with epic where we are able to see shadow and light aberration distorted on silhouettes of photographed people which makes their image look dreamy and ethereal. If to speak more technically describing the style of light and airy photography we use flat lighting to minimize shadows and make them soft. We use low-contrast features to flatter the image, that way lack of shadows allows us to hide blemishes in a photo.

When it comes to shooting light and airy wedding photos it is very important to follow essentials. And the 1st essential is to shoot for the edit. When it comes to this style a big misconception is that the magic happens in the edit. And oftentimes when photographers are first learning this style, a big mistake occurs that they focus more on how to edit for it, rather than how to shoot for it first. This is why one-click presets while great in theory are often disappointing. It is not that the presets are not great, but when you are not shooting for that final edit, no amount of editing in the post or presets is going to fix that. Your results are going to be as inconsistent as your shooting and will often fail to live up to your expectations. The photographers that have mastered this style of photography carefully consider that end image, before ever even clicking the shutter. So if you are not getting the kind of images that you have in your head or on your inspiration board, the main suggestion here is to focus on the number one area that is going to make the biggest impact in your photography. And that is mastering the natural light.
Following essentials, your background choice can drastically make the difference in light and airy photos. You want to avoid things like thick greenery, shrubs, and trees in the background of your photos in this style. The more light you allow in your photos the better it is going to be and all the listed above prevents light from going through and thus making it heavy not lighter. Compositions you should be looking for are wide open spaces where lots of light is able to get into your camera lens.

Make mastering the subtle nuances of natural light the top priority. Understand how to use light to flatter your subjects. Control the focus of the image, elicit emotion, as well as how to use lighting in a way to craft beautiful images regardless of the time of day or circumstances. This is going to allow you to walk into all of your shoots super confident, that you can create your best work no matter the circumstances. With that approach, you will achieve the dreamwork art of your life as well as pleasing the customer. As we have the right mental set, let us see how the magic starts in the camera.
The light is a key factor here embedded in lighting itself so it is essential to time your session right. Here is an unpopular opinion that shooting in Golden Hour is not the best way. Golden Hour is the last hour of the daytime’s light before sunset. This time has a distinctive orange tint which does not play well in light and airy style. Instead, you can try to shoot two hours before the sunset to have an hour before the Golden Hour to get your photoshoot done and thus avoid the orangy colors. If you time it perfectly you will catch the sun in a sweet spot where it is not casting ugly shadows over your customer's head and stays on a right angle to get this light and airy style with it without orange tints. Shooting at midday is also not the best time because of the harsh lights. We want to look for open shade which is the best friend for light and airy photography. Open shade is a large area where a building or a big three is casting a large area of shade so that your customer could be fully shaded within but still have the surrounding light.

The best light and airy photographers are extremely intentional in the way they design and craft their images. The goal is to essentially disappear from the image. It becomes more about that thing as a creative hack, the photographer’s creativity, than about the subject and the people and the emotions and the moment that we captured in the image. However, the beauty of this style of photography is the simplicity of it. To start down this path, we need to learn visual hierarchy and composition beyond the rule of thirds. The rule of thirds is a great starting place, but this is one of the most common compositional techniques, and it is often where most people stop. There is so much more when it comes to the design of your image to be able to take it to the next level. From learning the various other compositional techniques to learning how compression and lens choice works in your images, framing, and cropping for impact, and even how color can take effect on your photos. A good way to learn different compositional techs is to visit a museum and see how artists draw their pictures. It will give you a better idea about different styles and elevate you to the status of art director of your images.

Another essential thing is to expose your shot not for the background but for the subject. Light and airy photos have often blown out skies and many photographers say that is inappropriate. But if we have even light going over the body of our customers we have to sacrifice this and fix it in post.

If you are spending a lot of time editing your photos it probably means that you are not nailing the shooting fundamentals, like lighting and visual hierarchy in the camera, and are instead needing to spend a lot of extra time editing to fix it. However, the goal should be to enhance and work with the data that you already captured intentionally in the camera, not fix it. When you do this, not only will your edits become so much faster, but they will also be better and more consistent. For example, experienced photographers intentionally underexpose their images when shooting in a backlight scenario or when there are highlighted details to perceive in the image. By knowing this in advance you are able to more thoughtfully capture the image the right way in camera in order to have all that beautiful detail when it comes to editing. This is much better than trying to fix things in post-production when things are blown out, and they do not have that sky, skin tone, or other details presented anymore. Because the light and airy style is inspired by the richness and beauty of the film, you want to make sure that you pay attention to the entire image, not just the subject. Ensure that it all supports your end vision and the feelings and emotions that you want to evoke.
And to help with this it of course helps to be knowledgeable in Lightroom or Photoshop and how to edit to really bring your images home and create that end vision. Besides just using presets, which are not bad to speed up the workflow, you need to understand what those presets are doing to be able to customize them to your particular style and needs. And the area that is most recommended for learning beyond just the basics is mastering the curves tool in order to control the tonal ranges of your image.

If you are looking for a professional way to edit your wedding you can use a certain package of our professional services. With a team of dedicated professional Photoshop designers, we developed an app that allows you to retouch your photographs in a couple of clicks. With this service you can set a certain style for your image, be it light an airy pastel or any other style, and our editor will follow that and surpass your expectations. We also have an app with over a hundred options and services to choose from packed in a dozen of categories for your convenience. Here you can find all the types of possible editing tools and this library constantly updates.
To draw a conclusion we keep in mind that the most important factor in light and airy style is to not shoot to edit but edit to enhance your images. With the right composition, exposure, and light usage we can have these images as pure as they suppose to be without any need for additional editing. However, if you still want to enhance your photo, and you have no experience in Photoshop and want to make it quick, you can still use our PRO services for that matter and the results will not leave you uncertain.
Co-founder of RetouchMe. In addition to business, he is passionate about travel photography and videography. His photos can be viewed on Instagram (over 1 million followers), and his films can be found on his YouTube channel.
Moreover, his profile is featured on the most popular and authoritative resource in the film industry — IMDb. He has received 51 international awards and 18 nominations at film festivals worldwide.