Astro Image Processing: Everything You Need to Know

Astro Image Processing: Everything You Need to Know

Updated: Apr 28, 2024
Created: Mar 25, 2024
Time to read: 10 min

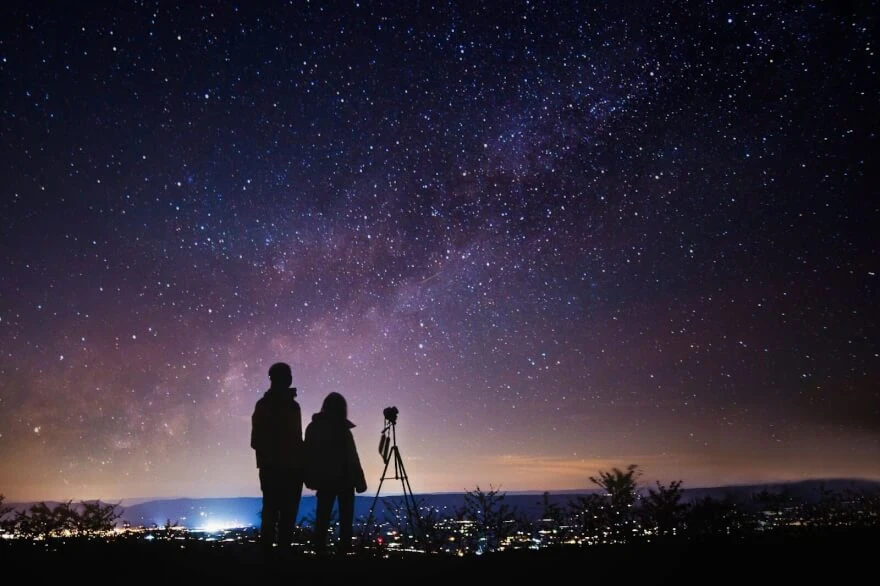
Imaging stars in the nightsky can be one of the most rewarding things to do in amateur astronomy. You are literally collecting photons of light from objects that are hundreds, thousands, or even millions of light years away. This process can also be complicated. In this guide, we are going to break down the basic steps and techniques and how to post-process astrophotography to reveal the beauty of the universe that unprocessed stargazing images may keep hidden.

Astrophotography image processing - Capturing process

Before the astrophotography editing process, we need to capture specific frames that are required in the post. So the shooting process is initial here.

Light Frames

The process starts with capturing the Light frames. Light frames are a significant part here because they are actual data of the objects that we are capturing in the nighttime sky that is going to be mainly used in astrophotography post-processing. Nothing else beyond this initial process really matters unless we have sharp, properly exposed images to work with down the line. An important concept to understand for the light frames is referred to as the signal-to-noise ratio. Basically, the more light frames we have the more we can stack that data to pull out fine details of these deep sky objects.

  • Capturing these images you need to make sure that you have RAW images captured in manual mode with proper exposure settings. After you meet that requirement you need to get a sharp focus.
  • Focus on the brightest start that you can find.
  • For proper exposure, set the shutter release to 15-60 seconds.
  • To determine which time is best press the info button to see the difference in histogram for each image. Our goal is to have the histogram at about three-fourths of the way over to the left.

The more light frames you have to stack together in the post the greater your signal-to-noise ratio will be. This will bring out faint, fine details.

Flat Frames

Flat frames improve the quality of our image when we are going to edit astrophotography by removing unwanted differences in brightness such as vignetting, and dust shadows on our sensor. To do that, your flat frames need to be perfectly illuminated across the entire field of view when you capture them. To accomplish this, make sure that your imaging setup is in the exact same orientation as it was for the light frames, and keep the raw quality with the same ISO and F-number as before. The only thing to change is the mode from manual to AV.

The technique lies in having a white stretched piece of fabric to put on your camera lens with a light source attached to it. Press the shutter button to take your flat frames (50-75) for future stacking. Make sure there is no wrinkles in the white piece of fabric and it is perfectly stretched. For the light source, you can use your iPhone with a brightness turned up to 100%.

Bias Frames

Bias frames are quickest to take, and require you to place the cap on your lens to make sure that no light gets onto your sensor. These frames will improve the image by removing the bias signal and read noise from our sensor. Switch your camera back to manual mode, and keep the same RAW quality and ISO setting that you have used before. Select the fastest shutter speed in the available camera settings. Take as many bias frames as you like, the more the better, around 75 is fine for astrophotography photo editing.

Dark Frames

These are used to improve our image when we will do photo editing for astrophotography by removing the thermal signal and hot and cold pixels that may have shown up throughout the evening. Like bias frames, you want to make sure your lens cap is on so that no light hits your sensor. But unlike the bias frames, you want your exposure length to be the exact same as the light frames that were captured earlier. 75-150 dark frames are the goal here.

Now, that you have collected all of those frames, it is time to know how to process astrophotography images.

Astro photo stacking software

As you get your images on your PC, the initial processing starts with stacking the photos. Image stacking is an essential technique for deep sky astrophotography and there are many different astrophotography stacking software available that can stack your images, some are free, some paid, some are easy to use and some are complex.

  • DeepsSkyStacker
  • PixInsight
  • Siril

DeepsSkyStacker and PixInsight are the two most common software that you may find for image stacking astrophotography. Siril is a great free open-source project in active development

How to Process Astrophotography with DeepSkyStacker

Being under development this software stays very consistent for image stacking.

As you open it up, you will see the reference settings for the frames you have captured: Dark files, flat files, offset/bias files, and light files. Just fill in the frames you have captured under the relevant tab and press the ‘check all’ beneath.

This process may take a while depending on your computing powers. Beneath you will get the scores for each of the Light frames which allow you to pick the best photos. The higher the score the better the image quality. Select one with the higher score and set it as a reference frame which the software will stack the rest frames of off (Right-click → Use as reference frame).

Now click on the ‘Register checked pictures’. Keep the settings as default here, then go to the Actions tab and click on Stacking parameters. Make sure the ‘Standard Mode’ is checked in the ‘Result’ tab

Now go to the ‘Light’ tab, let’s review the settings here for the Stacking mode:

  • Average: This setting will average all of the frames together but keep things like streaks of planes and satellites which we want to get rid of. Hence, this setting is only applicable if you are sure you have your frames clean of planes and satellites.
  • Median: Excludes planes and satellites, but you lose faint differences in brightness. Sometimes it leads to getting a stair-stepping effect making it not a smooth gradient from one brightness to another.
  • Kappa-Sigma: This setting is a perfect middle ground for the previous two taking the best of both worlds - the precision of brightness and the clipping that takes out bright extreme pixels that stand out (satellites, planes). This setting is recommended.

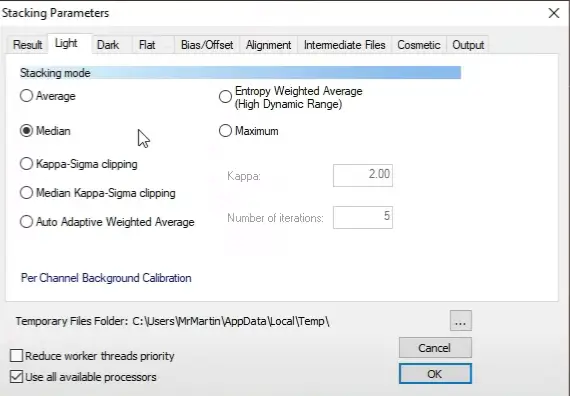
For Dark, Flat, and Bias frames (tabs) set this to Median Kappa-Sigma clipping.

Keep the rest of the settings by default, and make sure the Alignment tab has the Automatic setting checked. As you get all of these done, press the OK to start stacking. The processing may take up to an hour depending on how many frames you are stacking and your CPU powers.

As you have finished stacking, the results might not look promising as there is a lot of data to pull out from there using additional software.

Editing astrophotography in Photoshop

Now we need to pull out the hidden data from our stacked TFF image file. As you open it in for the first time, you won’t see anything impressive. That is because the data is hidden and that is why the post-processing occurs. Here is how to do it in Photoshop:

  1. Open Stacked Image in Photoshop
  1. Adjust Levels:
  • Go to the "Image" menu and select "Adjustments," then choose "Levels" (or press Ctrl + L).
  • In the Levels dialog box, adjust the input levels sliders to improve the overall brightness, contrast, and tonal range of the image. This helps reveal faint details in the astrophotography.
  • Move the black point slider (left slider) to the right to adjust the black point, and move the white point slider (right slider) to the left to adjust the white point. You can also adjust the midpoint slider to fine-tune the midtones.
  1. Enhance Contrast with Curves:
  • Go to the "Image" menu, select "Adjustments," and choose "Curves" (or press Ctrl + M).
  • In the Curves dialog box, you can create an S-curve by clicking and dragging on the curve line. Dragging the lower-left point downward darkens the shadows, while dragging the upper-right point upward brightens the highlights. Adjust the curve until you're satisfied with the contrast enhancement.
  1. Reduce Noise:
  • If your image has noticeable noise, you can reduce it to improve the clarity of details.
  • Go to the "Filter" menu, select "Noise," and choose "Reduce Noise."
  • Adjust the sliders for Strength, Preserve Details, Reduce Color Noise, and Sharpen Details until you achieve the desired noise reduction. Preview the changes and click "OK" when satisfied.
  1. Increase Sharpness:
  • Sharpening helps to enhance fine details in the image.
  • Go to the "Filter" menu, select "Sharpen," and choose "Unsharp Mask."
  • Adjust the Amount, Radius, and Threshold sliders to sharpen the image. Be careful not to overdo it, as excessive sharpening can introduce artifacts.
  • Preview the changes and click "OK" when satisfied.
  1. Adjust Color Balance:
  • To improve the color balance of the image, you can adjust the levels of individual color channels.
  • Go to the "Image" menu, select "Adjustments," and choose "Color Balance" (or press Ctrl + B).
  • Adjust the sliders for Shadows, Midtones, and Highlights in the Color Balance dialog box to fine-tune the color balance. Make adjustments until you're satisfied with the colors in the image.

Once you're happy with the adjustments, save your edited image. Consider saving it in a high-quality format such as TIFF or PNG to preserve the image quality.

These steps should help you reveal and enhance details in your astrophotography images using Adobe Photoshop. Experiment with different adjustments and settings to achieve the desired results.

Editing astrophotography in Lightroom

In pretty much the same way you can process your stack in Lightroom:

  1. Launch Adobe Lightroom and import your stacked astrophotography images into the Library module.
  1. Basic Adjustments:
  • Switch to the Develop module.
  • Start with basic adjustments such as exposure, contrast, highlights, shadows, whites, and blacks to adjust the overall tonal range of the image. Be careful not to clip too much of the highlights or shadows.
  • Adjust the white balance to correct any color casts. Since astrophotography often requires shooting in dark environments, you may need to experiment with the white balance settings to get accurate colors.
  1. Noise Reduction:
  • Scroll down to the Detail panel.
  • Increase the Luminance slider under Noise Reduction to reduce the noise in the image. Since astrophotography often suffers from high ISO noise, you may need to increase this slider more than usual. However, be careful not to overdo it, as it can lead to loss of detail.
  • You can also experiment with the Color slider to reduce any color noise present in the image.
  1. Sharpening:
  • Adjust the Amount, Radius, and Detail sliders under Sharpening to enhance the details in the image. Astrophotography images can benefit from a bit more sharpening to bring out the fine details of stars and celestial objects. However, again, be cautious not to overdo it, as it can introduce artifacts.
  • Hold down the Alt key (Option key on Mac) while adjusting the sliders to visualize the effect of sharpening and avoid haloing.
  1. Lens Corrections:
  • If necessary, apply lens corrections to correct any distortion, vignetting, or chromatic aberration caused by your lens.
  • Go to the Lens Corrections panel and enable the Profile Corrections and Remove Chromatic Aberration options.
  1. Gradient and Radial Filters (Optional):
  • Use Gradient and Radial filters to selectively adjust specific areas of the image. For example, you can darken the sky to reduce light pollution or enhance the brightness and contrast of the Milky Way.
  • Experiment with different adjustments such as exposure, contrast, clarity, and dehaze to achieve the desired effect.
  1. Final Touches:
  • Fine-tune your image as needed, making adjustments to clarity, vibrance, saturation, and other settings to enhance the overall look of the image.
  • Take your time to experiment with different settings and find the right balance between noise reduction, sharpening, and other adjustments to achieve the desired result.

Once you're satisfied with the processing, export the image in your desired format and resolution.

Remember, astrophotography processing is highly subjective, and there's no one-size-fits-all approach and you need to learn how to process astrophotography with your particular image. Experiment with different settings and techniques to find what works best for your specific images and artistic vision.

Share
Author
For commercial photographers
Retouchme Pro
Retouchme Pro
Retouching for Professional Photographers
Enhance your commercial photos with professional retouching!
Learn more
Our other products:
For mobile retouching
Before/after example
Transform Your Silhouette with RetouchMe
4.4
15570 Reviews
For TikTok influencers
bg
AppStore
Impressive effects for TikTok
Create videos with special effects like social media influencers!
4.2
47 Reviews
Learn more
For commercial photographers
Retouchme Pro
Retouchme Pro
Retouching for Professional Photographers
Enhance your commercial photos with professional retouching!
Learn more
Retouch your photos using packages

Colors & Cropping
Create order
Base Edit
Create order
Advanced Edit
Create order
High-End Edit
Create order
Wedding Light
Create order
Wedding Pro
Create order
Pro Color Correction
Create order
Subject Retouch
Create order
Clipping Path
Create order
Architecture Photo
Create order
Jewelry Retouch
Create order
Restoration Photo
Create order
Custom retouch
Create order
Portrait retouching
Download example
Body retouching
Download example
Newborn editing
Download example
Wedding editing
Download example
Pro color correction
Download example
Product retouching
Download example
Сlipping path
Download example
Real Estate photo
Download example
Jewelry Retouch
Download example
Portrait retouching | Basic
Download example
Portrait retouching | Advanced
Download example
Portrait retouching | Pro
Download example
Portrait retouching | High-End
Download example
Body retouching | Basic
Download example
Body retouching | Advanced
Download example
Body retouching | Pro
Download example
Body retouching | High-End
Download example
Newborn editing | Basic
Download example
Newborn editing | Advanced
Download example
Newborn editing | Pro
Download example
Wedding editing | Basic
Download example
Wedding editing | Advanced
Download example
Wedding editing | Pro
Download example
Wedding editing | High-End
Download example
Pro color correction | Pro
Download example
Product retouching | Basic
Download example
Product retouching | Pro
Download example
Сlipping path | Pro
Download example
Real Estate photo | Basic
Download example
Real Estate photo | Pro
Download example
Jewelry Retouch | Basic
Download example
Jewelry Retouch | Pro
Download example
Jewelry Retouch | High-End
Download example
The photo size is too small. Please choose another one.