


Reflection Photography Ideas
May 23, 2024
Editing photos in Photoshop can be a hard task, especially for beginners, as comprehending all the tools presented here requires a lot of time and dedication. But even advanced users and professionals struggle to find some of the hidden gems in Photoshop that are already there. In this guide, we talk about the 10 best photo filters in Photoshop. Some of them are just underrated and stay invisible for our consideration, but we explain their value and usability. Moreover, we are going to mention some of the top Photoshop filters and plugins that you can find outsourcing the software and download them to improve your workflow in Photoshop.
If you click on the Filters you will see a drop-down menu that contains some of the filters. But you will never find the ‘Shadows and Highlights’ filter down there. For some reason, developers decided to put these cool Photoshop filters into the ‘Image’ section within adjustments.

This filter works especially well when you are thresholding or half-toning something. Opting for this filter allows you to control the intensity or brightness of your shadows and highlights separately which is the main reason for this filter. Click show more options check box in the context menu of the filter to get more fine-tuning settings.
An amazing tool number two is minimum and maximum. These filters are in the filter drop-down under the ‘Other’ section. They are separate for Minimum and Maximum and you probably never use these filters because they appear pretty much useless at a distance. But they become absolute lifesavers when working with layer masks. These two filters only affect black and white values on the canvas and the layer masks work perfectly with them.
These two filters allow you to fine-tune your layer maks. The minimum filter shrinks areas of white values and expands areas of black values. The maximum filter does just the opposite in accordance.
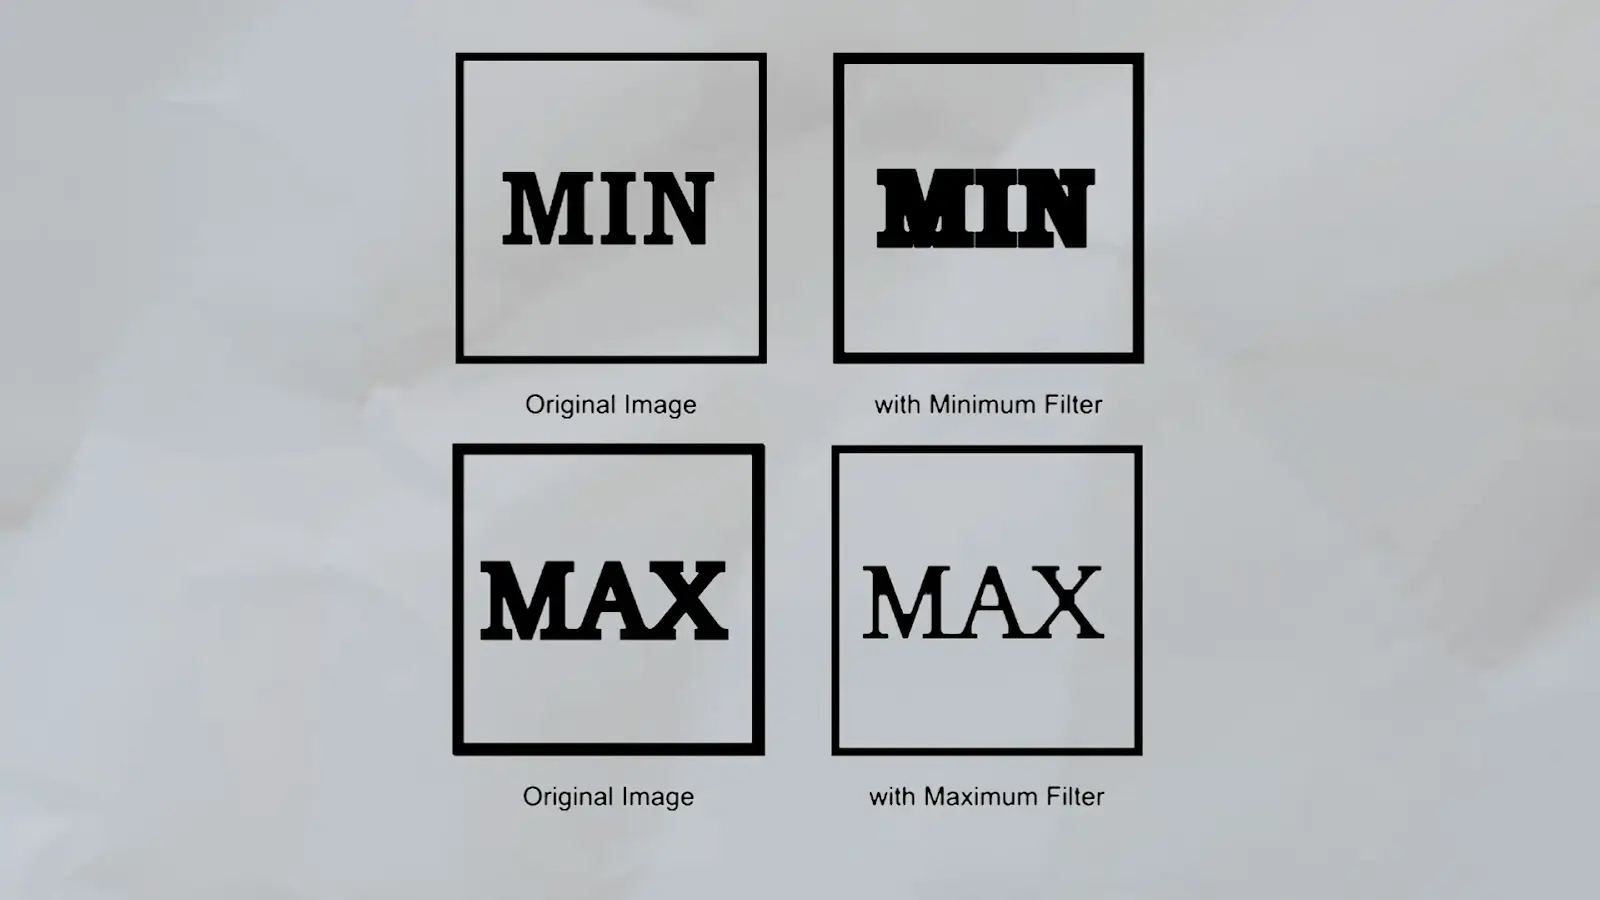
Let’s say you are working with a photo and you notice a white Halo on the photo which may appear after inaccurate use of the ‘Quick Selection’ tool to cut the subject of the background image. You can also get this halo working in PNG format, so the filter fixes that halo issue perfectly. With these filters, you do not need to go painting the white halo away by hand.
Here is how to use it:
Start with 4-5 pixels value and see how it affects the canvas. Turn on and off the layer mask to see the difference.
As we mentioned earlier, these are the best filters in Photoshop to work with black-and-white values which commonly occurs working in PNG format. In this regard, you can not only fix the halo issues but also fix black graining in some pictures by thresholding it with the Maximum filter which is the opposite use to what we have done with the Minimum filter.
The filter number three is the ‘High Pass’. A lot of people know that this filter exists but they are not really sure what to use it for. To put it really simply, it is a great filter to sharpen your image or de-noise it. It is a great Photoshop filter for portraits as it basically allows you to separate the frequencies of your portrait image.
To access the High Pass filter go to Filters → Other → High Pass. Once you click on this the results are pretty jarring and may scare you. There is a Radius parameter to go from high to low frequencies. The high freqs of the image would be the fine details - the things that are sharp and defined, such as the texture of skin, hair, and things like that. The low frequencies would be the overarching tone or values of the image. The good way to think about that is to think of the high frequencies – the details as texture, and the lows as light or value.
So the first use of it is to sharpen the image with a high pass, to do that:
This will overlay that extra texture on the image and sharpen it up for minute details that you will notice right off the bat or by using the zoom-in tool. Turn that duplicated layer on and off to see the difference clearly.

The opposite use of a High Pass filter is to denoise the image. Let’s say you want to get rid of some of the details instead of enhancing them. For that, you can either move the Radius slider into the opposite direction or invert the layer that you have already duplicated by pressing CTRL+I on your keyboard. Turn the duplicated and inverted layer on and off to see how the image blurred out reducing the amount of details. Use these two filters for enhancing details or blurring the extras.

One of the plugins that you may use as extra to High-Pass filters is Portraiture by Imagenomic. Delving into the realm of close-up photography, Portraiture stands out as a specialized tool tailored specifically for enhancing portrait photographs. Offering a range of features, Portraiture caters to the nuanced needs of portrait editing:
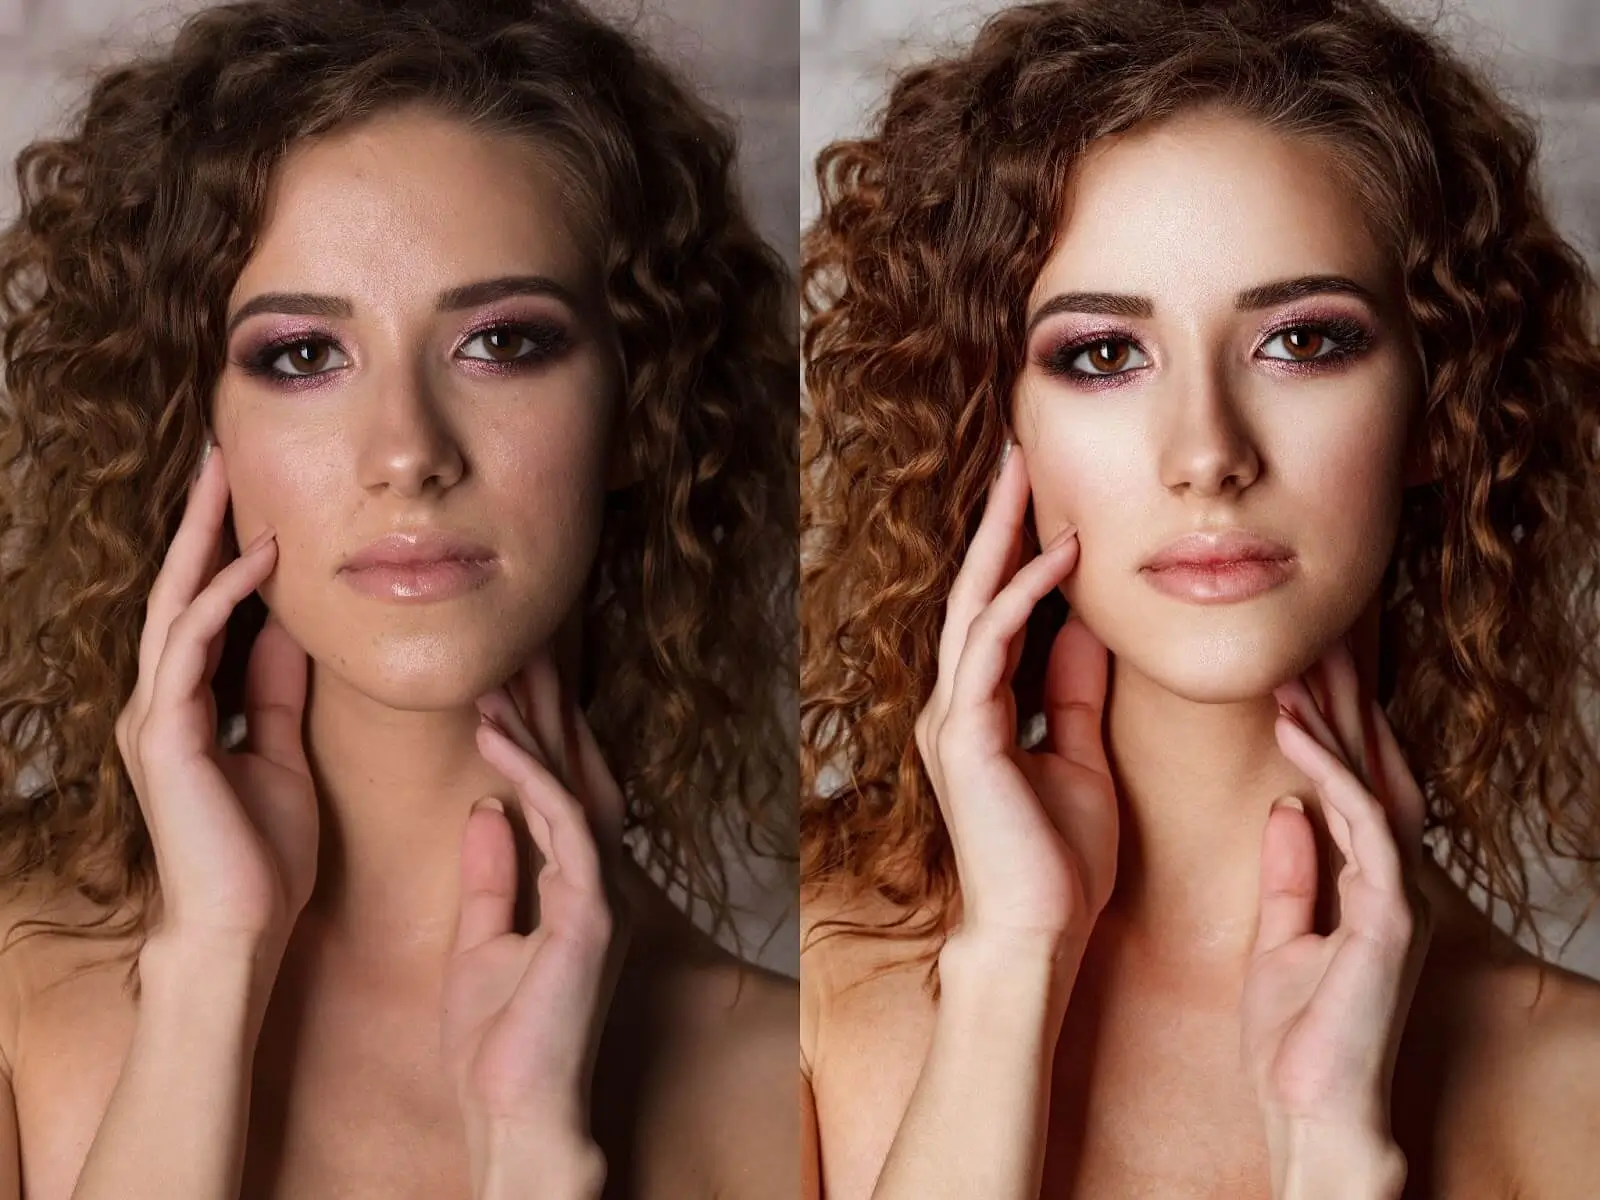
In practical application, Portraiture empowers photographers to elevate the skin tones of their subjects while maintaining a natural appearance, resulting in flawlessly captivating portraits cherished for generations to come.
To harness the capabilities of Portraiture, photographers can seamlessly integrate it into their workflow: Simply open Photoshop, load your desired image, and access Portraiture from the Filters menu. From there, fine-tune the settings in the control panel to align with your creative vision, and effortlessly apply the desired enhancements.
The number four on the list is the Camera Raw filter. This is pretty much a mini Lightroom inside of Photoshop which is a super powerful feature to have. If you are working with RAW or High-quality photos this is great to do some mini color grading or just adjustments to the image as a whole. But besides being useful for actual photography it is also a great filter to put some finishing adjustments on your work.
So, let’s say you are working on a designer poster for a magazine. Open up camera raw: Filter → Camera Raw Filter. Here you will see a menu that has everything for exposure contrast, highlight shadows, color corrections, color temperature, vibrance, saturation, curves, optics, and so on. These settings are pretty much a standard for any color grading software. Play with the sliders to fine-tune the image or a poster in this powerhouse.
Last but not least of hidden gems that we have inside Adobe Photoshop is the Field Blur filter. This filter lets you blur based on points that you set. So you can create a mesh of different blur values all over your image. To access the field blur go to ‘Filter → Blur Galley → Field Blur. This tool might be doing that way better than dodge and burn if you are going for a more stylized look or just trying to keep some detail in the image. So it is pretty much self-explanatory: you make a point and you set the blur value for that point. This allows you to separate blurring areas of the image preserving details in the areas you need and blurring the areas where you want this filter to take an effect.
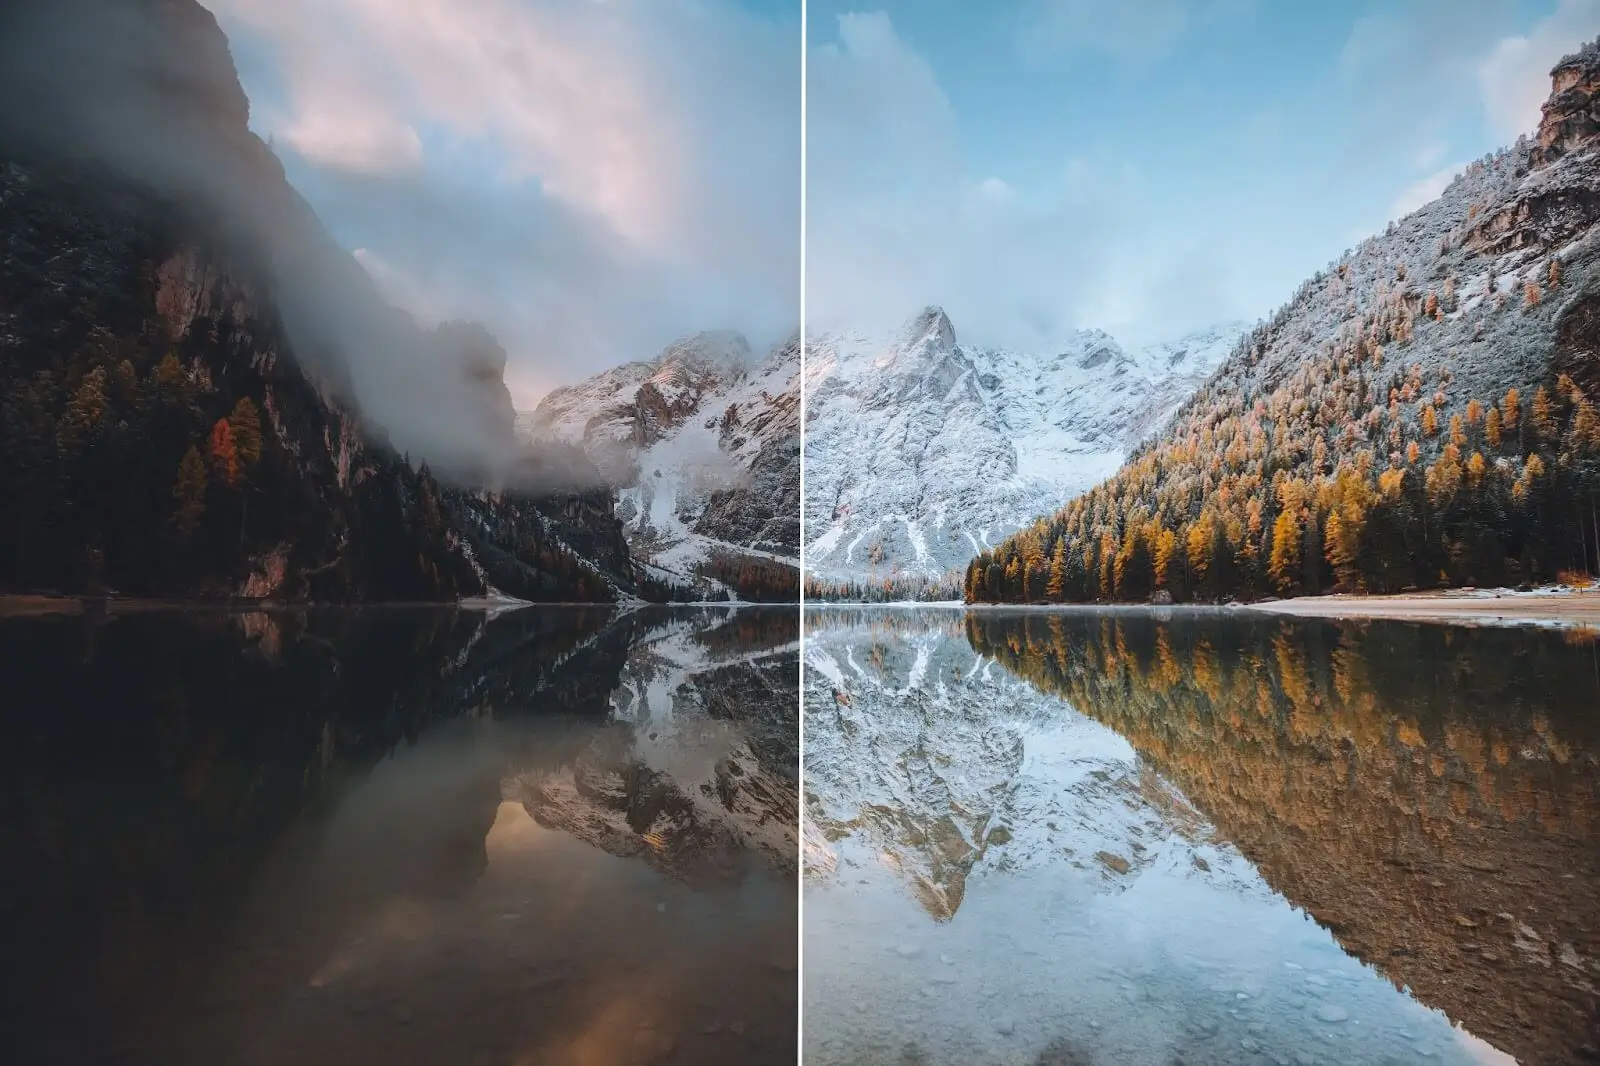
Another out-of-Photoshop preset can be found with Exposure X6 by Alien Skin. A free trial of this software provides photographers with a glimpse into its capabilities before committing to a purchase. Tailored explicitly for landscape photography, it offers a diverse array of presets and adjustments, encompassing color grading, sharpening, and noise reduction. With a focus on enhancing depth, richness, and atmospheric qualities, it elevates landscape images to professional-grade standards, ensuring they captivate with unparalleled allure. Seamlessly integrating with Photoshop, these outdoor presets empower photographers to unleash their creativity, enriching their landscape compositions with effortless precision and finesse.
Here are the last three plugins list that are worth paying for to use with Photoshop:
Co-founder of RetouchMe. In addition to business, he is passionate about travel photography and videography. His photos can be viewed on Instagram (over 1 million followers), and his films can be found on his YouTube channel.
Moreover, his profile is featured on the most popular and authoritative resource in the film industry — IMDb. He has received 51 international awards and 18 nominations at film festivals worldwide.